You are using an out of date browser. It may not display this or other websites correctly.
You should upgrade or use an alternative browser.
You should upgrade or use an alternative browser.
1st Solo Bedding Job
- Thread starter Kmccord
- Start date
Kmccord
Well-Known Member
The white tape is electrical tape and the green tape is frog tape for taping off walls, molding etc prior to painting.Looks really good! Really looking forward to what you get for results. I use electrical tape to hold it in there, it gives a nice moderate amount of elasticity. Some tension but not too much, lets it normalize any tension I add.
What tape is that, exactly? I tried that once with blue tape and got real bad results. Acetone and blue scocthbrite for hours.
I've been using pro-bed, I'm pretty neutral about it. It flows very well with a long open time but it doesn't have that great of adhesion on the stock. That could be my fault since I pop it after just 16 hours or so to make sure I can clean any mistakes up. That's probably why it usually takes me 2 rounds, the thinner spots haven't really bonded yet. It seems to take eons to get to glass hardness. But it stays sandable more than any other epoxy I've used. I'll probably try something else next time, might be time to try the devcon. Really pretty rig.
out of all the bedding compounds I've used I think Devon Plastic steel is the best stuff by far! The consistency is just right and batch to batch is identical for all practical purposes. Plus a good tub of it lasts a decent while.
JakeC
Well-Known Member
Oh yeah, nice. Yeah I meant the green tape. Can't wait to see how it worked, I've used blue and white, both were marginal at best. I used electrical for barrel alignment last week instead of wide masking tape and I liked it better.The white tape is electrical tape and the green tape is frog tape for taping off walls, molding etc prior to painting.
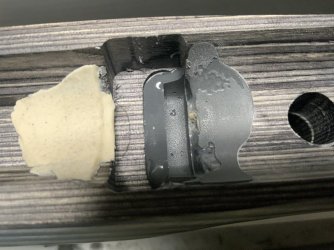
I've done 3 so far, and I'm far from good yet. My worst mess yet was last Dec. I did one on a cold weekend and when I had it all cleaned up for the night I hovered a spotlight directly above the action with a 60w incandescent bulb in it, the silver aluminum dish type. I figured it would keep it warm enough to not fail to cure.
It was warm enough to cure. It melted all the modeling clay out of the action and into the carpenter's vice and onto the floor. It tunneled right through the bedding and took some with it. But the epoxy was hard as a rock.
It's how I learn at least, looks like you might not require as much trial and error which is great!
William W.
Well-Known Member
- Joined
- Dec 30, 2014
- Messages
- 101
I use a clamp to secure the barrel, along with heavily greased screws from the bottom metal to center the barrel to the bottom metal. I bed one half at a session, starting with the action using a barrel set-off of a strip of the heavy clear plastic, that you see used for packaging all the time these days, between the barrel and the stock. I bed the pillars (cut to length) by my greased screws to the action using epoxy to surround them. Bed the lug first before the entire action; using your GREASED action screws as guides; this solves your centering issue as the action self-centers when settling into the pre-bedded lug hole. The Acraglas release is good, and I have moved to using J-B Weld because of availability, cost, consistency and working time. Only a 24-hour cure time is needed. Oh and a gazillion Q-tips to clean up the epoxy squeeze-out before it starts to harden. I learned the Q-tip technique on a co-op job for school. On the fine-clean stage, wet the Q-tip with your lips before using it.
Attachments
Last edited:
Looks good! But hey I know it's not a harvest pic but we still need to know the action, barrel, caliber, and stock man. Just so we can sleep at night!!!!!Well, this is my first solo bedding job, let's see what longtine88 taught me works without his assistance. I taped the dookey out of it to hopefully make cleanup a little easier and quicker. I get to verify if my jig I built to pull it out straight works as well. I think I will leave it in place until Monday afternoon, give it 72hrs to set.
Justice1327
Well-Known Member
Same or similar to what I use. Looks goodMaterial list will probably not set good with a lot of people, but I used JB Weld the strongest they offer for bedding compound, and for release agent, I used Brownells Acra Release agent aerosol. The other stuff is electrical tape around the recoil lug and in front of it, then used painters tape on all items I did not want bedding compound on. For filling in the trigger hanger, trigger pins, any openings on receiver, I used modeling clay from Hobby lobby.
hesse
Well-Known Member
I see you're using the good release agent spray that helps a lot. On my Winchester model 70s and I think there's another couple models besides a Winchester's the t-handle actions screws are great for not messing up the action screws I wish they made more of them for a lot more models
Justice1327
Well-Known Member
Here is a how to video. Has two partsShare your material list. I've not got up the courage to try myself.
Kmccord
Well-Known Member
Kelbly Atlas Tactical, AG Composite Adjustable Armor carbon fiber stock, Preferred Barrel Blank 1:7.5 twist in 6mm Creedmoor 24" twist with spiral fluting, Hawkins M5 Oberndorf BDL, Wyatt's MB5 Extended Mag and Trigger Tech Diamond.Looks good! But hey I know it's not a harvest pic but we still need to know the action, barrel, caliber, and stock man. Just so we can sleep at night!!!!!
A
Ahhhhhh sweet dreams I'll have tonight. Very nice setup. I really like the Ag Comp stocks, and the trigger tech and the Kelbly Atlas . I've got almost same setup in 22 creed except with PB carbon fiber barrel.Kelbly Atlas Tactical, AG Composite Adjustable Armor carbon fiber stock, Preferred Barrel Blank 1:7.5 twist in 6mm Creedmoor 24" twist with spiral fluting, Hawkins M5 Oberndorf BDL, Wyatt's MB5 Extended Mag and Trigger Tech Diamond.
Kmccord
Well-Known Member
Yes on the release agent, Longtine88 turned me to that.I see you're using the good release agent spray that helps a lot. On my Winchester model 70s and I think there's another couple models besides a Winchester's the t-handle actions screws are great for not messing up the action screws I wish they made more of them for a lot more models
I don't usually post negative coments but your methods are poor and the outcomes/results are crap. I cannot suggest anyone follow your recomendations. A good bedding job should look entirely different than that outcome.I use a clamp to secure the barrel, along with heavily greased screws from the bottom metal to center the barrel to the bottom metal. I bed one half at a session, starting with the action using a barrel set-off of a strip of the heavy clear plastic, that you see used for packaging all the time these days, between the barrel and the stock. I bed the pillars (cut to length) by my greased screws to the action using epoxy to surround them. Bed the lug first before the entire action; using your GREASED action screws as guides; this solves your centering issue as the action self-centers when settling into the pre-bedded lug hole. The Acraglas release is good, and I have moved to using J-B Weld because of availability, cost, consistency and working time. Only a 24-hour cure time is needed. Oh and a gazillion Q-tips to clean up the epoxy squeeze-out before it starts to harden. I learned the Q-tip technique on a co-op job for school. On the fine-clean stage, wet the Q-tip with your lips before using it.
Yes, that tool will work, they come in various configurations but accomplish the same job. Makes for easy pillar installation or just pour the hole full of bedding compound.One of these in 1/2" with a 5/16" pilot
Counterbores - Spotfacers - Countersinks - Consumables
www.yardstore.com