• If you are being asked to change your password, and unsure how to do it, follow these instructions. Click here

1st Solo Bedding Job

Bedding screws installed prior to setting action into Devconed stock. Wax was buffed to a shine before action was inserted

1720803532604.jpeg


Studs with double nuts after Devcon setup for 7 hours, so I can back them out easily and before the Devcon gets REALLY hard. I order these from Amazon based on thread and pitch, these are 5mm coarse metric for an Anschutz. Couple of bucks delivered to your door next day.

1720803689900.jpeg
 
I have the stock screws also.

A lot of those Al bedding blocks are junk, often warped, and cut to incorrect dimensions.

If you get into bedding your own stocks, it is advisable to purchase a piloted counter bore, 5/16" x 1/2" or 5/16" x .520". Drill the hole out first to 5/16, then use the piloted counterbore for your pillars.

I don't think that the jig fixture is necessary, there are a dozen ways to get the action out of the stock with little to no effort without disturbing the bedding, really nice tool, however!
 
Last edited:
My last few "stock bedding screws" have come right out of the bulk bin @ the hardware store, then, use a cutoff wheel to ditch the head.

Just need to figure out what size/thread-pitch you've got. Or, take your action screws w/you to the hardware store and use their gauge.
I don't mess with factory actions too much, not interested in them. I guess I'm a custom snob. Saying that…I too made my studs from the bulk drawers at Home Depot.

1/4"-28 bolts that are not fully threaded and I just parted off the heads and ground the stud smooth.
 
These guys don't care for their own cars, do they?

If you're old enough, your learning curve on applying wax happened 40 years ago.
Most cars of today are not worth the time & expense waxing. Throwaways. I waxed boats for a short span when working in a Marina in Norfolk Va. The type of wax was a bigger concern there. Being you're compounding/buffing in the sun most times. Dark colors show exactly how good you are when compounding/waxing. Swirl marks are a big, big, no, no. lol
 
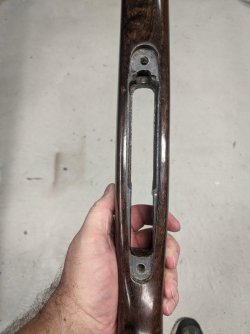
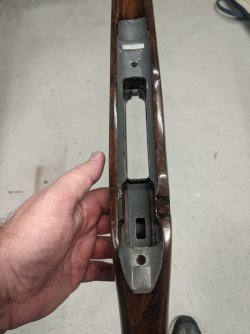
I did my first bedding job recently on a Tikka in a wood stock. Went basic tools and used JB Weld, Kiwi neutral shoe polish for release and plumber putty to fill in where didn't want epoxy. Made some pillars from lamp rod to set the action off the wood just a bit. Epoxied the pillars and bottom metal first with action in to keep pillars where I wanted and wrapped masking tape around action screws to keep them centered.

Then did the action and recoil lug bedding. Used the action screws again to hold it together, lightly torqued and loosened them after 8 hours I think it was. At about 24 hours, removed the screws and one good whack and it all popped apart.

Couple after pics (the rear tang isn't 100% cleaned up in this pic). The bottom area has a small chunk which I think I did when punching the bottom metal out after it all set.

PXL_20240204_212218675.jpgPXL_20240204_212243966.jpg
 
Looks very good! Congrats! Now, when you assemble, stand the gun up on the butt, with tighten all the screws as you would for final assembly.

Now, with your left hand, slide your index finger to the tip of the forearm, and wedge against the bottom of the barrel. Finally, tighten and loosen the front guard screw. You are checking to see if the action is in a bind, and IF IT IS, you will feel movement with your finger as the barrel springs away from the bind. Your finger can feel .003 movement easily.

If you feel a lot of movement, the stock had a Lot of warpage or was milled incorrectly, you bedded, and followed that same warpage by over-tightening the screws instead of letting the action "float". A simple skim coat on the existing bedding is all that is needed to get zero "feel" when you tighten and loosen the front guard screw. This kind of thing happens to all of us, don't be surprised, some stocks have horrible machining to action fit.
 
Last edited:
Top