• If you are being asked to change your password, and unsure how to do it, follow these instructions. Click here

Annealing

I was really worried about annealing correctly and after watching a couple of YouTube videos by Erik cortina (some pro shooter) I feel like the most important thing is to be consistent and don't go so far you start to anneal too far down the case.

In one of his videos, he shows he he usually does it and he leaves the flame on longer than what I've seen a lot of people on here recommend.

Do the same thing every time and don't go too far.
 
There is a lot of bad information going around about annealing cartridge brass. The whole point of annealing brass it to change the grain structure of the brass and drawn it back down to the level of hardness that it was at before firing and resizing. The biggest misunderstanding I had was that brass could be properly annealed by heating it to 750 degrees and letting it cool. Recently I bought all the parts and started building my own annealez style annealer. I was just following the advice of others online that had been repeated again and again. I never questioned where the number 750 came from; I just assumed that the people talking about it knew what they were talking about. It was just a few months ago that I came across a very long thread on LRH talking about the AMP annealer. This led me down a rabbit hole of research about how annealing actually works and stopped my home built annealer project. I ended up buying the AMP just for the piece of mind knowing that my brass will be the most consistent brass possible. Here is a video that explains why 750 degrees is not adequate to properly anneal brass. It might change the color of the brass and make it look annealed but it is not hot enough to change the grain structure of the brass and drawn it back to its previous hardness.

Very interesting info. Plays to my background in chemistry but brought back some nightmares in math class.

Don't want to spend $1,500 on an annealer (yet!) but will look at changing my process. Possible using 1000 degree Tempilaq on the neck and should with 650 degree down the case to assure it doesn't anneal in that are. Or watching for for a dull glow on the neck/shoulder area. Or both.

Thank you for posting this.
 
I did not tumble -clean the brass so necks are a little darker?
Should they be cleaned before annealing?
Actually my procedure was anneal, deprime & size, then trim to length. I figured if I annealed first it would save the brass from splitting since it had been loaded 3 times already ?
Curious what others steps are?
Cinch. I've had an Analeaze for almost 9 yrs. I shoot competition 308 Win and now that I've become familiar with the process I don't need to use the Tempilaq except when I change the gas or timing etc. Your cases look very good. Since the process has become so easy I anneal every time using the same procedure you do. I do use Krazy Cloth to wipe off cases after they cool down before sizing and hardly ever tumble cases. I clean the necks with a nylon brush. I have some cases I shot 15 times and I have never had a split neck. With LR brass and max loads you'll lose primer pockets long before a split neck shows up. You will gain consistent neck tension and seating depth, which should help you with precision, SD, and ES. Good shooting!
 
The cases look good. I also shoot NRA F-class and I clean in a de-prime then wet tumble then anneal. At that point my cases look much like your - the neck is blacked-ed and the annealing shows down about a third of the case. Then I dry tumble the cases.
I don't use tempilaq, I just judge the color. When the neck glows cherry red for about a second then the setting is correctly adjusted.
FYI = After dry tumbling I full length size with the shoulder bumped 2Ks. Then I run each case thru the action with the firing pin removed to make sure they fit. Next I expand the necks and then trim and chamfer. Lastly I will run the cases again in the dry tumbler.
 
They look fine to me,I anneal every time I use the brass and the consistency of neck tension is perfect.I use an AMP so all the thinking and hard work is done for me, having said that they are expensive but really are worth it.
 
I agree, what is the point of annealing if the brass is already sized?
If you anneal your brass after every one or two firings, then annealing won't matter where it is in your reloading process. At a minimum, quality brass should be able to handle several firings before annealing is needed. I decap. briefly clean (just so I don't crud up my dies), anneal, chamfer, size, etc...
 
I feel you are on the right track. I de-cap with a de-priming die. No sizing at that time. Clean them and then anneal them. After that I resize them. Check for case length at that time and every time. It all depends on where you want to go.
 
I built my own flame annealer used it for a year, setup for consistent annealing was a timely process. Color of brass is NO indication of proper annealing. The condition I noticed that from one batch of brass to the other I had to reset the annealer. I also purchase once fired brass, then fire form to my chamber as fouling rounds. Once fire formed goes through brass prep process. Annealing occurs after de-prime and brass cleaning once annealed FL resize...etc. Then it is worked up into a batch of 50 cases. After a while of this I cried once and bought an AMP annealer the setup for annealing is very quick and enables me to produce a better consistence across the different batches of brass. The neck tension is a bit more consistent using a dial indicator setup on K&M arbor press. Measuring and tracking neck tension in this manner again is not the best way. However awaiting an AMP press to actually measure and track neck tension. One may think this is over doing it a bit in the reloading process. One question I ask myself is how much have I spent in setting up a hunt year after year either guided or unguided. Besides shooting PRC for skill building.
 
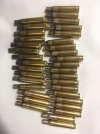
This is my first attempt at annealing.
I watched several videos on youtube about it last night and a few of the guys only used a drill and some type of brass holder and a propane torch. Today I did the same thing he did only I didn't have the brass holder so I used a 1/2 deep socket to hold the 30-06 brass as I spun it in the blue flame of the hand torch.
Pros/Cons on this process and if wrong tell me why if you don't mind.
@ButterBean
 

Attachments

  • Annealed Brass.jpg
    Annealed Brass.jpg
    253.8 KB · Views: 115
This is my first attempt at annealing.
I watched several videos on youtube about it last night and a few of the guys only used a drill and some type of brass holder and a propane torch. Today I did the same thing he did only I didn't have the brass holder so I used a 1/2 deep socket to hold the 30-06 brass as I spun it in the blue flame of the hand torch.
Pros/Cons on this process and if wrong tell me why if you don't mind.
@ButterBean
I'd probably stay away from the body as much and keep to the neck more. I started with a torch and drill many years ago so use what you have. I'd also recommend tempilaq if you didn't use it this time. The problem with the drill method is you don't have a timer or indicator, and no way to consistently rotate the brass. Other annealers will rotate the brass for x time and at x speed to get the desired results. AMP is a different creature altogether and would be apples to oranges comparison.
 
Last edited:
I'd probably stay away from the body as much and keep to the neck more. I started with a torch and drill many years ago so use what you have. I'd also recommend tempilaq if you didn't use it this time. The problem with the drill method is you don't have a timer or indicator, and no way to consistently rotate the brass. Other annealers will rotate the brass for x time and at x speed to get the desired results. AMP is a different creature altogether and would be apples to oranges comparison.
What does the tempilaq do for it?
 
Tempilaq only allows you to approximate the temperature range of the brass you are attempting to anneal. That is why you apply to different Tempilaq temperatures one indicates you have reached above an appropriate temperature 650 degrees and the other is to indicate you have not gotten it to hot 750 degrees. You do this process to setup the time the brass is in the direct flame. Once you have the correct amount of time in the flame indicated from using the Tempilaq paints you are ready to begin annealing your brass, It does nothing for the brass itself.
 
Top