• If you are being asked to change your password, and unsure how to do it, follow these instructions. Click here

How to identify mauser 98 action.

First, there will be different opinions on what and how things need to be done, but these are things that I have done.

Buy a truing mandrell or fixture from Brownell's, or make one. I like the mandrell, and have made several out of old barrels. Take a light truing cut (or cuts) on the receiver face. Usually takes me about .006" - .008" to get one (Mauser) like I want it. Flat, square, and with a wider face for better make-up. I don't try to true the inner shoulder, because I want the outer to make up first Most of the books say to make up on the inner shoulder first, but I cut the tenon .001" short so the outer face will make up first. Once the barrel breech abuts the inner shoulder, make-up rotation stops cold, and I prefer that the outer shoulder be made up just before that happens.

Forge, or cut and weld the bolt handle to clear a scope. If you haven't done this, have someone you really trust to do it the way you want it. A good bolt can be screwed up if it's not done right. Next, drill and tap the receiver for scope bases. (I like 2 pc bases). Same precaution. I've seen too many receivers screwed up by off-center, off-spaced, out of line holes. Not a job for a hobbyist.

If you use the military bolt shroud, you'll need a scope safety. Buehler used to make them. If you find one of the nice commercial shrouds, they need a trigger with a side safety.

As for where to spend money, go for a high quality barrel first. A Lilja stainless barrel is my favorite.

Next, you need a good stock. For the money, a plain laminate stock from Stocky's is the best deal going. It will need to be pillar blocked and SteelBedded.

If they make them for large ring 98's, Bell and Carlson Medalist stocks are also good for the money, but for maximun accuracy, they need to be bedded also.

The standard military trigger can be modified to a clean, 3 - 4 lb, single stage let-off, but if you haven't seen one or done one, I don't recommend trying it. Get a fully adjustable Timney for about $100. It's a good buy, and is available with a side safety.

Scopes are the hardest to pick, and can be the single biggest expense on a build if you do the labor yourself. If you have to have the rifle built, the labor will cost more than a decent scope will. Don't expect much from a $100 Chinese scope, no matter what the brand name is. At around $250 you can start to get a pretty good scope. Watch for a Leupold or Nikon in that price range. I also think the SWFA Super Sniper at $300 is a good scope. It's a fixed power though.

Once you have all the pieces in hand or ordered, and know what they are going to cost, you can decide if you want to Parkerize or rustblue the action and floormetal. Parkerize (the dark manganese phosphate) looks good on a working gun. A nice rustblue is prettier though.

If you're patient, and can do the 'smithing yourself, you can build a fine 1/2 moa rifle for $1200.

Good luck, Tom
 
Since were on the topic of my first build and I have a pretty good idea that alot of you guys have ample experience on these types of builds, I would like to ask several more questions.

1. If there was an order as to what to do first and so on and so forth from there...what would it be??? Or does this really matter?

2. Are there any common pitfalls that a new builder might run into?

3. Were should I not sacrifice quality for price or vice a versa when it comes to this build (I want a rifle that will hold 1/2 moa out to 500 yds, and I would like to keep the overall price under $1200) Should I invest more money in a great scope, or more money into the best trigger, barrel, muzzel brake and stock that I can get my hands on for the price I'm willing to pay?

My response to your post is very lengthy. I apologize if I went too far in trying to answer your questions. So, here goes:

You have already defined your performance goal (which is both reasonable and achievable) and selected the action to be used as your build platform (VZ-24). Let's call that step one.

Before you go any further, I strongly recommend doing some reading on the subject. The previously mentioned book by Jerry Kuhnhausen is an excellent place to start. Take the time to inspect your action (the Kuhnhausen book will walk you through this) and get firmly in mind how you intend to modify it to reach your performance goal.

Next, honestly evaluate your skills, interest, and available resources. If you are a skilled machinist and welder (or have a willing accomplice that is) and have access to the necessary tooling, you can do the entire build yourself. If not, you will need to farm some of the work out and must plan your budget accordingly. You should also consider how many mauser rifles you plan to build. If you plan to build several rifles, it may be worthwhile to acquire the tooling necessary to do more of the work yourself. If this is a one shot deal for you, it may be more budget friendly to have a gunsmith do most of the work for you.

Your level of interest in this project and your motive for wanting to do it should also be carefully considered. If you are doing this to save money, you would be best served to simply buy a rifle off-the-shelf. If you are doing this to learn something and have the personal satisfaction that comes from building and shooting your own rifle, by all means, press onward.

Available resources that deserve to be considered include available tooling and workspace and the knowledge base that you have access to (such as willing friends with technical know-how and/or equipment).

Once the logistical side of this has been examined, you can begin to consider parts and materials. To sporterize a mauser, you will need at minimum: barrel, stock, trigger, safety, bolt handle, scope, rings, and mounts. Depending on what you choose to do yourself, you will also need to consider materials for metal finish, action bedding, and stock finish (if you choose to use a wood or laminate stock).

Now for the basic gunsmithing involved. Regardless of who does the work, most of the things that need to be done to sporterize a mauser are best done after the original barrel has been removed and before the new one is installed. Examples of this include truing the action/barrel mating surfaces, truing the bolt face, lapping the bolt lugs (a controversial subject when it comes to milsurp mausers), and drill and tap the receiver for scope mounts. Before the drill and tap operation is done, the stripper clip boss should be removed, if desired. This would also be a good time to have the new bolt handle welded on and a new safety fitted.

Once the action work is done and the new barrel has been fitted, the desired metal finish should be applied. There are a host of options here, each one requiring different preparation, different methods of application, and different tooling. Whatever choice is made here, make sure that the metal finish has been applied before doing any bedding or inletting work.

Regardless of which stock you choose for your mauser, you should expect to do some inletting work to achieve a good fit. This takes a few simple tools and a lot of patience. Personally, I have succeeded in getting my barreled actions to fit and have a barrel that is free-floated. However, I suck at making my inletting look good. I am still trying to get better at this. If you are a perfectionist in terms of appearance, I encourage you to either have the inletting done by a true professional or have someone who really knows what they are doing guide you through the process. Once the inletting is completed, the appropriate stock finish should be applied if you are using a wood or laminate stock. Be advised that if you choose a stock that is inletted for a commercial mauser action (such as a Bell & Carlson Medalist w/aluminum bedding block, Charles Daly, or something intended for a Remington 798) you will also need to obtain bottom metal for a commercial action.

The next step is bedding the barreled action. Your method of bedding will be highly dependent on what stock you have chosen. There are many options in technique and materials and a lot has been written about this elsewhere, so I won't detail the process here.

Once the action work has been completed, the barrel fitted, all finishes applied, the stock has been fitted, and the action has been bedded into the stock, it is time to install the scope mount(s), rings, and scope. Boresight the scope, if desired. With the rifle assembled, the final steps involve barrel break-in and load development.

In general, my mausers have cost me about $700-$850 in parts and labor to build, including the cost of the action (which was far below what they are going for now) I am not a skilled welder or machinist, so I had to pay to have the barrel fitted and the bolt handle welded on. The other things I tackled myself, with satisfactory results. I am not including optics or tooling. Plan to handload to get the most out of your build. If the emphasis of your build is accuracy, spend your money on a good barrel and good machine work. A decent aftermarket trigger will cost you between $50 and about $100, depending on features. A good laminate or synthetic stock can be had for between about $70 to about $250, again depending on included features. I am not an advocate of spending a lot of your money on a scope right out of the gate for the following reasons:

A good, serviceable scope can be had for $300 or less.

You can always upgrade your scope when your skill level and budget can justify doing so.

Optics technology advances more rapidly than anything else in the shooting sports. Undue emphasis placed on a high dollar scope now will result in dollars being spent on technology that will be obsolete in a short time in comparison to money spent on a better barrel, good machine work, or practice ammo. The best scope in the world will not make a so-so barrel shoot like a top grade match barrel.

In summary, my priorities, in terms of what to spend my money on, would look something like this:

1. quality barrel

2. quality machine work

3. trigger

4. stock/bedding

5. optics and mounts

Another thing worth considering, if you have not already purchased an action, is to base your build on a commercial mauser action. The commercial action will cost more to purchase, but the additional cost will be offset by reduced gunsmithing and parts costs. You will also get more modern steel in the bargain, reducing the risk of a failed build resulting from problems with heat treating of the older steels. An additional benefit is the better bottom metal that comes with a commercial action. So far, my build on a Zastava commercial action is the most accurate among my stable of mausers.

This concludes my shotgun blast style attempt to answer your questions. I hope that I provided some information that proves to be useful to you.
 
There is alot of good advice in the above posts. The only thing I did not read though was firing pins. I replace all of my 98's / VZ24's with Superior Shooting Systems firing pins and springs, a must!!
 
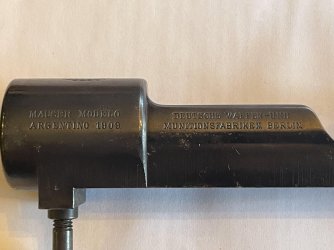
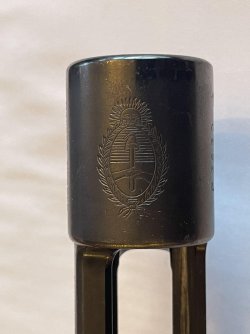
On the LH side of the military receivers look for these words: Deutsche Waffen-Und MunitionsFabrriken Berlin, aka DWM. Many countries chartered their military rifles manufacturing through DWM and had stamped a country name and image on the top and side of the forward receiver ring. The Mauser Model Argentino 1909 has been a popular basis to build a sporterized action from, due to the quality of workmanship requested in those actions and the "bottom metal" which has a hinged floor plate for the magazine. The Argentine Army took very good care of these rifles and many still have beautiful bluing on the metal work. It may be stamped as any number of countries name, but if it says DWM on it, you can bet it came from Germany.
 
These DWM-manufactured receivers are a great place to start when building a Mauser project rifle.
 

Attachments

  • 1909 Mauser Receiver.JPG
    1909 Mauser Receiver.JPG
    207.8 KB · Views: 43
  • 1909 Mauser Receiver1.JPG
    1909 Mauser Receiver1.JPG
    185.1 KB · Views: 40
Top