Help With Heavy Bolt Lift on Mauser Action

The shotgun conversion is real interesting - never seen one. Apparently the entire front end of the bolt is removed & some fixture attached & the safety lug at the rear of the bolt is used. Just the thing to protect gardens from maruding rabbits or shoot some protein for dinner in post WWII Europe. No stripper clip reload.
 
Never seen it but I suppose it could happen - like obstruct the bolt from turning.
I'll look at that but I very rarely have loaded rounds directly into the chamber. This has always been a hunting rifle and I end every hunt by extracting the chambered round and pushing it back down into the magazine, where it's later chambered for the next hunt.

I'm going to disassemble the bolt this week following Hugnot's excellent instructions. You know, this is exactly what forums like this are for. Thanks everyone !
 
Scope mounting & other - the Mauser was designed to be a battle rifle. There are better designs for Long Range Hunting using big fat speedy rounds - like how far do you want to shoot?. The magazine was designed for rounds having a .473 diameter at the base - my preference is to not go for magnum cartridges in a M98 type Mauser. I have done it but regret doing it, altering feed rails can be tricky.

The commercial Mausers not having a thumb slot and stripper clip hump are usually drilled & tapped for scope mounting. I like Warne steel bases and Burris Signature Zee rings, either 1 inch or 30mm. Mounting a 34 mm tube scope on a Mauser would be a new experience for me. The exterior dimensions of these Mausers usually varies a small amount. Screw holes might not be exactly in line.

IMG_1099.JPG

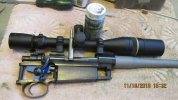
Here is a FN Mauser with Warne Weaver type Bases & Burris Signature Zee Rings. This was a J.C. Higgins M50, an older version with screw 1/2 inch hole spacing on the receiver bridge. The rear Zee Ring was set up with the +20 insert down, the front ring had the + 5 insert on the left side and -5 insert on the right side. This positioned the scope to have a zero close to 200 yards with the reticle close to being centered - very little lateral adjustment needed because the front +5 & -5 inserts. The scope is a Leupold VXIII 4.5-14X40 1 inch tube. The reticle was centered by using a mirror the get a reticle reflection. It has enough elevation to get me on at 600 yards plus and probably more. Warne makes a longer extended front base for real shorty scopes. Burris Medium Sig Zee 1 inch rings were used

It is a 9 twist # 4 Douglas contour McGowen barrel, 24" .280 Rem. I used Brownell's Oxpho cold blue on the bolt handle & extractor. Good stuff, has not worn off yet. I rubbed the Oxpho on with fine steel wool & warmed things up with a hair dryer. Nitrile gloves. Timney M98FN Featherweight trigger.
 
Last edited:
Possibly, your brass does not have enough head space. You might consider grinding down the top of the shell holder used for that one rifle and use that shortened shell holder to bump back the shoulder of the brass. Use appropriate cautions not to create excessive head space. Full length size ammo. Trim brass to spec.

The Mauser probably is of the M98 type that is a controlled feed action. This means the rounds must be fed from the magazine to enable the extractor groove on the brass to fit inside the non rotating extractor. By droppng a round into the chamber & closing the bolt the non-rotating extractor is forced over the rim of the cartridge causing much resistance. On miltitary issue M98's it is impossible or difficult to close the bolt on a round not fed from the magazine. The military M98's are usually loaded using a stripper clip. Single loads are done by placing a round in the magazine on top of the follower. Complete firing pin spring compression is done upon bolt closing - added resistance.

Upon inspecting the Mauser bolt, a transferse slot may be seen on the left side bolt lug. This is provided to allow the ejector mounted on the left side of the rear of the action to contact the base of the fired or unfired round as the bolt is retracted. A bolt stop is included with the ejector assembly on the left rear side of the receiver. There is no plunger in a M98 type bolt face - just an extractor slot.

Periodic bolt stripping is a real good idea for inspection, cleaning, and testing for ammo chamber fit. For an unaltered M98 the safety is placed in the upright postion , the bolt lock on the left side of the bolt shroud depressed & the threaded bolt turned out with the shroud, cocking piece, firing pin & spring from the bolt body. For an altered M98 type used with a left side safety, for a low mounted scope, bolt dissasembly requires retracting the cocking piece and blocking the cocking piece from the back of the bolt shround. I use a dime (coin). Attached to a fixture on my bench is a rebar wire loop that I use to pull on bottom of the cocking piece and when the cocking piece is pulled back far enough the dime is shoved between cocking piece & bolt shroud. The bolt catch is depressed & the dime, shroud, firing pin, spring, and cocking piece can be turned out from the bolt body. Re-assembly requires pulling back on the cocking piece to allow rotation and repositioning the bolt body with the cocking piece and removal of the dime.

Ammo/chamber fit may be testedUsing the stripped bolt. Give all parts a real good cleaning including the inside of the bolt.

The 6.5-06 is a "wild cat" cartridge and may not be completely in spec with standard .25-06, .270W & .30-06 ammo being chambered by an independent gunsmith that decided on minimum head space for crush fit fire forming. My several 6,5-06's including a M98 type are chambered for minimum head space specs. I use a separate shortened shell holder for each rifle.

I use the same dime to disassemble Rem 700 bolts by shoving the dime in a slot machined in the left side of the cocking piece to allow cocking piece to be held apart from bolt body so firing pin assembly may be turned out of bolt body.

M98's represent a remarkable achievement in rifle design
Best to machine the die only, take say 0.002" off it then chamber the cases from the magazine like you suggest. If you fiddle with the shell holder it alters everything, best to address tho problem and that's the resizing die. I have a 6.5 PRC and after being resized won't chamber!
 
I rather grind & shorten shell holders to increase headspace. Redding sells a set of shell holders having different heights (established procedure) but I can get the same effect by grinding & shortening only one (hardened steel) and using that shortened shell holder for a particular rifle. Should multiple rifles of the same caliber be loaded for and have slightly different headspace measurements this avoids buying multiple expensive dies. By shortening a die beyond a certain point inside dimensions of the die will be changed as the inside diameter(s) of the die will be less (die conforms to tapered brass dimensions).

Grinding the top of a hardened steel shell holder using a diamond abrasive wheel in my Dremel tool is a quick & easy job and has no effect on die dimensions. .
 
Scope mounting & other - the Mauser was designed to be a battle rifle. There are better designs for Long Range Hunting using big fat speedy rounds - like how far do you want to shoot?. The magazine was designed for rounds having a .473 diameter at the base - my preference is to not go for magnum cartridges in a M98 type Mauser. I have done it but regret doing it, altering feed rails can be tricky.

The commercial Mausers not having a thumb slot and stripper clip hump are usually drilled & tapped for scope mounting. I like Warne steel bases and Burris Signature Zee rings, either 1 inch or 30mm. Mounting a 34 mm tube scope on a Mauser would be a new experience for me. The exterior dimensions of these Mausers usually varies a small amount. Screw holes might not be exactly in line.

View attachment 378146

Here is a FN Mauser with Warne Weaver type Bases & Burris Signature Zee Rings. This was a J.C. Higgins M50, an older version with screw 1/2 inch hole spacing on the receiver bridge. The rear Zee Ring was set up with the +20 insert down, the front ring had the + 5 insert on the left side and -5 insert on the right side. This positioned the scope to have a zero close to 200 yards with the reticle close to being centered - very little lateral adjustment needed because the front +5 & -5 inserts. The scope is a Leupold VXIII 4.5-14X40 1 inch tube. The reticle was centered by using a mirror the get a reticle reflection. It has enough elevation to get me on at 600 yards plus and probably more. Warne makes a longer extended front base for real shorty scopes. Burris Medium Sig Zee 1 inch rings were used

It is a 9 twist # 4 Douglas contour McGowen barrel, 24" .280 Rem. I used Brownell's Oxpho cold blue on the bolt handle & extractor. Good stuff, has not worn off yet. I rubbed the Oxpho on with fine steel wool & warmed things up with a hair dryer. Nitrile gloves. Timney M98FN Featherweight trigger.
When I customized my Mauser 98 I removed the stripper clip hump before I drilled and tapped for the mounts and I always had good luck, even though I didn't have to since the jig I had would accommodate the hump. The jig I have also allowed me to drill and tap for a two-piece base if I wanted to go that way. I also removed the blast shield off the shroud and welded in the rotating trigger safety after removing the end square piece because I always used an aftermarket trigger with a Rem style safety. When I was in a hurry I would buy a commercial-built replacement shroud that accommodated the Rem style safety.
Like you, I've altered the feed rails to build a few 300 WSM and it is tricky, so far so good, but you can change one into a single shot (not good for a control feed bolt) real easy if you take too much off the feed rails.
 
My guess is the head of the case is expanding because of excessive pressure, Measure the head of the case just up from the rim against an unfired case, If you don't have one a 30-06 case will do. When there is too much pressure the head will expand way too much, When you reach the point of stiff bolt lift you are way over pressure, If your primer is flattened out and your primer pockets are loose, This is a sign of over pressure.
I hear what everyone is saying about possible overpressure but I really don't think that's it. I've been shooting this exact load in this rifle for over 40 years and have never had a split case or other signs of overpressure. Also, the bolt is stiff on an unfired, resized empty case. I'll take some more detailed pictures of the bolt, action and some brass and post them on this thread.
 
Lastly, Can you show us a pic of of fired case, Showing your primer? The only other things I can think of that could be causing your problem, Is way to hot of a load, Or a dirty or pitted chamber.
OK, here are some new photos of spent brass, the action and the bolt, as best I can photograph them.
 

Attachments

  • IMG_4545[1].JPG
    IMG_4545[1].JPG
    1.4 MB · Views: 65
  • IMG_4546[1].JPG
    IMG_4546[1].JPG
    1.2 MB · Views: 67
  • IMG_4548[1].JPG
    IMG_4548[1].JPG
    866 KB · Views: 58
  • IMG_4551[1].JPG
    IMG_4551[1].JPG
    1.3 MB · Views: 63
  • IMG_4554[1].JPG
    IMG_4554[1].JPG
    1.3 MB · Views: 65
  • IMG_4555[1].JPG
    IMG_4555[1].JPG
    1.2 MB · Views: 75
  • IMG_4556[1].JPG
    IMG_4556[1].JPG
    1.2 MB · Views: 75
I see some damage to the rear locking lug, Or safety lug if you will, The primers look pretty flat, But don't look overly flat. Can you remove the firing pin assy/Bolt shroud, cocking piece? Check the camming surface that forces the sear/cocking piece rearward when you lift the bolt, Check for galling, It should be very smooth with a high polished look to it. It's the v-shaped opening on the bottom rear of bolt.
 
I see some damage to the rear locking lug, Or safety lug if you will, The primers look pretty flat, But don't look overly flat. Can you remove the firing pin assy/Bolt shroud, cocking piece? Check the camming surface that forces the sear/cocking piece rearward when you lift the bolt, Check for galling, It should be very smooth with a high polished look to it. It's the v-shaped opening on the bottom rear of bolt.
I'll attempt to take the bolt apart this week or possibly the weekend. Have a lot of good instruction in this thread. Wish me luck.
ExplodingHead2.jpg
 
Top