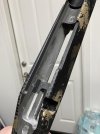
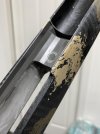
Did I really mess up my first bedding attempt

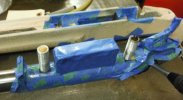
Remember Johnson's paste wax on everything, inside screw holes, action and all! Next put oil base modeling clay in the action screw holes and all others, the clay will push up into the action instead of the beading compound. If a tiny bit does get in the action leaves it and let it cure, it will be easier to get out if you don't mess with it, it will give you a little bearing surface to tap with a. Brass punch. Plus a little heat is your friend for a stubborn piece. Remember Benchrest shooters and some F-Class shooters epoxy their actions into their stocks, a little heat and they pop richt out. But wax and a little piece of clay will realy make hinge easier. And try and get the top of the beading between the stock and action cleaned up and nice and level, it saves a lot of work after. I find that Brownells accugel or Devcon 10110 works much better and is a lot easier to work with. It's thicker and doesn't run all over like marinetex, it's easier to get a nice clean even line with the edge of the stock. This is one I did with Devcon 10110 steel putty.
 

Attachments

  • DDDFB2A2-DB02-4A77-819F-96A7F9CDD4EC.jpeg
    DDDFB2A2-DB02-4A77-819F-96A7F9CDD4EC.jpeg
    1.3 MB · Views: 133
  • D73D2787-BF5C-498E-BEF6-712A2C29D0E3.jpeg
    D73D2787-BF5C-498E-BEF6-712A2C29D0E3.jpeg
    1.2 MB · Views: 127
I've pushed glops of bedding material into a few actions. It usually pops loose easily and cleanly once dried. Not really a big deal as far as bedding mistakes go. I would let it soft set, then get the action screws out. Clean them well , then oil them up hood and reinstall them till the bedding cures. As long as you just pushed a bubble of bedding the size of the screw into the action, it will pop out like snapping a plastic part out of a die.
 
All is good. I thought I reposted yesterday but may have not. And I did watch plenty of videos and researched for awhile before my first attempt. I obviously still screwed up and in the process of getting the faction in and screws got the epoxy in there. I got it all cleaned out and got some long screws yesterday and cut the heads off like some recommended. Currently on attempt #2 and it's looking good just waiting for it to all cure. Thanks for the input from everyone. Live and learn lol
If you ain't screwing up your not trying.
 
Oops you forgot to use the clay to fill the spaces you don't want epoxy. Waxing is good not to much. Also as you let it rest in the stock make sure you have your barrel clearance is were in needs to be and your action is perpendicular to the level stock. Remember your looking to bed it with no STRESS on action & barrel. GOOD LUCK. Also again if you use to much wax your bedding the wax surface not the action surface.
 
Youtube for all of it's faults (at least as far as the 2A goes) is still a wonderful resource. I watched so many videos from pros to DIYers like me before I had the balls to attempt my bedding and I was still leary. I second tobnpr; I used a bunch and had it squirting out everywhere. I used JB Weld and black shoe polish for a release agent. It isn't the prettiest but it works. I also second mulie. I used a bunch of Play-Doh to keep those globs from going where I didn't want them.
 
Early on I did the exact same thing, but I did not remove anything to clean it out. What I did was feel of it until it started to harden and once it was well on its way I took a sharpened wood tongue depressor and cut the glob out. I did have everything coated with a release agent inside and outside of the receiver. With that said the next rifles I tried to plan on just a little to push out so there weren't any voids left in the glass. Some people that I talked to just glassed the receiver and the barrel later, I like to get the entire glass job done at once, receiver, barrel, magazine box, and floorplate. So far, knock-on wood-pun intended, I've never had to chisel a stock off.
I've never tried any of the homemade release agents I've seen on this site so I use a spray-on-release agent (works much better than the rub on liquid imo) and Acraglas gel from Brownell's.
 
All is good. I thought I reposted yesterday but may have not. And I did watch plenty of videos and researched for awhile before my first attempt. I obviously still screwed up and in the process of getting the faction in and screws got the epoxy in there. I got it all cleaned out and got some long screws yesterday and cut the heads off like some recommended. Currently on attempt #2 and it's looking good just waiting for it to all cure. Thanks for the input from everyone. Live and learn lol
Perfect practice makes perfect never give up!
 
My first bedding job got epoxy all over my hands, pants, and chair.
Most of the epoxy leaked out of the rifle, but there was enough to glue the stock to the action.
I had to break the stock to pieces to get it off.
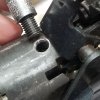
Sometimes I make pillars from Aluminum, sometimes I make pillars from 3/8" steel tubing.
 

Attachments

  • oil coated masking tape inside stock for pillar bedding b 9-16-2013.jpg
    oil coated masking tape inside stock for pillar bedding b 9-16-2013.jpg
    77.9 KB · Views: 73
  • Savage 110 bolt release pillar 20210929_095752.jpg
    Savage 110 bolt release pillar 20210929_095752.jpg
    135.8 KB · Views: 60
Everybody does it at least once. I just bedded a rifle last night and the clay dam at the front of the mag well broke and let the same thing happen. The bedding was supposed to go up but instead went back and up into the feed ramp. A few tense minutes with q tips and messy fingers fixed it without starting over. Turned out fine when I took it apart.

I use kiwi shoe polish for release agent because it is so easy to work with and goes on incredibly thin for a perfect fit.
 
My first bedding job got epoxy all over my hands, pants, and chair.
Most of the epoxy leaked out of the rifle, but there was enough to glue the stock to the action.
I had to break the stock to pieces to get it off.
Sometimes I make pillars from Aluminum, sometimes I make pillars from 3/8" steel tubing.
I like the steel better because aluminum has a higher thermal expansion rate.
 

Recent Posts

Top