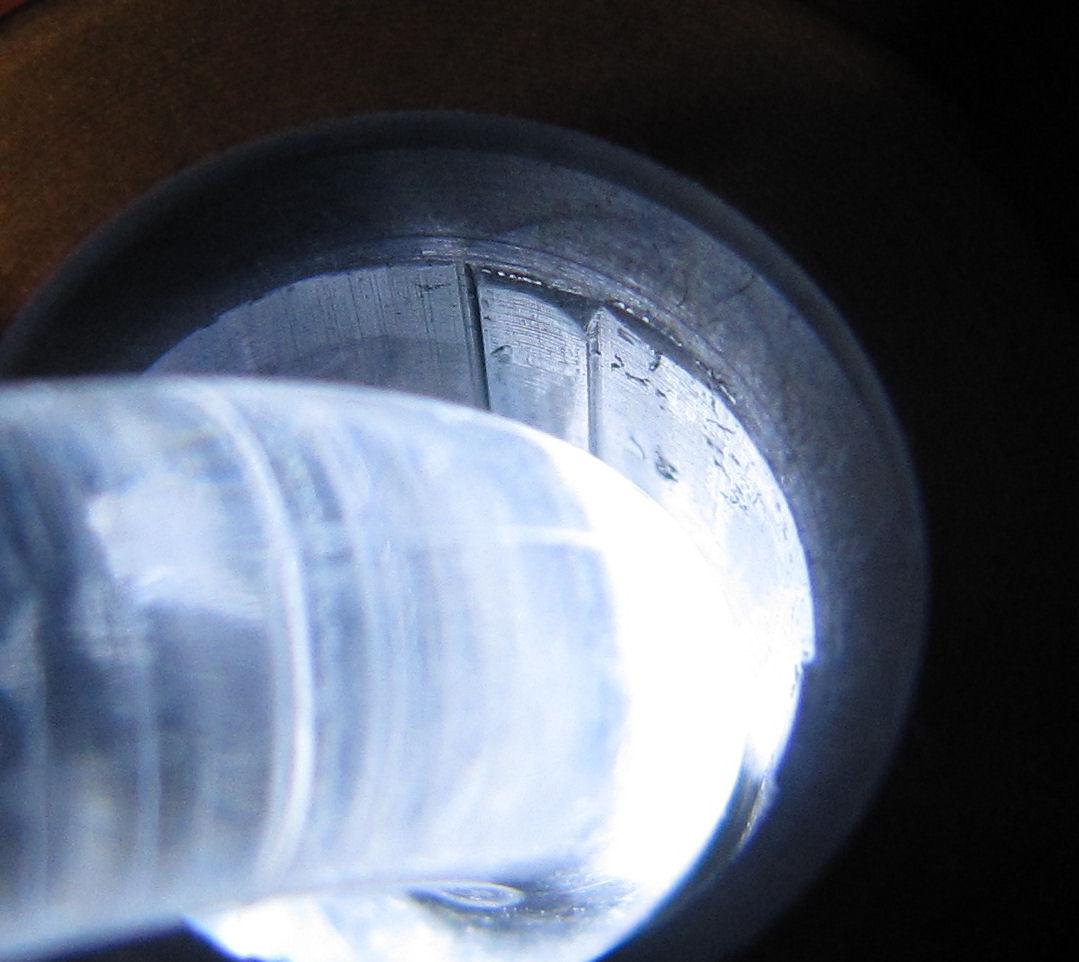
barrel crown

I wish I had a Hawkeye bore scope to just see what is going on!

I too have hungered after a bore scope. But as you can see from the photo above, a regular off the shelf digital camera in macro mode with a cheap bore light shows terrific detail of the crown area. In fact way more than can be seen with a jeweler's loop.

I noticed the wear on the lands and groove with a jewelers loop. But lots of other things became apparent that I never knew till I took a few pictures. For example, the small globules of molten metal, and also note the stain above the defect that marks the boundary of a temper change in the base metal.

The temper change tells me that I will probably have to remove about an 1/8 inch of metal to reach virgin barrel metal.

My main interest is in knowing ( or at least getting an experienced opinion ) how this damage was done. That will tell me the probability of other internal damage. Which of course I could also see with a bore-scope!!! LOL!

Cheers!
 
JE Custom - Your reply prompted a memory flash. Don't have those very often anymore...... so I cherish them when they do!

My recollection suggests that you are correct. Thats how this whole 11 degree thing got started.

But I also remember now that a group of benchrest shooters reviewed the military data and then wore out a few barrels testing the angles further to see how the military photo results affected accuracy. They found that an 11 degree crown also seemed to produce the most consistent accuracy.

I don't remember where I saw this. It may have been in the Rifle Magazine, in Precision Shooting Magazine, or in Handloader Magazine. I suppose it could have been in one of the many books I had too - "The Accurate Rifle" comes first to mind. It sure as heck wasn't the internet. Contrary to popular belief, the internet did exist back then but a multitude of BBSs and Compuserve was about as good as it got - and they were pretty poor.

I threw out all my old magazines when my self appointed management threatened to divorce me. So I tried to find something on the net to corroborate my memory. I could only find the short description in the following link:

Barrel crowning (Bart Bobbitt)

Accuracy back then wasn't what it is now - although still **** good. So maybe recent improvements have shown this to be a flawed conclusion. In any event, I think that even if the precise angle does make a difference, it isn't likely important for anything but the finest competition rifle and probably couldn't be detected on the finest long range hunting rifle.

That said, I know of no evidence to suggest that any other angle is better than the 11 degree crown, so as they say "In the absence of any compelling information to the contrary", I'll stick with what I currently know won't hurt - 11 degrees.

BTW, I found this forum because I was looking for info on how the OEMs make their crowns. I recently purchased a Browning X-Bolt White Gold. Its never been fired. But it appears to have some crown damage in it that is hard to explain. Other damage I have seen is easy to explain by poor tooling and the like. But this is very different. The metal actually appears to have been melted at the crown edge and there are little tiny beads of metal welded to the edge.

Here is a photo taken with a digital camera in Macro mode using a bore light. The loose stuff in the barrel is just dust.

Does anyone know how this happened? My best theory is a lathe centering tool that came loose and spun in the barrel. But its hard to imagine how that could have happened at the factory. I'm contemplating either re-crowning the rifle or re-barrelling it.

Defect_View.jpg


Cheers!

My best "Guess" would be that the back of the tool touched before it started cutting if it was
single pointed. or the pilot turned in the bore and galled the crown.

Ether way, this crown needs to be replaced because if you notice the land has an uneven
bevel on it and there is no clean edge anywhere on the crown.

As far as something happening at the factory, Murphy works there and it is very unusual to find
a factory rifle that has a good crown.

The factory rifles normally use a crown cutter and they dont worry about the centering very
much. The only factory crowns that I ever saw that were done right were from the custom shops.

There are some good crowning tools, and when properly used they do a good job. But I still like single pointing my crowns for consistency crown to crown.

Occasionally I do one that I don't like and have to take another cut.

I had an old master smith tell me that the last thing that effects the bullet is the crown and after
that mother nature and the bullet maker had control.

J E CUSTOM
 
Thanks JE

I don't think its a back of the tool thing or the damage would be all the way around the crown, not just one side.

Yes, the bevel on the lands and groove is what I noticed first. I could not see it with the naked eye, but it jumped out at me with a Jewelers loop. I always inspect the crown, last inch if bore, and chamber visually with any rifle before I shoot it. As your quote says "The last thing that effects the bullet is the crown and after that mother nature and the bullet maker had control." I never put it quite that way, but it reflects my sentiments exactly!

I think a turning pilot makes some sense. The only aspect that says otherwise is the angle on the burnishing - quite steep. It would have to be a pretty short pilot or perhaps a 22 caliber pilot in a 30 cal hole. The molten stainless droplets and temper change also signal something very hard spinning fairly fast.

Unfortunately, I cannot see any marks on the wear to signal the direction of movement (in/out or rotational). If I knew it was rotational I wouldn't worry - I would just re-crown and be done with it because I would know that the odds of additional internal damage would be MUCH lower.

Anyway, all good guesses. Cheers and Thanks JE!

The reason I mentioned the back of the tool was because it is common for the outside of the barrel
to be eccentric to the bore on lots of factory barrels.

When setting up to crown you set up on the bore, just like when installing a break, the threads have
to be concentric with the bore and the hole has to be concentric with the bore to perform properly.

The same thing can happen to the chamber if you setup on the outside of the shank instead of the
bore.

Everything has to be based on the bore center line in order to have an accurate rifle.

Jerry
 
JE:

"I see" said the blind man! Ok, I measured the eccentricity and it is as close to zero as one could hope for - less than a thou believe it or not. I expect that is probably because Browning barrels are hammer forged. But maybe its also because they used a centering tool in the bore and then turned the barrel OD.

That said, your comment about eccentricity makes me realize that the barrel outside surface has a very high polish on it - almost a mirror surface. Certainly much more so than I see on other Browning barrels. The polishing was probably done after crowning and chambering but before final assembly to the receiver. So I'm back to thinking that the damage was done by a centering tool that came loose and spun.

That said, I can see no similar or associated damage to the chamber end of the barrel. Perhaps the threaded end was chucked? Nah, if that was true, the other end would be damaged around the entire circumference of the muzzle crown. More likely they drove the barrel with a tool at the muzzle. The barrel stopped turning and the centering tool burnished and damaged the crown. Yah, it still sounds dumb - who would drive the barrel with a centering tool? But on the other hand, shipping a premium rifle with that kind of damage is dumber still!!!

Cheers!
 
Last edited:
The whole issue between 11 degree and 90 degree is accuracy of the set up.

For an 11 degree crown to be perfect the barrel needs to be set up with absolute zero run out. The bore or the lands (another controversy) needs to be dialed in perfectly.

To cut a 90 degree crown it only matters that your cross slide is tangent to the centerline of the headstock. The barrels bore could be oscillating for all you care, the cut will still be 90 degrees.

"Simply making a 90 degree cut would leave burrs. " This is a quote from a prev post...All I can say is...Huh???

A couple years ago there was an article in shooting times where a fellow cut a muzzle at various angles and accuracy didn't suffer. Unfortunately he wasn't using a benchrest accurate rifle so "accuracy" becomes relative. Just like the military tests of 50 years ago where 11 degrees was "discovered". I have a 6BR benchrest rifle that shoots in the 2s and has for years. I've recrowned the barrel six times and alternate between 11 degree and 90 degree. I've not been able to discern a lick of difference. Not a scientific test for sure, but it's all I can offer...
 
I too have hungered after a bore scope. But as you can see from the photo above, a regular off the shelf digital camera in macro mode with a cheap bore light shows terrific detail of the crown area. In fact way more than can be seen with a jeweler's loop.

I noticed the wear on the lands and groove with a jewelers loop. But lots of other things became apparent that I never knew till I took a few pictures. For example, the small globules of molten metal, and also note the stain above the defect that marks the boundary of a temper change in the base metal.

The temper change tells me that I will probably have to remove about an 1/8 inch of metal to reach virgin barrel metal.

My main interest is in knowing ( or at least getting an experienced opinion ) how this damage was done. That will tell me the probability of other internal damage. Which of course I could also see with a bore-scope!!! LOL!

Cheers!

There are several lengths of bore scopes. 2", 7", 12", 17",and 22".

I recommend the 17" because it will work on any barrel length.

Also buy the one (What ever the length) with the 90o Mirror tube .

The strait works fairly good but the 90o gives you a better look at the crown, Chamber,Throat
Leade and rifling.

I use mine to check the crown and chamber condition every time and occasionally I will re do
the crown if it doesn't look perfect.

I also use it while cutting chambers to see if the reamer is cutting clean or needs resharpening.it
is a wonderful tool and worth every penny.

Sometimes you can find used ones very reasonabley priced.

I have a hawkeye and you can google [email protected] and have a look.

J E CUSTOM
 
I have looked at the HawkEye models in the recent past. Actually a better choice of words would be "lusted" or "hungered after".

Trouble is that I'm retired on a fixed income. They are just plain too much money.

If I did have that kind of coin laying around, I'd buy a barrel.

Cheers!
 
I have looked at the HawkEye models in the recent past. Actually a better choice of words would be "lusted" or "hungered after".

Trouble is that I'm retired on a fixed income. They are just plain too much money.

If I did have that kind of coin laying around, I'd buy a barrel.

Cheers!


I hear you !!!

I lucked out and found one that had a problem with the power supply (The battery had leaked
and corroded up real bad).

The guy said it was the light bulb and they were real cheep.(I knew better, and that he was trying
to cheat me) so I acted dumb (Easy for me) and offered him .$250.00 for it.

The fix was easy and later I had to tell him that I fixed it by simply swapping the power supply (The
little Mag Light is a perfect match) and replaces it .

So for $260.00 I have a complete setup with case and all.

PS: The Con,backfired on him and the look on his face was priceless when I told him I fixed it
for $10.00.

I have seen some good deals on line but you have to check them often or they will be gone.

I to am retired and on a fixed income so I know where you are coming from.

J E CUSTOM
 
Last edited:
Just had a factory 700 barrel re-crowned, accuracy did not improve. After scoping, we could see a very small burr about 1/2" below the muzzle. Even tho removed, it was no help. BTW, burrs can sometimes be found with a Q tip; run it down and slowly back up each groove, and see if a burr will pick a strand of cotton off.
 
Others will no doubt argue. IMHO, Remington sells diamonds in the rough. Very very few 700s shoot well out of the box. The vast majority look and feel like junk. But I have never owned or worked on one that couldn't be made to shoot well under an inch (typically 1/2 to 3/4 in for 30 cal and under) with reasonable tuning.

1. Dump the forend pressure, then check the action bedding - in that order. If there is any binding or if you can feel any movement at the forend/barrel interface or rear tang/stock with your thumb lightly touching both steel and wood when the acton screws are loosened or tightened, step 4 is not optional.
2. Run a box of Tubbs lapping bullets through it - follow directions thoroughly.
3. Lap the crown just enough to include the crown ends of the lands.
4. If that doesn't do it, glass bed the action (with pillars if you can).

Sometimes it takes a bit more than that, but not very often. Whole books have been written on other "tinkering" options and all of them include options that work well on the 700.

By the way, Tubbs would probably have eliminated the burr.

Last but not least I would be remiss if I did not add that finished diamonds are available everywhere for big bucks. But turning a rough diamond 700 into a fine gem tack driver is a labour of love that provides the kind of satisfaction and pride that money simply cannot buy.

Just one old man's point of view.
 
Last edited:
I know this is an old thread but many times people including me search older threads for answers and advice.

I too never really understood why you would use a bore guide on the chamber end but not on the muzzle crown end. A jag and rod will drag and strike the muzzle crown area hundreds if not thousands of times cleaning during the life of a barrel. I created a simple bore guide for the muzzle crown end and it works really well. We have two sizes at the moment with more coming out soon. There are some good videos on the site too which demonstrate the issue and how the Crown Cradle works. Hope this helps and maybe is seen as a solution or least as extra insurance/precaution for the precision marksman.

Home / Crown Cradle
 

Attachments

  • DSC_0038.jpg
    DSC_0038.jpg
    48.7 KB · Views: 184
Warning! This thread is more than 10 years ago old.
It's likely that no further discussion is required, in which case we recommend starting a new thread. If however you feel your response is required you can still do so.

Recent Posts

Top