-
If you are being asked to change your password, and unsure how to do it, follow these instructions. Click here
You are using an out of date browser. It may not display this or other websites correctly.
You should upgrade or use an alternative browser.
You should upgrade or use an alternative browser.
Case Head Separations
- Thread starter HuntnID
- Start date
MagnumManiac stated in a different thread in past few weeks that he strives for 3/4 to 1 thousandth's. He's a brass condition expert. There is mention of using a pick to test for thinning on the inside. I make my pick tool using a large paper clip. I file a long taper point on one end after straightening the clip, then make a 90 degree bend with the short leg about 3/16 to 1/4" length. Scrape that sharpened point from the head up the case wall paying particular attention to start near the 0.200 line.I copy that. I thought .002 was for guys that wanted a tight fit and going a bit over that helped for more reliable chambering. I'm adjusting my dies then.
.002 bump may or may not be enough, often that is not enough to reduce the dia in the web. Two separate dies is best for this step, one for shoulder bump and another for web sizing. Some dies will do each very well, while more often than not, you have to bump the shoulder back further than you like to get the web-sized to where the bolt will close easily.
Using a micrometer that measures to the .0001
Measure and record the following, which will vary from brand to brand:
New brass dimension in the web
Fully fire formed dia in the web
Dimension where the bolt starts to get sticky-Rockwell hardness may vary 6% over the same lot number
Dimension where the bolt is HARD to lift
Full-Length sized dimension
You didn't specify (that I saw), but since you've got a bolt nose recess, I'm assuming you've got an M700 or clone.It was suggested that it could be bolt nose recess is in excess. I checked it as best I could with tape on the bolt nose and as best as I could tell it was about .023" which seems excessive and everything I've found suggested it should be .005".
I'm not clear on what's really going on here...
Bolt nose radial clearance should be about .005 or so as you mentioned (I use a form tool to cut them, which is .705 for the typical .700 bolt nose). However, you could cut it a mile wide- or eliminate it altogether as some do with an M700 and just have a flat breech (Savage and many others)- and it would have ZERO effect on brass stretch. It's the "3rd ring of steel", it contains the gases from a casehead separation which you experienced...
If the counterbore had been much wider (or not there at all), it would have been a much more unpleasant- and possibly dangerous- occurrence for you. What matters here is not the diameter of the counterbore- it's the unsupported casehead length that matters.
If the chamber is cut too deep you can have exposed brass forward of the thickened casehead that would cause case separation, as could gunsmiths that put too large a radius on the chamber chamfer- which effectively causes the same issue.
I switched to some newer brass and while it didn't do it to every piece, there is still a mark on the brass and it cracked the brass on 1 of the 3.(cases on the right in photo).
You didn't say what "newer" is- nor how many additional firings until it failed.
Assuming it isn't on the first or second firing, I concur with those that pointed out you're oversizing your brass. Headspace doesn't matter too much for handloaders (within reason) because the brass will stretch "to fit" on the first firing- then as long as you bump the shoulder only .002 or so on each sizing there's no room for it to stretch again- it's tight between the shoulder and boltface.
I've got Lapua brass that's been sized a half-dozen times for a .338 LM with no issues. That said, with nearly 100 grains of powder being detonated a few inches from my face they're getting retired for new...
randy86314
Well-Known Member
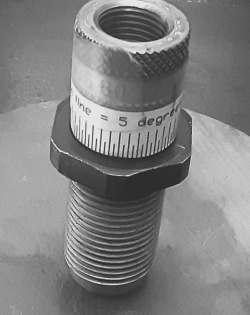
To refine the adjustment of my sizer dies, I made a simple ruler that I tape to my dies. A full 360 degree rotation of the die (14 TPI) is about .072" bump. Thusly, 5 degrees rotation yields 0.001" bump. How do I rotate the die 5 degrees? There is a reference line scratched onto the lock ring. It's easy to loosen the lock ring and rotate the die one or more lines.
Attachments
Thanks for the suggestions. My bolt drops easily without a piece of brass. I have heard of using different height shell holders and grinding the die but I am just starting out and that seems to be an advanced technique beyond my skill set.Sometimes virgin brass is so short the first firing doesn't fully form the case to the chamber. It's possible you're trying to push the shoulder back farther than you want to. I typically take about 10 cases and reload them until the action is stiff to close, then measure the shoulder and set my dies to bump back about .002" from there. From that point on I know my die will properly size brass that needs it and not touch new brass that's not yet long enough to need it.
Some guns are too stiff for the bolt to drop like you see on Youtube no matter what you do. Try it with an empty action. If the bolt won't drop closed with an empty action you'll never get it to drop closed on a piece of brass.
I've occasionally had to turn a little bitt off the bottom of a die to properly size brass for real tight chambers. You can grind the shell holder down to achieve the same thing.
I ended up calling a technician at Lee Precision and I was told that screwing the die down further will just change the handle throw and basically their full length dies have little to no adjustment as far as a means to increase the shoulder bump if I understood him correctly.
He said not to worry about it and just resize the case per the die instructions and if the worked case will chamber I am good to go, I guess I am overthinking things?
This is my first go at reloading so excuse my ignorance on the subject.
Thanks again for the help!
Critter Picker
Well-Known Member
I don't think the technician from Lee understood the question. Sounds like he thinks your die is bottomed out on the shell holder.
Due to the mechanical linkages, thread clearances, etc. there's (relatively) a lot of "slop" in presses.
Many presses state to screw down the die until it makes contact with the shellplate. Contact, ain't all that's available. Screwing the die down further removes the slop and will increase shoulder bump. If you're not getting the maximum sizing/bump you're looking for you need to keep screwing the die down in small increments until your press handle cams over hard- as in an audible "clunk". That's using maximum force to remove all clearances. If that's not enough, you could try another die (might make a difference)- or you grind the die ya got- but that's an unusual scenario.
Many presses state to screw down the die until it makes contact with the shellplate. Contact, ain't all that's available. Screwing the die down further removes the slop and will increase shoulder bump. If you're not getting the maximum sizing/bump you're looking for you need to keep screwing the die down in small increments until your press handle cams over hard- as in an audible "clunk". That's using maximum force to remove all clearances. If that's not enough, you could try another die (might make a difference)- or you grind the die ya got- but that's an unusual scenario.
Thankfully, as a green reloader, I was recommended a Redding Competition Shellholder Set which has 5 holders +0.002 thru +0.0010 for the case head family. You're able to, by steps, get the bump you desire. Lee and Redding, and all the USA Die makers, give us great product AND support. Just another proven method. Good loading!Due to the mechanical linkages, thread clearances, etc. there's (relatively) a lot of "slop" in presses.
Many presses state to screw down the die until it makes contact with the shellplate. Contact, ain't all that's available. Screwing the die down further removes the slop and will increase shoulder bump. If you're not getting the maximum sizing/bump you're looking for you need to keep screwing the die down in small increments until your press handle cams over hard- as in an audible "clunk". That's using maximum force to remove all clearances. If that's not enough, you could try another die (might make a difference)- or you grind the die ya got- but that's an unusual scenario.
I thought I explained what I was trying to do pretty clearly. Talked to him for quite a while about my process thus far, checking headspace with the bolt sans firing pin and ejector, youtube videos on the subject, putting scotch tape on the fully sized case to double check headspace, etc.I don't think the technician from Lee understood the question. Sounds like he thinks your die is bottomed out on the shell holder.
My take on what he said was that once the die fully resizes your brass, if it doesn't bump the shoulder back to what you want, there is no further adjustment possible and screwing the die down further at that point just changes the lever stroke. The sizing dies are designed to hit the middle of the SAAMI specs for the most part so they produce reloads that work in every chamber.
One other check he said I could do would be to put a bore brush on a rod and run it down the bore into the mouth/neck of a fully sized piece of brass, and if it doesn't rattle around in the chamber, it is good. Though to be fair, I think he was half joking.

Thanks for your help.Due to the mechanical linkages, thread clearances, etc. there's (relatively) a lot of "slop" in presses.
Many presses state to screw down the die until it makes contact with the shellplate. Contact, ain't all that's available. Screwing the die down further removes the slop and will increase shoulder bump. If you're not getting the maximum sizing/bump you're looking for you need to keep screwing the die down in small increments until your press handle cams over hard- as in an audible "clunk". That's using maximum force to remove all clearances. If that's not enough, you could try another die (might make a difference)- or you grind the die ya got- but that's an unusual scenario.
That makes sense. I went way past making contact with the shell holder hence my question on how far you can screw your die in? I am way past first contact and am getting cam over and an audible clunk. I ordered a resizing die and bushing set-up from L.E. Wilson to see if that makes any difference.
Thanks for your suggestion.Thankfully, as a green reloader, I was recommended a Redding Competition Shellholder Set which has 5 holders +0.002 thru +0.0010 for the case head family. You're able to, by steps, get the bump you desire. Lee and Redding, and all the USA Die makers, give us great product AND support. Just another proven method. Good loading!
In my research I saw someone else suggest that (as well as shimming the shell holder) as a solution. Seems like an easy fix but I wasn't sure if those graduated Redding Shellholders would fit in my Lee classic press?
Reviews were also all over the board on the machining tolerances of these as well…
Critter Picker
Well-Known Member
He's right to a point. If the die is bottoming on the shellholder,you cannot size the case any further without modification to the die or to the shellholder.I thought I explained what I was trying to do pretty clearly. Talked to him for quite a while about my process thus far, checking headspace with the bolt sans firing pin and ejector, youtube videos on the subject, putting scotch tape on the fully sized case to double check headspace, etc.
My take on what he said was that once the die fully resizes your brass, if it doesn't bump the shoulder back to what you want, there is no further adjustment possible and screwing the die down further at that point just changes the lever stroke. The sizing dies are designed to hit the middle of the SAAMI specs for the most part so they produce reloads that work in every chamber.
One other check he said I could do would be to put a bore brush on a rod and run it down the bore into the mouth/neck of a fully sized piece of brass, and if it doesn't rattle around in the chamber, it is good. Though to be fair, I think he was half joking.
I'm not sure what the bore brush thing is supposed to do, I would skip over that process.
However SAAMI, like everyone has tolerances. The purpose of tolerance is to promote interchangeability,so if the die is in the middle of tolerance and the chamber is in the middle of the tolerance all is well. However if the die is in the middle and chamber is on small side, it won't size the brass enough, or if the chamber is on the large end brass will be overworked causing case head separation. Long story short,middle isn't always the best choice.
Well..if you size the brass too much it would give you info.....I'm not sure what the bore brush thing is supposed to do, I would skip over that process
if you shove a brush thru the barrel on a rod and you can feel the brass go back and forth in the chamber.....
there's a problem....
Brass is short and WILL STRETCH to fit the chamber....
...and it will obviously give you less fps due to pushing the brass out to fill the chamber again.....
just like virgin brass will lengthen so will the 'overworked' brass...but the 'overworked' brass may blow apart due to over stretching....
Just keep watch on the brass color above the casehead....if it developed a light colored ring...that's casehead separation waiting to happen...
Check the case wall with a pointed end of a piece of metal to determine how much stretch it has done....
in my experience with my 65284s....
If my pointed rod 'lightly bumps thru' I have one more firing....some of these I use for hunting.....depends on 'the bump'
If my pointed rod 'sticks' that brass is finished......
Last edited: