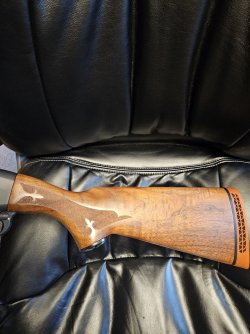
So I bought this stock unfinished and got shaped the way I want, bottom metal and action have been bedded by me. I've sanded to 400 grit and applied a heavy coat of Arrow oil and these marks became visible and arose a few questions for those with a lot more experience than me.
1. Are the vertical marks (a couple in the butt area and the ones by my hand in the second picture) tooling marks left by who cut the stock? If so, do I just sand that area more and try to remove them?
2. The black areas on the cheek piece; is that just a characteristic of walnut (stock is claro walnut)?
3. The small black spots and lines all over the stock; are these wood pores? When I sanded, I didn't wipe off any of the dust and oiled over it, thinking it would fill in the pores with the dust (was told this by an experienced stock builder/finisher). Well, obviously they're still there and I'd like them to go away to create a better surface.
So what would my next steps be?
thanks,