Modify custom action ?

I have a Defiance Deviant action that has the pic rail integral to the action. The most forward lug on the rail needs to be removed to accommodate the scope bell which is just touching it.

Can I have a gunsmith mill this lug off?
Dremel!!!
Just grind off the edge corner of the Rail to match the angle on the Bell of your Scope. I have done this on a few Rails. Easy & fast to do! I am sure that you are skilled enough to do this.
 
I currently have two 6.5SSs. I had two others previously. But yes, I love the 6.5SS. Probably my favorite cartridge I own.
6.5 Saum x4 for me. 2 of those I built for my boys. I almost built a 300 SS but decided to go 300 Sherman max instead.
 
Dremel!!!
Just grind off the edge corner of the Rail to match the angle on the Bell of your Scope. I have done this on a few Rails. Easy & fast to do! I am sure that you are skilled enough to do this.
My ocd wouldn't let me take a Dremel to any of my custom actions with integral rails. Especially the rifle being discussed. See post #25. I'd definitely let LPR get r done proper. Now, were it a separate rail that's a different kind of thing.
 
End of story:

First, thank you Elk Hunter 338 for your offer to professionally mill the rail and refinish the metal work properly.

Ultimately, I decided to give it a go myself. I taped off everything with multiple layers of masking tape. Then I tried to reduce the lug height with a Dremel tool and stone. That was a no-go. The stone barely did anything. With a bit of trepidation, I reached into the toolbox and grabbed a flat file. I ran the file along the lug at an angle that was similar to the angle of the scope bell. It was a long and slow process to remove the metal and to keep the angle consistent from side to side.

I eventually got the lug reduced in height and the angle to where it closely matched the scope. I was careful to not go any farther than needed. I touched up the angled portion of the lug with a little black paint. All in all, I think it came out pretty well.

Pic rail.jpg
 
End of story:

First, thank you Elk Hunter 338 for your offer to professionally mill the rail and refinish the metal work properly.

Ultimately, I decided to give it a go myself. I taped off everything with multiple layers of masking tape. Then I tried to reduce the lug height with a Dremel tool and stone. That was a no-go. The stone barely did anything. With a bit of trepidation, I reached into the toolbox and grabbed a flat file. I ran the file along the lug at an angle that was similar to the angle of the scope bell. It was a long and slow process to remove the metal and to keep the angle consistent from side to side.

I eventually got the lug reduced in height and the angle to where it closely matched the scope. I was careful to not go any farther than needed. I touched up the angled portion of the lug with a little black paint. All in all, I think it came out pretty well.

View attachment 633957
Well there ya go!! Nice work boss.
 
End of story:

First, thank you Elk Hunter 338 for your offer to professionally mill the rail and refinish the metal work properly.

Ultimately, I decided to give it a go myself. I taped off everything with multiple layers of masking tape. Then I tried to reduce the lug height with a Dremel tool and stone. That was a no-go. The stone barely did anything. With a bit of trepidation, I reached into the toolbox and grabbed a flat file. I ran the file along the lug at an angle that was similar to the angle of the scope bell. It was a long and slow process to remove the metal and to keep the angle consistent from side to side.

I eventually got the lug reduced in height and the angle to where it closely matched the scope. I was careful to not go any farther than needed. I touched up the angled portion of the lug with a little black paint. All in all, I think it came out pretty well.

View attachment 633957
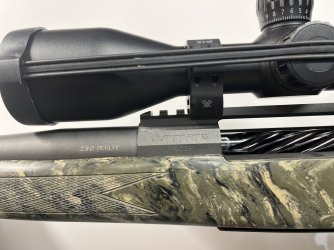
Good job! You went the best way you had access to. Hand tools are a bit slower, but you have much more control as you go as opposed to power tools, and you learned something.
 
One last question before I put a tool to this rifle - Using a feeler gauge, I find that there is exactly .008" of clearance. That is considerably less clearance than on any other rifle I've set up in the past. Is it enough to prevent contact between the rail and the scope under recoil? The rifle is chambered in 280AI.

This would have been a lot easier if the pic rail was separate. Not fond of the idea of grinding away on a custom action. LOL
If the scope moves at all, it isn't mounted right and won't stay zeroed. Even .008 is plenty, as recoil or anything else should not cause them to touch.
 
End of story:

First, thank you Elk Hunter 338 for your offer to professionally mill the rail and refinish the metal work properly.

Ultimately, I decided to give it a go myself. I taped off everything with multiple layers of masking tape. Then I tried to reduce the lug height with a Dremel tool and stone. That was a no-go. The stone barely did anything. With a bit of trepidation, I reached into the toolbox and grabbed a flat file. I ran the file along the lug at an angle that was similar to the angle of the scope bell. It was a long and slow process to remove the metal and to keep the angle consistent from side to side.

I eventually got the lug reduced in height and the angle to where it closely matched the scope. I was careful to not go any farther than needed. I touched up the angled portion of the lug with a little black paint. All in all, I think it came out pretty well.

View attachment 633957
Very good job. Using a hand file is a little slower but produces a great outcome. I use a Dremel a lot, BUT it takes a LOT of practice with a Dremel to do a good job and you can make some real bad divots and marks while learning. Best to practice on bar stock and wood 2.4s till you get really good with a Dremel.

Excellent outcome and now you won't be near as worried about doing minor alterations to rifles.
 
Top