• If you are being asked to change your password, and unsure how to do it, follow these instructions. Click here

Annealing newbie - Anyone tried this DIY annealer?

I appreciate the kind words, however, I'm neither a metallurgist, nor a Materials scientist. I know there are specific hand operated testing units one can purchase, they are, however, about half the cost or more of an AMP.
I don't think you would have to be a metalurgist or a materials scientist to build one, but I appreciate that it would be difficult.
For now, I might just buy or build a cheap annealer (flame or induction), and buy a very cheap hardness tester. I don't want to put up a link here, but they can be had for about $125 online. I wouldn't trust them to be precise, but they would certainly be closer than my poor eyes, and they would allow me to test for repeatability across a batch of brass.
 
I built my own and spent a little less with speed controls. it works well for .223, .243 ;308, 30-06 ,300 WSM 6.5 PRC and many other. I bought and aluminum one the goes in your cordless drill for My 6 PPC and 6.5 Grendel because they are so short. I got it from Midway it was $15 or so and many sizes are available. it works well you can see the change and pull it from the flame. I know guys who use deepwell sockets with drill adaptors but the are not smooth inside and tend to heat up alot.
 
I built my own and spent a little less with speed controls. it works well for .223, .243 ;308, 30-06 ,300 WSM 6.5 PRC and many other. I bought and aluminum one the goes in your cordless drill for My 6 PPC and 6.5 Grendel because they are so short. I got it from Midway it was $15 or so and many sizes are available. it works well you can see the change and pull it from the flame. I know guys who use deepwell sockets with drill adaptors but the are not smooth inside and tend to heat up alot.
How about pictures?
 
The phone I had my photos on ate its SIM and SD card while at work one day. The recovered photos are on my laptop...but here are some of the previous ventures.

Keep in mind with the all metal unit, this was V1, v2 had dual speed control and was painted. The Annie, I stole the folding touch screen, arduino and photo sensor for other tinkering projects. I couldn't find an all assembled picture.

I'm not sure I'd trust anything short of PEEK printed parts for a 3d printed annealer.
Whatever that contraption is, no wonder you have the point of view you do. That is far more in depth than a simple DIY flame annealer that can anneal to whatever templaq paint you use regardless of the manufacturer hahaha. Hats off to ya, doubt most of us would get that in depth on a DIY build.
 
if your buying off that website I would use a prepaid gift card with a low amount. We had a CC number stolen when using there sight a few years back. Hopefully better now but just FYI….
 
I built this one from scratch years ago. It is what I still use today. I don't see a motor, a 12v power supply, torch or a cord in that kit. I also installed 2 small computer fans in the top back of the cabinet with vents at the bottom to help keep the power supply cool. This one has separate motors
and speed controls for the case spinner and the feeder.
If I remember right, all the parts were about $100 back then including the torch and a propane bottle.

ANNEALER 069.JPG
 
Last edited:
This may help you. Link to parts list in 1st post.
 
I built this one from scratch years ago. It is what I still use today. I don't see a motor, a 12v power supply, torch or a cord in that kit. I also installed 2 small computer fans in the top back of the cabinet with vents at the bottom to help keep the power supply cool. This one has separate motors
and speed controls for the case spinner and the feeder.
If I remember right, all the parts were about $100 back then including the torch and a propane bottle.

View attachment 624391

That's another nice unit!
 
This may help you. Link to parts list in 1st post.
Thanks for the links and info. Very well done!
 
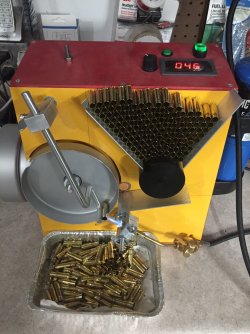
I built one of the "$75 DIY Annealers" quite a few years ago. Worked great. Instead of having two speed controls (one for the feed wheel, one for the annealing/flame side), I used a proximity sensor so it automatically fed a case any time there wasn't one waiting to drop into the flame. I also made two different size feed wheels and several annealing/flame side wheels for different depth cases.

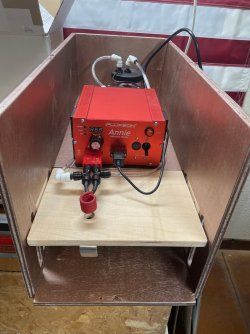
However, I decided to go with an Annie induction annealer almost a year ago and it works great. No auto feed, but still really quick. Just drop in a case, anneal (just a few seconds for most cases) and hit the lever below to drop the case into the pan. The deck adjusts quicky to change height for different cartridges. Happy with it so far!
 

Attachments

  • IMG_6707.JPG
    IMG_6707.JPG
    298.3 KB · Views: 29
  • IMG_3734.JPG
    IMG_3734.JPG
    313 KB · Views: 32
I built one of the "$75 DIY Annealers" quite a few years ago. Worked great. Instead of having two speed controls (one for the feed wheel, one for the annealing/flame side), I used a proximity sensor so it automatically fed a case any time there wasn't one waiting to drop into the flame. I also made two different size feed wheels and several annealing/flame side wheels for different depth cases.

However, I decided to go with an Annie induction annealer almost a year ago and it works great. No auto feed, but still really quick. Just drop in a case, anneal (just a few seconds for most cases) and hit the lever below to drop the case into the pan. The deck adjusts quicky to change height for different cartridges. Happy with it so far!
I had somehow missed the Annie. Thank you for bringing this one to my attention!
 
Top