Load Development, at Home and In-The-Field
By E. Wade Loudamy of LegacyShootingProducts.com
In pursuit of long-range extreme accuracy, most of us reload to achieve the best performance from the rifle/ammo, whether for competition, hunting varmints or for pursuing big game. A load that produces sufficient velocity and achieves superb accuracy requires variations of components and how they are assembled. Finding that combination can take time and sometimes a lot of trial and error. Whether new to reloading, or a veteran hand-loader, this article will provide some information that can enhance the process and make more enjoyable the pursuit of those one-hole groups. We will discuss a proven, systematic approach to develop accurate loads, and how to enhance that process by performing some of the reloading tasks at the range or in the field. Loading in the field allows one to more quickly, and with more confidence find that pet load. It is my desire to share some of the things learned over years of trial and error, so other shooters can benefit and enjoy the sport more thoroughly.

This article will not detail the very basic aspects of reloading methods and safety. The author, nor LongRangeHunting.com are responsible for inadequate reloading safety considerations.
Background
The early years of my reloading were met with both satisfaction and frustration with equal frequency trying to find an accurate handload for a rifle. Often a load would perform quite well without much fuss, but just as often it would take several months and many rounds down the barrel to find a load that would shoot accurately. There were so many variables to consider, I didn't know where to start. The choices of bullets, powders, sizing methods, neck tension, OAL, powder charge, were overwhelming. Without any guidance, I would flounder a bit deciding which variables to change first, and in what sequence each should be addressed. It was only with years of trial and error and lots of reading (way before internet blogs) that I found a systematic approach that proved to be effective and greatly reduced the time required to find an accurate load. Loading in the field is the most recent and the most significant enhancement to that process, and has greatly reduced the time required and the number of trips to the range.
So, let us start with what I have found to be the most effective sequence/method for achieving accurate long-range loads and we'll also discuss how to make that even more effective by performing some of the reloading tasks at the range.
Sequence of Load Development: Basics
Component Selection:
We will assume you have a shooting platform capable of delivering sub-minute accuracy, hopefully half-minute or better. We also will take it for granted that you've purchased quality brass, because consistency in thickness of the case mouths, primer pockets and the hardness & temper of the brass is basic to accuracy. Bullets can and do perform differently in some rifles than others, but some bullet makers have a better reputation than others for accuracy. Today's powders and primers are made with better quality than ever before, but there are some things to consider when choosing rifle powders.
Consider that some of the fastest powders can be more sensitive to temperature, so some shooters prefer to sacrifice a bit of velocity for consistency. There are volumes of information one could find on each of the powders within this site, and much debate on which is the best for a given caliber. However, one should consider that accuracy must be repeatable not only from shot-to-shot, but from one shooting session to the next. Some loads can produce great accuracy, but experience 100 fps velocity drop when the temperature drops 60 degrees. When sighter rounds are permitted, such as in a competition, one can make sight adjustments, but when hunting live game, the results can be tragic. So, consider the purpose of your load and make the best choice for powder based on testing under various weather conditions.
Brass Preparation:
Brass is central to accuracy. Without consistency of volume and dimensions, consistent ammo cannot be produced and the results will show up on target. The inside of the primer hole must be de-burred and primer pockets uniformed. The overall length of the case must be trimmed to specs and the inside and outside of the case mouth chamfered. Some shooters weigh each case and cull any outliers. Some like to uniform the thickness of the case neck by reaming inside or outside. Whatever your preference, these steps can be done in one's reloading room where he has everything needed perform those tasks. There is no advantage to doing this portion of the loading process in the field. Primers can be seated at home or in the field with equal ease. For initial testing I use a single primer choice and vary other components quite a bit before doing primer tests. For this reason, I usually head to the range with 50-100 pieces of brass prepared, including primers.
Determine Base-to-Ogive distance:
The next step in the process is to determine the base-to-ogive length. We have to know this to determine the seating depth of the cartridge. Some bullets don't mind "jumping" a bit before engaging the lands while most prefer just touching and some shoot best being "jammed" into the rifling. As a rule, bullets with secant ogives prefer to be touching the lands or even "jammed" a few thousandths, while a bullet with a tangent or hybrid radius is more forgiving regarding seating depth. In any event, start by determining the exact distance from the lands to the base of the cartridge.
While there are many tools to help determine this base-to-ogive length, a very simple method can give a good measurement while requiring few special tools. Start with a full-length-sized case and, without primer or powder (a dummy round), seat a bullet about 2/3 into the case neck. Chamber the round to see if the bolt will fully close without forcing it. Likely it will not, due to the bullet contact with the rifling. Seat the bullet slightly deeper and re-check to see if it will chamber without force. Repeat this until the bolt closes. Now, assemble a new dummy round and adjust the seating plug out about ¼ to ½ turn. When you chamber and remove this round, observe the bullet for marks created by the rifling. Increase the seating depth in small increments, observing the marks on the bullet each time. Using a sharpie to blacken the bullet between trials allows one to easily observe where the bullet contacts the lands of the barrel.


Within a few trials, one can determine the distance from the base of the cartridge to where the bullet just barely touches the rifling, and that is a good start for initial seating depth. There are more sophisticated tools for achieving this dimension, but this method produces a great result also. This method also goes a lot quicker than it takes to describe it on paper. The seating depth will have to be adjusted in the loading process to determine the effect on accuracy, so it's just a starting point.

The only special tool you will need is "comparator" to measure from the base of the cartridge to the ogive. This is a Sinclair hex-type comparator that works quite well, but there are others also. Record this length for future use using dial calipers which should be a standard item on any reloading bench.
Determine Initial Powder Charge:
Now the reloader is ready to start testing for the proper amount of propellant. It should go without saying that several sources should be referenced to determine a safe starting load for the components selected. For first testing, seat the bullet to just touch the lands as described above. That will be altered later to determine the best base-to-ogive length for accuracy, but at this point, we need to establish an acceptable powder charge for the lot of powder we have on hand. Accuracy is indeed observed but the focus is to determine acceptable pressures for further testing. Initial testing is usually done at 100 or 200 yards. One should consider that there is often 3.0 or more grains difference between the starting load and the maximum load listed. If done properly, one loads a few rounds at the staring load, and increases by 0.2 or 0.3 grains until safe pressure signs are confirmed. Now the handloader has an acceptable powder charge for which he can continue development. But this process can require a lot of rounds if loaded at home and subsequently shot at the range. This can be done very efficiently when loading at the range or in the field, with many benefits.
This single step in the reloading process was the impetus for me taking loading tools and components to the range. Too many times I would load four of five increments of a powder charge and go to the range. Seldom would I find a charge that produced optimal pressure/velocity on the first trip. Another trip to the reloading room and back to the range was required to refine the powder charge before I could proceed with further testing. At times, I would reach optimal pressure with one of the lighter charges, but would have loaded rounds in my shooting box that had an additional .5 or .8 grains. These loads would have been dangerously over-pressure if shot in that rifle, but were just loaded at home as part of the process to determine a good powder charge. Since they were high pressure loads, I would have to disassemble them and dump the powder when I returned home. It now makes me cringe to consider the consequence if one of those rounds had been mixed up with the safe loads and fired in that rifle. The results could have been catastrophic.
When working up loads at the range, there are never any rounds loaded that contain a dangerous charge of powder, because the powder is increased and shot one at a time, with pressure signs being observed after each loading. Now, I nearly always do this portion of load development at the range for expediting the process and for the obvious safety benefits.
When done afield, one can shoot an initial 3 shot group and observe pressure signs, then load and shoot one at a time with .2 or .3 increases until he sees the signs are approaching moderate levels. At that point, he can go back to loading 2-3 rounds at each level and paying more attention to accuracy as he still observes for indications of pressure. By doing this at the range/field, one can achieve the same data usually in 10 shots or so. With an optimal powder charge, other variables can then be investigated for the effects on accuracy.
The handloader should be aware that each lot of powder can vary significantly, so the charge weight will have to be re-established for each lot of powder he acquires.
Seating Depth:
We discussed how to find the distance from the base of the cartridge to the lands. During load testing, this dimension can be altered to determine the effects on accuracy and this is the next step of the process. If shooting a new rifle, use fully sized brass. If you have cases that has already been fired in a particular rifle, use neck-sized or partially sized cases for best case-to-chamber fit. Load three to five rounds so the bullet just touches the lands, then each test-load will be varied to determine the rifle/bullet preference for accuracy. Increase the seating depth by .020", .040" and .060" and test each load for accuracy.
Now, after shooting on paper, the rifleman knows the gun/load preference on OAL, but only in gross increments. For the sake of discussion, just say the loads that jumped .040" and .060" were not accurate, but the load that jumped .020" and the one touching the lands were equally accurate. The accuracy buff would then try a load maybe at .010 off the lands to see if that changed the results on paper. While some bench rest shooters claim .002' or .003" can make a difference in accuracy, I have never tried such small incremental changes in seating depth. I know there may be benefits to this attention to detail for those shooting bench rest guns at short ranges, but for long-range, my time and effort will be spent learning to read the wind/conditions better.
The seating depth can also be lengthened to "jam" the bullet into the lands a few thousandths of an inch. However, be aware that when doing this, the bullet can be jammed so tight, that it will not extract if one tries to unload the rifle, and the round must be discharged. Or, the bullet can be pulled out of the case, spilling powder in the action and leaving a bullet in the barrel. Loading ammo in this manner is okay for target shooting when a loaded round is never ejected from the rifle, but is not an option for hunting ammo. (Don't ask me how I know about that scenario.) Also be aware that pressure decreases when the bullet jumps and increases when jammed, so monitor pressure signs if jamming the bullet and adjust the powder charge appropriately.
Refine powder charge: The first time we determined powder charge was to establish a general range for acceptable pressure levels, but now the powder charge can be "tweaked" with the emphasis on accuracy. So, assuming the initial accuracy results were promising, this is the next step taken before other components are considered. If possible, increase the distance to 300 or 400 yards, and shoot another group of about five rounds of the initial load at that distance. Then, by reducing or increasing (assuming the load is not already at max) the powder charge by .2 grain increments, one can find a charge that may perform a bit better. Sometimes these changes are minor at 100 yards, but are much more obvious at longer distances. If one has access to a chronograph, he should record the velocities of each test load.
By recording velocities and accuracy at each level, one begins to recognize patterns of accuracy within a velocity range, referred to as an "accuracy node." Often there are a couple of these accuracy nodes within which a bullet performs best. Some of the science-minded folks argue quite convincingly that the bullet must achieve its best gyroscopic stability at those given velocity ranges, thus the optimal accuracy also.
The other benefit from keeping velocity records is noticed when a new lot of powder is acquired. Each lot of powder can vary quite significantly regarding the powder charge and resultant chamber pressure. A well-known shooter/friend told me recently that a new lot of XXXX powder required an additional two grains in his 284 Winchester to achieve the same velocity as the prior lot. That was astonishing to many of us. He called the manufacturer with the lot numbers of that powder and, after visiting with the technical guys, was told this variance was within the acceptable levels of quality control. The new lot was accurate, but just required two grains more for the same performance. So the charge of any given cartridge/load should be reduced when a new can or keg of powder is obtained. If one knows the velocity he was achieving with the first accurate load, it is most likely that any subsequent lot of a given powder will perform best at that same velocity. Achieving that velocity to reproduce a pet load can be quick with the aid of a chronograph, but certainly is not a mandatory tool.
Revisit Component Selection
Powder: Now, the above sequence assumes all the selected components work well and the desired level of accuracy was achieved through the process. Most of the time, with quality equipment, the rifleman will find a load that performs decently well on the first outing, but not always. So, if the above sequence doesn't produce loads that meet expectations, the next variable to for consideration should be to change powder or primer. We'll discuss powder first.
I know a very accomplished rifleman who was shooting a custom rifle with a Panda action, the most expensive scope, stock, barrel, that on initial testing shot a horribly when testing at 750 yards. He was not able to keep the bullets on a 30" target, but by changing from one powder to another, using the same bullet and other variables, shot a 3-1/2" group at that distance. That's sub ½ minute at 750 yards!! Such drastic differences are not often made just by switching powders, but substantial changes are not uncommon. Obviously, the charge amount must be established again, so go back to step one to work up the appropriate charge of a new powder to be tested.
Primers: It is surprising to many what a difference can be seen simply by changing primers. Powders and primers work together, and the pressure curve/accuracy can be changed favorably sometimes just by changing the primer. Primers can burn hot or mild. They can give a more sustained ignition versus a fast-hot burn. The characteristics of primer ignition is beyond the scope of this article, but just consider that a primer indeed can make a considerable difference in accuracy. There are times I choose to experiment with primer selection before changing powders, because I have a good reason for wanting to use a given powder. Maybe I have an 8-pound keg of one type and use it in several guns. It could be that I appreciate the characteristics of that powder, such as temperature insensitivity, or maybe the second powder choice gives significantly less velocity in the cartridge. A change in primers is sometimes the key to making the selected powder shoot best and getting optimal accuracy. I seldom shoot any cartridge at its max pressure, so it's easy to just load three rounds each with different primers and test them on paper. If loads are already at max pressure, one should decrease the charge by 10% when a new primer is tested.
Bullet: Occasionally one may find that the bullet with the best reputation for accuracy does not shoot as well as desired. Long range accuracy buffs try to find those with a greatest ballistic coefficient (BC) but if it doesn't produce the accuracy expected, another similar-weight bullet may change the game. But, if several bullets of similar weights don't produce the desired accuracy, it's time to select a different bullet weight and try again. This can be a bit frustrating if you are trying to gain the best LR accuracy possible, but sometimes it's worth a step-back-and-think approach. Often, we select the heaviest bullet based on BC and trajectory. Those usually work well with tight twist barrels, but if your gun doesn't like the heavier bullets, it's worth trying a lighter projectile. The wind drift advantage of the heaviest bullet compared to a one a few grains lighter may only be 2-3 inches at 600 or 700 yards, depending on velocity. Considering that a 1 MPH change in a cross wind can often change bullet impact similarly at that distance, one can appreciate the change to a lighter bullet that shoots more accurately.
Load Development In-The-Field
So, as mentioned above, there are many benefits from performing some of the load development in the field or at the range. The methods discussed will describe the what proven to work for the author, whether shooting 200 yards at an established range with permanent, concrete benches or testing at a friend's ranch at targets out to 1,000 yards. Surely there are lots of things one could do to improve what is described herein, but this article is intended as a "primer" regarding field loading and how it has enhanced the process of load development. Hopefully it can benefit many and open the door for more discussion on the subject.

Preparation:
As many steps as possible should be done at the reloading bench where all the tools and gadgets are available. All the case preparation is done at home, including cleaning, sizing and often primers can be seated also. The initial seating depth can be established at home also and usually, one can take the first few rounds completely loaded with the "starting load" charge of the selected powder. Take 50-100 prepared cases to the field for load work-up. There is an equipment list at the end of this article that I try check a couple times before leaving the house. Nothing is quite as frustrating as planning an outing for load testing but leaving key tools or components at home. (Again, don't ask me how I know.)
Powder Charge: Weighing powder in the field or range requires some special attention. This is the most finicky part of the process, but well worth the effort required. Two methods can be used for this.
If using ball powder that meters consistently through a powder hopper, you won't need a powder scale. Simply record the settings on your powder measure that correspond to charge weight while at home. Do this for the starting listed load and the max powder charge and a couple readings between these two figures. Record these while at the convenience of your reloading bench. Then you will only need to increase the powder charge by altering the settings on your hopper when developing loads in the field. When you get back home, convert the setting back to the charge weight in grains and record this in your load book.
If loading extruded powders that don't meter consistently, it is wise to measure every charge. You will need an electronic scale with batteries and a shield to protect the force plate from the wind. This can be elaborately designed or can be as simple as a clear Tupperware dish that sits over the scale. This, in fact, is all I use, but additionally, a small hole is cut in the top through which the powder is trickled up to the desired charge weight. Although a bit inconvenient to use, the overall advantage becomes apparent when your pet load is accomplished in one outing.

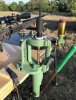
You will need a reloading press and dies. The bench rest shooters use special dies that can be used without a press, but most of us are not BR shooters and have standard dies for use in a cam press. There is nothing to say you couldn't use a full-size press, but a smaller press is a bit handier. By fastening the press to a mounting plate, C-clamps can easily be used to clamp the press to a shooting bench. Since all the case sizing has been completed at home, the only need for the press is to seat the bullets after charging the case with powder.
The same fastening arrangement can be done for the powder measure also and this allows one to quickly and easily set up the entire process in the field with just a few clamps.
A portable bench, such as shown here, is a great asset for shooting and load development at long range. The only nearby shooting ranges here allow for 200-yard testing, but on a friend's ranch loads can be tested out to 1000 yards and that is much preferred over the short range. By clamping the press and powder measure to the off-side of the bench one can still shoot normally from the strong-side with plenty room. The Legacy shooting bench shown here is sturdy and very portable and makes long shooting sessions quite comfortable and its many benefits can be seen at the website. (LegacyShootingProducts.com).
This checklist is not intended to be a comprehensive list of everything needed to shoot. The normal things for shooting, such as hearing protection, targets, etc., are not listed here, but only those things additionally that are needed when loading at the range.
Loading-At-The-Range Check List:
Prepared cases, Primers, Bullets, Powder, Hand-Priming tool, Press, Neck chamfer tool, C-clamps, Dies, Shell holder, Powder hopper, Powder scale with wind shield, Calipers, Hex gauge, Load data book, Recording book, Load tray, Sharpie, Pen, Extra 9V battery, Drinks, Hand wipes, Cleaning Rod.
About The Author:
Wade Loudamy is a life-long shooter and the innovator of the Legacy Benches. He has been competing since the mid 90's in various rife sports, starting with black powder cartridge silhouette and in the last few years has come full-circle, back to precision bolt guns, shooting 200-1000 yard matches. He holds a Bachelors of Business Administration from Wayland Baptist University, a Masters of Physical Therapy from Texas Tech University and has other post-graduate credentials relating to his Physical Therapy Practice. He resides in Waco, TX with his wife and three teenage boys who are involved in their local church and preparing to attend college. He is supervisor of a Sports and Rehabilitation facility in Waco, Texas.
By E. Wade Loudamy of LegacyShootingProducts.com
In pursuit of long-range extreme accuracy, most of us reload to achieve the best performance from the rifle/ammo, whether for competition, hunting varmints or for pursuing big game. A load that produces sufficient velocity and achieves superb accuracy requires variations of components and how they are assembled. Finding that combination can take time and sometimes a lot of trial and error. Whether new to reloading, or a veteran hand-loader, this article will provide some information that can enhance the process and make more enjoyable the pursuit of those one-hole groups. We will discuss a proven, systematic approach to develop accurate loads, and how to enhance that process by performing some of the reloading tasks at the range or in the field. Loading in the field allows one to more quickly, and with more confidence find that pet load. It is my desire to share some of the things learned over years of trial and error, so other shooters can benefit and enjoy the sport more thoroughly.
This article will not detail the very basic aspects of reloading methods and safety. The author, nor LongRangeHunting.com are responsible for inadequate reloading safety considerations.
Background
The early years of my reloading were met with both satisfaction and frustration with equal frequency trying to find an accurate handload for a rifle. Often a load would perform quite well without much fuss, but just as often it would take several months and many rounds down the barrel to find a load that would shoot accurately. There were so many variables to consider, I didn't know where to start. The choices of bullets, powders, sizing methods, neck tension, OAL, powder charge, were overwhelming. Without any guidance, I would flounder a bit deciding which variables to change first, and in what sequence each should be addressed. It was only with years of trial and error and lots of reading (way before internet blogs) that I found a systematic approach that proved to be effective and greatly reduced the time required to find an accurate load. Loading in the field is the most recent and the most significant enhancement to that process, and has greatly reduced the time required and the number of trips to the range.
So, let us start with what I have found to be the most effective sequence/method for achieving accurate long-range loads and we'll also discuss how to make that even more effective by performing some of the reloading tasks at the range.
Sequence of Load Development: Basics
Component Selection:
We will assume you have a shooting platform capable of delivering sub-minute accuracy, hopefully half-minute or better. We also will take it for granted that you've purchased quality brass, because consistency in thickness of the case mouths, primer pockets and the hardness & temper of the brass is basic to accuracy. Bullets can and do perform differently in some rifles than others, but some bullet makers have a better reputation than others for accuracy. Today's powders and primers are made with better quality than ever before, but there are some things to consider when choosing rifle powders.
Consider that some of the fastest powders can be more sensitive to temperature, so some shooters prefer to sacrifice a bit of velocity for consistency. There are volumes of information one could find on each of the powders within this site, and much debate on which is the best for a given caliber. However, one should consider that accuracy must be repeatable not only from shot-to-shot, but from one shooting session to the next. Some loads can produce great accuracy, but experience 100 fps velocity drop when the temperature drops 60 degrees. When sighter rounds are permitted, such as in a competition, one can make sight adjustments, but when hunting live game, the results can be tragic. So, consider the purpose of your load and make the best choice for powder based on testing under various weather conditions.
Brass Preparation:
Brass is central to accuracy. Without consistency of volume and dimensions, consistent ammo cannot be produced and the results will show up on target. The inside of the primer hole must be de-burred and primer pockets uniformed. The overall length of the case must be trimmed to specs and the inside and outside of the case mouth chamfered. Some shooters weigh each case and cull any outliers. Some like to uniform the thickness of the case neck by reaming inside or outside. Whatever your preference, these steps can be done in one's reloading room where he has everything needed perform those tasks. There is no advantage to doing this portion of the loading process in the field. Primers can be seated at home or in the field with equal ease. For initial testing I use a single primer choice and vary other components quite a bit before doing primer tests. For this reason, I usually head to the range with 50-100 pieces of brass prepared, including primers.
Determine Base-to-Ogive distance:
The next step in the process is to determine the base-to-ogive length. We have to know this to determine the seating depth of the cartridge. Some bullets don't mind "jumping" a bit before engaging the lands while most prefer just touching and some shoot best being "jammed" into the rifling. As a rule, bullets with secant ogives prefer to be touching the lands or even "jammed" a few thousandths, while a bullet with a tangent or hybrid radius is more forgiving regarding seating depth. In any event, start by determining the exact distance from the lands to the base of the cartridge.
While there are many tools to help determine this base-to-ogive length, a very simple method can give a good measurement while requiring few special tools. Start with a full-length-sized case and, without primer or powder (a dummy round), seat a bullet about 2/3 into the case neck. Chamber the round to see if the bolt will fully close without forcing it. Likely it will not, due to the bullet contact with the rifling. Seat the bullet slightly deeper and re-check to see if it will chamber without force. Repeat this until the bolt closes. Now, assemble a new dummy round and adjust the seating plug out about ¼ to ½ turn. When you chamber and remove this round, observe the bullet for marks created by the rifling. Increase the seating depth in small increments, observing the marks on the bullet each time. Using a sharpie to blacken the bullet between trials allows one to easily observe where the bullet contacts the lands of the barrel.
Within a few trials, one can determine the distance from the base of the cartridge to where the bullet just barely touches the rifling, and that is a good start for initial seating depth. There are more sophisticated tools for achieving this dimension, but this method produces a great result also. This method also goes a lot quicker than it takes to describe it on paper. The seating depth will have to be adjusted in the loading process to determine the effect on accuracy, so it's just a starting point.
The only special tool you will need is "comparator" to measure from the base of the cartridge to the ogive. This is a Sinclair hex-type comparator that works quite well, but there are others also. Record this length for future use using dial calipers which should be a standard item on any reloading bench.
Determine Initial Powder Charge:
Now the reloader is ready to start testing for the proper amount of propellant. It should go without saying that several sources should be referenced to determine a safe starting load for the components selected. For first testing, seat the bullet to just touch the lands as described above. That will be altered later to determine the best base-to-ogive length for accuracy, but at this point, we need to establish an acceptable powder charge for the lot of powder we have on hand. Accuracy is indeed observed but the focus is to determine acceptable pressures for further testing. Initial testing is usually done at 100 or 200 yards. One should consider that there is often 3.0 or more grains difference between the starting load and the maximum load listed. If done properly, one loads a few rounds at the staring load, and increases by 0.2 or 0.3 grains until safe pressure signs are confirmed. Now the handloader has an acceptable powder charge for which he can continue development. But this process can require a lot of rounds if loaded at home and subsequently shot at the range. This can be done very efficiently when loading at the range or in the field, with many benefits.
This single step in the reloading process was the impetus for me taking loading tools and components to the range. Too many times I would load four of five increments of a powder charge and go to the range. Seldom would I find a charge that produced optimal pressure/velocity on the first trip. Another trip to the reloading room and back to the range was required to refine the powder charge before I could proceed with further testing. At times, I would reach optimal pressure with one of the lighter charges, but would have loaded rounds in my shooting box that had an additional .5 or .8 grains. These loads would have been dangerously over-pressure if shot in that rifle, but were just loaded at home as part of the process to determine a good powder charge. Since they were high pressure loads, I would have to disassemble them and dump the powder when I returned home. It now makes me cringe to consider the consequence if one of those rounds had been mixed up with the safe loads and fired in that rifle. The results could have been catastrophic.
When working up loads at the range, there are never any rounds loaded that contain a dangerous charge of powder, because the powder is increased and shot one at a time, with pressure signs being observed after each loading. Now, I nearly always do this portion of load development at the range for expediting the process and for the obvious safety benefits.
When done afield, one can shoot an initial 3 shot group and observe pressure signs, then load and shoot one at a time with .2 or .3 increases until he sees the signs are approaching moderate levels. At that point, he can go back to loading 2-3 rounds at each level and paying more attention to accuracy as he still observes for indications of pressure. By doing this at the range/field, one can achieve the same data usually in 10 shots or so. With an optimal powder charge, other variables can then be investigated for the effects on accuracy.
The handloader should be aware that each lot of powder can vary significantly, so the charge weight will have to be re-established for each lot of powder he acquires.
Seating Depth:
We discussed how to find the distance from the base of the cartridge to the lands. During load testing, this dimension can be altered to determine the effects on accuracy and this is the next step of the process. If shooting a new rifle, use fully sized brass. If you have cases that has already been fired in a particular rifle, use neck-sized or partially sized cases for best case-to-chamber fit. Load three to five rounds so the bullet just touches the lands, then each test-load will be varied to determine the rifle/bullet preference for accuracy. Increase the seating depth by .020", .040" and .060" and test each load for accuracy.
Now, after shooting on paper, the rifleman knows the gun/load preference on OAL, but only in gross increments. For the sake of discussion, just say the loads that jumped .040" and .060" were not accurate, but the load that jumped .020" and the one touching the lands were equally accurate. The accuracy buff would then try a load maybe at .010 off the lands to see if that changed the results on paper. While some bench rest shooters claim .002' or .003" can make a difference in accuracy, I have never tried such small incremental changes in seating depth. I know there may be benefits to this attention to detail for those shooting bench rest guns at short ranges, but for long-range, my time and effort will be spent learning to read the wind/conditions better.
The seating depth can also be lengthened to "jam" the bullet into the lands a few thousandths of an inch. However, be aware that when doing this, the bullet can be jammed so tight, that it will not extract if one tries to unload the rifle, and the round must be discharged. Or, the bullet can be pulled out of the case, spilling powder in the action and leaving a bullet in the barrel. Loading ammo in this manner is okay for target shooting when a loaded round is never ejected from the rifle, but is not an option for hunting ammo. (Don't ask me how I know about that scenario.) Also be aware that pressure decreases when the bullet jumps and increases when jammed, so monitor pressure signs if jamming the bullet and adjust the powder charge appropriately.
Refine powder charge: The first time we determined powder charge was to establish a general range for acceptable pressure levels, but now the powder charge can be "tweaked" with the emphasis on accuracy. So, assuming the initial accuracy results were promising, this is the next step taken before other components are considered. If possible, increase the distance to 300 or 400 yards, and shoot another group of about five rounds of the initial load at that distance. Then, by reducing or increasing (assuming the load is not already at max) the powder charge by .2 grain increments, one can find a charge that may perform a bit better. Sometimes these changes are minor at 100 yards, but are much more obvious at longer distances. If one has access to a chronograph, he should record the velocities of each test load.
By recording velocities and accuracy at each level, one begins to recognize patterns of accuracy within a velocity range, referred to as an "accuracy node." Often there are a couple of these accuracy nodes within which a bullet performs best. Some of the science-minded folks argue quite convincingly that the bullet must achieve its best gyroscopic stability at those given velocity ranges, thus the optimal accuracy also.
The other benefit from keeping velocity records is noticed when a new lot of powder is acquired. Each lot of powder can vary quite significantly regarding the powder charge and resultant chamber pressure. A well-known shooter/friend told me recently that a new lot of XXXX powder required an additional two grains in his 284 Winchester to achieve the same velocity as the prior lot. That was astonishing to many of us. He called the manufacturer with the lot numbers of that powder and, after visiting with the technical guys, was told this variance was within the acceptable levels of quality control. The new lot was accurate, but just required two grains more for the same performance. So the charge of any given cartridge/load should be reduced when a new can or keg of powder is obtained. If one knows the velocity he was achieving with the first accurate load, it is most likely that any subsequent lot of a given powder will perform best at that same velocity. Achieving that velocity to reproduce a pet load can be quick with the aid of a chronograph, but certainly is not a mandatory tool.
Revisit Component Selection
Powder: Now, the above sequence assumes all the selected components work well and the desired level of accuracy was achieved through the process. Most of the time, with quality equipment, the rifleman will find a load that performs decently well on the first outing, but not always. So, if the above sequence doesn't produce loads that meet expectations, the next variable to for consideration should be to change powder or primer. We'll discuss powder first.
I know a very accomplished rifleman who was shooting a custom rifle with a Panda action, the most expensive scope, stock, barrel, that on initial testing shot a horribly when testing at 750 yards. He was not able to keep the bullets on a 30" target, but by changing from one powder to another, using the same bullet and other variables, shot a 3-1/2" group at that distance. That's sub ½ minute at 750 yards!! Such drastic differences are not often made just by switching powders, but substantial changes are not uncommon. Obviously, the charge amount must be established again, so go back to step one to work up the appropriate charge of a new powder to be tested.
Primers: It is surprising to many what a difference can be seen simply by changing primers. Powders and primers work together, and the pressure curve/accuracy can be changed favorably sometimes just by changing the primer. Primers can burn hot or mild. They can give a more sustained ignition versus a fast-hot burn. The characteristics of primer ignition is beyond the scope of this article, but just consider that a primer indeed can make a considerable difference in accuracy. There are times I choose to experiment with primer selection before changing powders, because I have a good reason for wanting to use a given powder. Maybe I have an 8-pound keg of one type and use it in several guns. It could be that I appreciate the characteristics of that powder, such as temperature insensitivity, or maybe the second powder choice gives significantly less velocity in the cartridge. A change in primers is sometimes the key to making the selected powder shoot best and getting optimal accuracy. I seldom shoot any cartridge at its max pressure, so it's easy to just load three rounds each with different primers and test them on paper. If loads are already at max pressure, one should decrease the charge by 10% when a new primer is tested.
Bullet: Occasionally one may find that the bullet with the best reputation for accuracy does not shoot as well as desired. Long range accuracy buffs try to find those with a greatest ballistic coefficient (BC) but if it doesn't produce the accuracy expected, another similar-weight bullet may change the game. But, if several bullets of similar weights don't produce the desired accuracy, it's time to select a different bullet weight and try again. This can be a bit frustrating if you are trying to gain the best LR accuracy possible, but sometimes it's worth a step-back-and-think approach. Often, we select the heaviest bullet based on BC and trajectory. Those usually work well with tight twist barrels, but if your gun doesn't like the heavier bullets, it's worth trying a lighter projectile. The wind drift advantage of the heaviest bullet compared to a one a few grains lighter may only be 2-3 inches at 600 or 700 yards, depending on velocity. Considering that a 1 MPH change in a cross wind can often change bullet impact similarly at that distance, one can appreciate the change to a lighter bullet that shoots more accurately.
Load Development In-The-Field
So, as mentioned above, there are many benefits from performing some of the load development in the field or at the range. The methods discussed will describe the what proven to work for the author, whether shooting 200 yards at an established range with permanent, concrete benches or testing at a friend's ranch at targets out to 1,000 yards. Surely there are lots of things one could do to improve what is described herein, but this article is intended as a "primer" regarding field loading and how it has enhanced the process of load development. Hopefully it can benefit many and open the door for more discussion on the subject.
Preparation:
As many steps as possible should be done at the reloading bench where all the tools and gadgets are available. All the case preparation is done at home, including cleaning, sizing and often primers can be seated also. The initial seating depth can be established at home also and usually, one can take the first few rounds completely loaded with the "starting load" charge of the selected powder. Take 50-100 prepared cases to the field for load work-up. There is an equipment list at the end of this article that I try check a couple times before leaving the house. Nothing is quite as frustrating as planning an outing for load testing but leaving key tools or components at home. (Again, don't ask me how I know.)
Powder Charge: Weighing powder in the field or range requires some special attention. This is the most finicky part of the process, but well worth the effort required. Two methods can be used for this.
If using ball powder that meters consistently through a powder hopper, you won't need a powder scale. Simply record the settings on your powder measure that correspond to charge weight while at home. Do this for the starting listed load and the max powder charge and a couple readings between these two figures. Record these while at the convenience of your reloading bench. Then you will only need to increase the powder charge by altering the settings on your hopper when developing loads in the field. When you get back home, convert the setting back to the charge weight in grains and record this in your load book.
If loading extruded powders that don't meter consistently, it is wise to measure every charge. You will need an electronic scale with batteries and a shield to protect the force plate from the wind. This can be elaborately designed or can be as simple as a clear Tupperware dish that sits over the scale. This, in fact, is all I use, but additionally, a small hole is cut in the top through which the powder is trickled up to the desired charge weight. Although a bit inconvenient to use, the overall advantage becomes apparent when your pet load is accomplished in one outing.
You will need a reloading press and dies. The bench rest shooters use special dies that can be used without a press, but most of us are not BR shooters and have standard dies for use in a cam press. There is nothing to say you couldn't use a full-size press, but a smaller press is a bit handier. By fastening the press to a mounting plate, C-clamps can easily be used to clamp the press to a shooting bench. Since all the case sizing has been completed at home, the only need for the press is to seat the bullets after charging the case with powder.
The same fastening arrangement can be done for the powder measure also and this allows one to quickly and easily set up the entire process in the field with just a few clamps.
A portable bench, such as shown here, is a great asset for shooting and load development at long range. The only nearby shooting ranges here allow for 200-yard testing, but on a friend's ranch loads can be tested out to 1000 yards and that is much preferred over the short range. By clamping the press and powder measure to the off-side of the bench one can still shoot normally from the strong-side with plenty room. The Legacy shooting bench shown here is sturdy and very portable and makes long shooting sessions quite comfortable and its many benefits can be seen at the website. (LegacyShootingProducts.com).
This checklist is not intended to be a comprehensive list of everything needed to shoot. The normal things for shooting, such as hearing protection, targets, etc., are not listed here, but only those things additionally that are needed when loading at the range.
Loading-At-The-Range Check List:
Prepared cases, Primers, Bullets, Powder, Hand-Priming tool, Press, Neck chamfer tool, C-clamps, Dies, Shell holder, Powder hopper, Powder scale with wind shield, Calipers, Hex gauge, Load data book, Recording book, Load tray, Sharpie, Pen, Extra 9V battery, Drinks, Hand wipes, Cleaning Rod.
About The Author:
Wade Loudamy is a life-long shooter and the innovator of the Legacy Benches. He has been competing since the mid 90's in various rife sports, starting with black powder cartridge silhouette and in the last few years has come full-circle, back to precision bolt guns, shooting 200-1000 yard matches. He holds a Bachelors of Business Administration from Wayland Baptist University, a Masters of Physical Therapy from Texas Tech University and has other post-graduate credentials relating to his Physical Therapy Practice. He resides in Waco, TX with his wife and three teenage boys who are involved in their local church and preparing to attend college. He is supervisor of a Sports and Rehabilitation facility in Waco, Texas.