Maximizing Range with the Iron-Sighted Rifle
By Paul C. Carter
These days, most hunters utilize scopes to take aim at their quarry. A few of us, due to choice or legal requirement, still do things the old-fashioned way and attempt to take game using iron sights of one configuration or another. There's no question that those who hunt with iron sights must settle for a maximum effective range that's considerably less than that achievable by shooting the same gun topped with a scope. There are two main reasons for this, both related to eyesight. First, the iron-sighted hunter is handicapped by a lack of magnification. Second, iron sights tend to obscure large portions of target animals, especially at longer shooting distances, making precise aiming extremely difficult. While there is no fix for the magnification problem, the effective shooting range of hunters using iron sights can be significantly extended, given thoughtful choices regarding the type of sights one uses, along with an innovative aiming method.

As stated previously, a substantial problem with iron-sighting systems is target visibility. Typically, as the range to target approaches 100 yards, the animal begins to disappear behind the front sight. If the front sight blots out the entire animal, picking an appropriate aiming point (sight picture) becomes an exercise in futility. In addition, certain rear sight configurations can contribute to target coverage. At the same time, obtaining the proper relationship of the front sight to the rear sight (sight alignment) can be problematic, as well, especially as we age.
So, what can be done to improve the confusing visual milieu and extend the effective shooting range of iron-sighted firearms? First and foremost, there are substantial benefits to having a rear sight that is of the so-called "peep" design. Essentially a disc with a circular opening in the middle, the rear peep makes aiming simpler. The eye tends to naturally center the front sight in the opening, leaving only two objects the eye must focus on: the front sight and the target. Of equal value is the fact that the peep sight obscures no portion of the front sight or the target. A peep with a small opening is recommended for precision shooting at longer ranges. The configuration of the front sight is equally important to shooting well. For use in hunting, I recommend red fiber-optic beads. They contrast well against most animals and backdrops, allowing for faster and more accurate target acquisition than that offered by blades or posts. Generally speaking, the smaller the diameter of the bead, the greater the potential for extending one's effective shooting range. The smallest such bead I'm aware of measures 3/32″ in diameter.
Once your chosen rifle is optimally equipped, the remaining task is to find a way to orient the front sight relative to the target animal, so that aiming can be precise. For most people, this will require some adjustments to their shooting routine. First of all, traditional bull's eye type targets aren't going to work because, at ranges in excess of 100 yards, the front bead will obscure too much (if not all) of the target. Instead, for reasons which will become evident, we're going to practice on a life-size facsimile of whatever animal is to be our quarry. Make sure the body dimensions are reasonably accurate, especially the backbone-to brisket measurement. I make my targets out of plywood, using a jigsaw to cut the outline. The plywood can be painted to match the animal's coloring, and pointed stakes can be attached via screws, so the target can be placed wherever needed.
The system I will describe uses the top of the animal's back as the standard aiming reference point, with the goal of delivering bullets to the vertical center of an animal's body. In order to accomplish this task, we need three additional pieces of information: the number of inches the front bead covers at various ranges; the amount of bullet drop that is present at each range; and the animal's backbone-to-belly measurement. Let's address each of these factors separately, before putting all of this together.
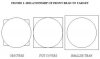
The front bead I recommended may measure 3/32″ in diameter when you hold it in your hand. However, once it's installed on the barrel, it will project (or subtend) a significantly larger circle, depending on how far away from your eye it is located (i.e., the length of the barrel) and the distance to the target. We need to know these "bead covers" measurements at proposed shooting distances, in twenty-five-yard increments. Since target coverage by the bead usually isn't severe enough to interfere with aiming inside of 100 yards, let's start this exercise at 125 yards. A square of plain white paper can be used as a backdrop. As a beginning point, make the square ten inches per side. With the gun in a stable position, place the target exactly 125 yards away, using a laser rangefinder to determine the distance. Sight down the barrel at the white square and note whether the front bead just fits within the square, is significantly smaller than the square, or is larger than the square. Adjust the size of the white square until the bead just touches the sides when looking down the barrel, and note this "bead covers" measurement at 125 yards. You have it right when the bead's relationship to the target looks like the middle picture of Figure 1. The same procedure should be repeated at additional increments of range. Of course, as the distance to target grows, the bead will cover an ever larger circle. Although your "bead covers" measurements may differ, for my muzzleloader the results are: 10 inches @ 125 yards, 13 inches @ 150 yards, 15 inches @ 175 yards, 18 inches @ 200 yards, 20 inches @ 225 yards, and 23 inches @ 250 yards.
The next piece of information to be gathered is the amount of bullet drop that can be expected at each of these distances. As you shall shortly see, in order to provide a useful aiming convention at extended ranges, we need to measure this drop in relation to the top of our front bead. Before advancing on this front, however, we first need to zero the gun. We'll do that at 100 yards. The front bead can be expected to cover about eight inches (give or take) at this distance, which is substantially smaller than the backbone-to-belly dimension of most big-game animals. At 100 yards from a rock-solid position, zero the gun so that the resultant group is centered left to right, and falls slightly high of center, vertically. For this exercise, aiming can be facilitated by selecting an appropriate target. A square piece of white paper, which is an inch or two larger than the projection of the front bead will work nicely. Thus, if the bead covers eight inches at 100 yards, a white square measuring nine or ten inches per side will make it easier to center the front bead while aiming.
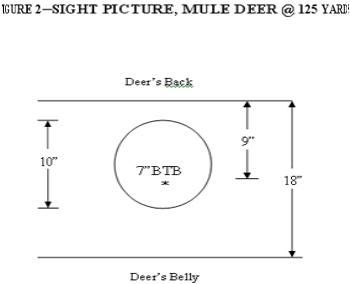
Once the rifle is so zeroed, we're going to determine the amount of bullet drop at each of those ranges where we previously obtained "bead covers" measurements. Once again, plain white paper will suffice as a target. While shooting this time, however, it's important to hold the top of the bead at the top of the paper. Doing so will provide drop values in terms of how far below the top of the bead (BTB) shots fall at each range. As examples, my BTB measurements are: 7 inches BTB @ 125 yards, 9 inches BTB @ 150 yards, 14 inches BTB @ 175 yards, 24 inches BTB @ 200 yards, 33 inches BTB @ 225 yards, and 41 inches BTB @ 250 yards.
The final piece to the puzzle is the animal's back-to-belly measurement. Once we know that, some very simple math will allow us to develop sight pictures at various target ranges. For illustration purposes, let's assume we are to hunt mule deer bucks with an expected backbone-to-belly measurement of eighteen inches. As stated previously, our goal is to place bullets in the vertical center of the buck's body. In this case, that equates to nine inches below the top of the buck's back. Using the data derived for my gun, at 125 yards we know the bead covers 10 inches and bullets hit 7 inches BTB. Therefore, if we were to place the top of the bead at the top of the mule deer buck's back, the bullet should hit 7 inches below the top of the back. Since we want the bullet to strike 9 inches below the top of the back, we must lower our aim so that the top of the bead is positioned 2 inches below the top of the back. The proper sight picture, drawn to scale, can be seen in Figure 2.
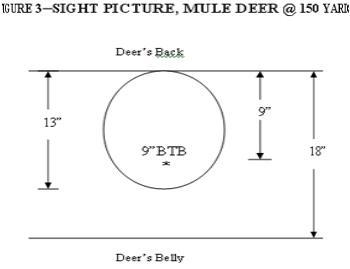
Let's perform the same series of manipulations to arrive at the proper sight picture for a mule deer located 150 yards away. From our previously gathered data, we note that the front bead covers 13 inches at this distance, and bullet drop is 9 inches BTB. In this particular case, bullet drop just happens to fall 9 inches BTB, which is perfect for an eighteen-inch animal. Therefore, the correct sight picture, as shown in Figure 3, would involve placing the top of the bead at the top of the buck's back.
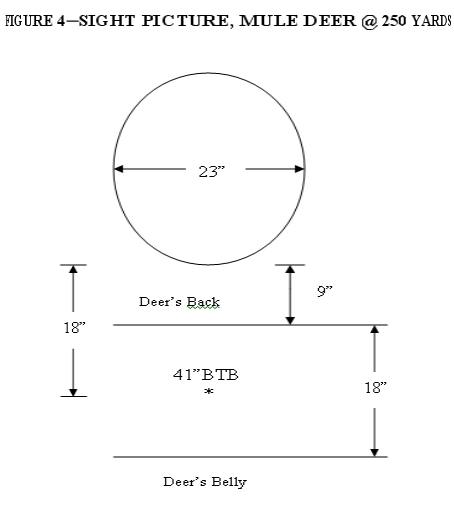
Finally, let's see what sight picture works for a buck located 250 yards distant. At this range, the bead covers 23 inches and bullets hit 41 inches BTB. Stated differently, this means bullets will strike 18 inches below the bottom of the bead (23 + 18 = 41). If the bottom of the bead were held at the top of the back, bullets would hit 9 inches too low. Therefore, we need to elevate aim by 9 inches to hit the vertical center of the buck. The correct sight picture would have 9 inches of space between the bottom of the bead and the top of the buck's back (See Figure 4). Please notice that, in this instance, I described the correct hold in terms of the bottom of the bead instead of the top of the bead. The only reason for doing so is that's it's much easier to estimate 9 inches of space between the animal's back and the bottom of the bead, than it is to estimate 32 inches (23 + 9 = 32) from the top of the bead to the top of the back.
In conclusion, this system uses two distinct and universally available reference points to facilitate aiming: the top of the rifle's front sight and the top of the animal's back. Combined with the known (or estimated) backbone-to-belly dimension of the animal being hunted, a series of range-appropriate sight pictures can be created, allowing precise bullet placement at ranges well beyond those achievable using more conventional aiming techniques. Before I developed this aiming technique, I wouldn't have contemplated shooting at anything beyond 125 yards. After making the aforementioned alterations in my iron sights and adopting the aiming convention I described, I've doubled the effective range of my muzzleloader, routinely placing 90% of my shots in the vital zone of my practice targets at 250 yards! Of course, this improvement didn't happen overnight, but it wouldn't have happened at all if I hadn't altered my equipment and my approach.
This article is a condensed version of a chapter in the author's book: Great Shot! A Guide to Acquiring Shooting Skills for Big-Game Hunters, available at www.paulccarter.com.
By Paul C. Carter
These days, most hunters utilize scopes to take aim at their quarry. A few of us, due to choice or legal requirement, still do things the old-fashioned way and attempt to take game using iron sights of one configuration or another. There's no question that those who hunt with iron sights must settle for a maximum effective range that's considerably less than that achievable by shooting the same gun topped with a scope. There are two main reasons for this, both related to eyesight. First, the iron-sighted hunter is handicapped by a lack of magnification. Second, iron sights tend to obscure large portions of target animals, especially at longer shooting distances, making precise aiming extremely difficult. While there is no fix for the magnification problem, the effective shooting range of hunters using iron sights can be significantly extended, given thoughtful choices regarding the type of sights one uses, along with an innovative aiming method.
As stated previously, a substantial problem with iron-sighting systems is target visibility. Typically, as the range to target approaches 100 yards, the animal begins to disappear behind the front sight. If the front sight blots out the entire animal, picking an appropriate aiming point (sight picture) becomes an exercise in futility. In addition, certain rear sight configurations can contribute to target coverage. At the same time, obtaining the proper relationship of the front sight to the rear sight (sight alignment) can be problematic, as well, especially as we age.
So, what can be done to improve the confusing visual milieu and extend the effective shooting range of iron-sighted firearms? First and foremost, there are substantial benefits to having a rear sight that is of the so-called "peep" design. Essentially a disc with a circular opening in the middle, the rear peep makes aiming simpler. The eye tends to naturally center the front sight in the opening, leaving only two objects the eye must focus on: the front sight and the target. Of equal value is the fact that the peep sight obscures no portion of the front sight or the target. A peep with a small opening is recommended for precision shooting at longer ranges. The configuration of the front sight is equally important to shooting well. For use in hunting, I recommend red fiber-optic beads. They contrast well against most animals and backdrops, allowing for faster and more accurate target acquisition than that offered by blades or posts. Generally speaking, the smaller the diameter of the bead, the greater the potential for extending one's effective shooting range. The smallest such bead I'm aware of measures 3/32″ in diameter.
Once your chosen rifle is optimally equipped, the remaining task is to find a way to orient the front sight relative to the target animal, so that aiming can be precise. For most people, this will require some adjustments to their shooting routine. First of all, traditional bull's eye type targets aren't going to work because, at ranges in excess of 100 yards, the front bead will obscure too much (if not all) of the target. Instead, for reasons which will become evident, we're going to practice on a life-size facsimile of whatever animal is to be our quarry. Make sure the body dimensions are reasonably accurate, especially the backbone-to brisket measurement. I make my targets out of plywood, using a jigsaw to cut the outline. The plywood can be painted to match the animal's coloring, and pointed stakes can be attached via screws, so the target can be placed wherever needed.
The system I will describe uses the top of the animal's back as the standard aiming reference point, with the goal of delivering bullets to the vertical center of an animal's body. In order to accomplish this task, we need three additional pieces of information: the number of inches the front bead covers at various ranges; the amount of bullet drop that is present at each range; and the animal's backbone-to-belly measurement. Let's address each of these factors separately, before putting all of this together.
The front bead I recommended may measure 3/32″ in diameter when you hold it in your hand. However, once it's installed on the barrel, it will project (or subtend) a significantly larger circle, depending on how far away from your eye it is located (i.e., the length of the barrel) and the distance to the target. We need to know these "bead covers" measurements at proposed shooting distances, in twenty-five-yard increments. Since target coverage by the bead usually isn't severe enough to interfere with aiming inside of 100 yards, let's start this exercise at 125 yards. A square of plain white paper can be used as a backdrop. As a beginning point, make the square ten inches per side. With the gun in a stable position, place the target exactly 125 yards away, using a laser rangefinder to determine the distance. Sight down the barrel at the white square and note whether the front bead just fits within the square, is significantly smaller than the square, or is larger than the square. Adjust the size of the white square until the bead just touches the sides when looking down the barrel, and note this "bead covers" measurement at 125 yards. You have it right when the bead's relationship to the target looks like the middle picture of Figure 1. The same procedure should be repeated at additional increments of range. Of course, as the distance to target grows, the bead will cover an ever larger circle. Although your "bead covers" measurements may differ, for my muzzleloader the results are: 10 inches @ 125 yards, 13 inches @ 150 yards, 15 inches @ 175 yards, 18 inches @ 200 yards, 20 inches @ 225 yards, and 23 inches @ 250 yards.
The next piece of information to be gathered is the amount of bullet drop that can be expected at each of these distances. As you shall shortly see, in order to provide a useful aiming convention at extended ranges, we need to measure this drop in relation to the top of our front bead. Before advancing on this front, however, we first need to zero the gun. We'll do that at 100 yards. The front bead can be expected to cover about eight inches (give or take) at this distance, which is substantially smaller than the backbone-to-belly dimension of most big-game animals. At 100 yards from a rock-solid position, zero the gun so that the resultant group is centered left to right, and falls slightly high of center, vertically. For this exercise, aiming can be facilitated by selecting an appropriate target. A square piece of white paper, which is an inch or two larger than the projection of the front bead will work nicely. Thus, if the bead covers eight inches at 100 yards, a white square measuring nine or ten inches per side will make it easier to center the front bead while aiming.
Once the rifle is so zeroed, we're going to determine the amount of bullet drop at each of those ranges where we previously obtained "bead covers" measurements. Once again, plain white paper will suffice as a target. While shooting this time, however, it's important to hold the top of the bead at the top of the paper. Doing so will provide drop values in terms of how far below the top of the bead (BTB) shots fall at each range. As examples, my BTB measurements are: 7 inches BTB @ 125 yards, 9 inches BTB @ 150 yards, 14 inches BTB @ 175 yards, 24 inches BTB @ 200 yards, 33 inches BTB @ 225 yards, and 41 inches BTB @ 250 yards.
The final piece to the puzzle is the animal's back-to-belly measurement. Once we know that, some very simple math will allow us to develop sight pictures at various target ranges. For illustration purposes, let's assume we are to hunt mule deer bucks with an expected backbone-to-belly measurement of eighteen inches. As stated previously, our goal is to place bullets in the vertical center of the buck's body. In this case, that equates to nine inches below the top of the buck's back. Using the data derived for my gun, at 125 yards we know the bead covers 10 inches and bullets hit 7 inches BTB. Therefore, if we were to place the top of the bead at the top of the mule deer buck's back, the bullet should hit 7 inches below the top of the back. Since we want the bullet to strike 9 inches below the top of the back, we must lower our aim so that the top of the bead is positioned 2 inches below the top of the back. The proper sight picture, drawn to scale, can be seen in Figure 2.
Let's perform the same series of manipulations to arrive at the proper sight picture for a mule deer located 150 yards away. From our previously gathered data, we note that the front bead covers 13 inches at this distance, and bullet drop is 9 inches BTB. In this particular case, bullet drop just happens to fall 9 inches BTB, which is perfect for an eighteen-inch animal. Therefore, the correct sight picture, as shown in Figure 3, would involve placing the top of the bead at the top of the buck's back.
Finally, let's see what sight picture works for a buck located 250 yards distant. At this range, the bead covers 23 inches and bullets hit 41 inches BTB. Stated differently, this means bullets will strike 18 inches below the bottom of the bead (23 + 18 = 41). If the bottom of the bead were held at the top of the back, bullets would hit 9 inches too low. Therefore, we need to elevate aim by 9 inches to hit the vertical center of the buck. The correct sight picture would have 9 inches of space between the bottom of the bead and the top of the buck's back (See Figure 4). Please notice that, in this instance, I described the correct hold in terms of the bottom of the bead instead of the top of the bead. The only reason for doing so is that's it's much easier to estimate 9 inches of space between the animal's back and the bottom of the bead, than it is to estimate 32 inches (23 + 9 = 32) from the top of the bead to the top of the back.
In conclusion, this system uses two distinct and universally available reference points to facilitate aiming: the top of the rifle's front sight and the top of the animal's back. Combined with the known (or estimated) backbone-to-belly dimension of the animal being hunted, a series of range-appropriate sight pictures can be created, allowing precise bullet placement at ranges well beyond those achievable using more conventional aiming techniques. Before I developed this aiming technique, I wouldn't have contemplated shooting at anything beyond 125 yards. After making the aforementioned alterations in my iron sights and adopting the aiming convention I described, I've doubled the effective range of my muzzleloader, routinely placing 90% of my shots in the vital zone of my practice targets at 250 yards! Of course, this improvement didn't happen overnight, but it wouldn't have happened at all if I hadn't altered my equipment and my approach.
This article is a condensed version of a chapter in the author's book: Great Shot! A Guide to Acquiring Shooting Skills for Big-Game Hunters, available at www.paulccarter.com.