Long Range Hunting Ambush
By Shawn Carlock
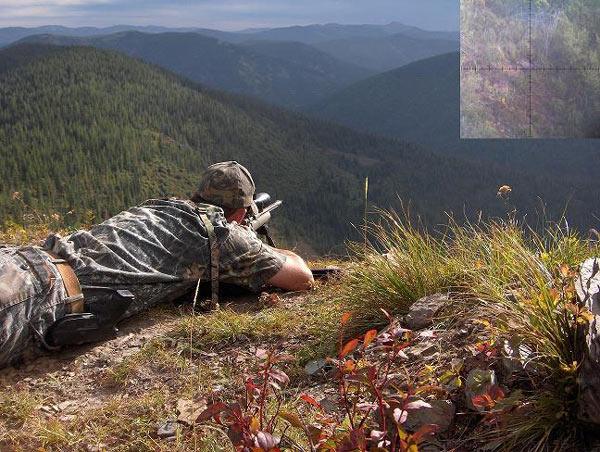
In recent years long range hunting has come into style. Remington was the first company to recognize this market and introduced the Sendero line. While the coupling of flat shooting high energy rounds and precision rifles is common place today, I find that many people are lacking in techniques for their use. The most common use of the purpose-built long range hunting rifle today seems to be, spot it, range it and shoot it. This style of hunting seems to be most common from a vehicle or ATV. Here in the northwest the long range hunting rifle has given the rifleman a way to hunt areas that were effectively un-huntable before.
In the early 90's I hunted elk and whitetail deer in the Clearwater region of northern Idaho. It was about that time I discovered several locations where I could catch elk first thing in the morning out in open feeding areas. The second thing I discovered was that while I was a very good shot, I was not a long range rifleman. I quickly learned that I could not judge distance well enough for the task at hand and was sorely lacking in the proper equipment and techniques for my new hunting areas. After a very disappointing first year in these new areas I decided to do whatever I had to, to learn to hunt them effectively.
My first year attempt at longer range hunting was unique in my learning curve. I had in the summer taught myself how to range elk and deer based on their relative size using the scope reticule and the variable power selector ring. Having always been a number cruncher it occurred to me that one could also get a more precise hold over using the reticule and the power selector ring. So during the early part of elk season I spot a line of elk filtering out of a draw. I ranged the first cow using the reticule at max power and determine that the distance is about 450 yards. I looked on my spec sheet on the side of the scope and turn the power down to 5x, hold the tip of the fat part of the crosshair right behind the shoulder and squeeze off a shot. The .338 250 grain Partition impacted the elk within 4 or 5 inches of the point of aim. So now I am the king of long range shooting!
Late buck season a month later teaches me some humbling lessons. I miss no less than three 130 – 145 class bucks in as many days. The distances run from 300 to 450 yards. Now I doubt myself and start to chalk up the earlier elk shot to luck. I learn about scopes that shift their point of impact when the power selector ring is changed. I learn about elevation impact differences shooting a Browning BAR with a bipod. I also discover how your summer zero is affected when the temperature has dropped 60 degrees. I vow to be dialed in for next season.
It is the spring of my 3rd year that a timely event happened to me. I was selected from the Emergency Response Team at the county where I worked to attend scout / sniper school. I sold my beloved BAR the day I got back and purchased a Remington Sendero in 7mm Remington Mag. I topped the rifle with a Leupold 3.5-10x mil-dot tactical scope and was off to the races. That summer I also acquired a Ranging 1000 range finder. Now at the time I was absolutely setup. I practiced through the summer, and that fall using a combination of mil-dot ranging and the range finder anchored an elk at 625 yards with 1 shot.
Since those early days I have changed equipment, mostly upgrades in existing equipment. Laser range finders, better optics, more accurate rifles etc, but the base equipment stayed the same. The biggest change over the past 10 years of long range hunting for me has been the perfection of the long range ambush.
In the early years I used the techniques used by many today. Simply put, move through an area glassing for the long range game, spot it, setup and shoot. I found some serious disadvantages to this:
I now conduct most of my long range hunting by long range ambush. Here is how I would start the shooter that is new to long range hunting.
First and foremost analyze your equipment. Remington, Winchester, Savage, and Weatherby to name a few, all produce a long range hunting rifle.
Now we need to mount the appropriate optics for our needs. What optics a person needs for long range shooting is a hotly contested issue. Some feel that the long range shooter is best served with an optic of massive power say a 5.5-22x and the largest objective you can get, say 50-56 mm. I will lean toward the high magnification scope for extreme range shooting, but I believe that most shooters are better served by a different optic setup. My preference is a scope of variable power, with a low end of 3x or 4x and a top power of 10x-15x. If you're low power is say 6x or 8x and you jump the "big one" at close range on the way to your ambush spot you can lose the animal from not being able to get on it. I learned this to the hard way. The size of the objective is also an issue, if you choose a larger objective for its' light gathering capabilities that is great, but be sure to get an adjustable cheek piece to insure proper cheek weld. The last thing to choose is how you want to compensate for hold over correction.
Do you want to dial up a target knob or use a reticule hold over such as mil-dots? Calibrated reticules such as the one in a Shepard scope work very well if the rifle / load combo matches the scope calibration. Nominally graduated scopes such as the Horus Vision, Mil-Dot or the Nightforce NXS with NPR2 reticule work very well and are much more versatile. My personal preference is using the target knobs to dial a direct hold on the target. Using this method allows easy condition adjustment and a direct hold point. I also prefer a fairly course adjustment on the knobs. Knobs with 1 MOA adjustment for elevation and ½ MOA for windage are very fast and accurate for shooting out to 600 yards. Distances past 600 I prefer ¼ MOA clicks.
Now I take my new LR setup and head to the range. It is very important not to skip this step. I know people who have purchased a LR rifle, zeroed at 100 yards, ran some computer generated drop figures and headed to the field hunting. I just can't even count the things that can go wrong between the two steps. Get some drop figures to get you close I use the exbal program and have had great results with it. Now zero your rifle at the distance you want to zero at. I like 200 yards and have run the drop chart with this zero in mind. Once you have established a zero at say 200 yards, place a target at 300 yards look to your drop chart and it will tell you to come up a certain distance in minutes of angle (if your program only gives inches you will have to convert) dial the elevation knob of your scope up the desired minutes of angle and shoot a group. Take notes (I keep a small spiral bound note book for this) about where the impact was and the size of group. I put this information right under the notes about the conditions I am shooting in. I repeat this at every 100 yards out to the distance I intend to shoot. Just because you zero for 200 then move out to 300 and the drop chart is right doesn't mean that it will be on at 500 yards. Shoot all distances you intend to shoot.
Home | Next Page>
By Shawn Carlock
In recent years long range hunting has come into style. Remington was the first company to recognize this market and introduced the Sendero line. While the coupling of flat shooting high energy rounds and precision rifles is common place today, I find that many people are lacking in techniques for their use. The most common use of the purpose-built long range hunting rifle today seems to be, spot it, range it and shoot it. This style of hunting seems to be most common from a vehicle or ATV. Here in the northwest the long range hunting rifle has given the rifleman a way to hunt areas that were effectively un-huntable before.
In the early 90's I hunted elk and whitetail deer in the Clearwater region of northern Idaho. It was about that time I discovered several locations where I could catch elk first thing in the morning out in open feeding areas. The second thing I discovered was that while I was a very good shot, I was not a long range rifleman. I quickly learned that I could not judge distance well enough for the task at hand and was sorely lacking in the proper equipment and techniques for my new hunting areas. After a very disappointing first year in these new areas I decided to do whatever I had to, to learn to hunt them effectively.
My first year attempt at longer range hunting was unique in my learning curve. I had in the summer taught myself how to range elk and deer based on their relative size using the scope reticule and the variable power selector ring. Having always been a number cruncher it occurred to me that one could also get a more precise hold over using the reticule and the power selector ring. So during the early part of elk season I spot a line of elk filtering out of a draw. I ranged the first cow using the reticule at max power and determine that the distance is about 450 yards. I looked on my spec sheet on the side of the scope and turn the power down to 5x, hold the tip of the fat part of the crosshair right behind the shoulder and squeeze off a shot. The .338 250 grain Partition impacted the elk within 4 or 5 inches of the point of aim. So now I am the king of long range shooting!
Late buck season a month later teaches me some humbling lessons. I miss no less than three 130 – 145 class bucks in as many days. The distances run from 300 to 450 yards. Now I doubt myself and start to chalk up the earlier elk shot to luck. I learn about scopes that shift their point of impact when the power selector ring is changed. I learn about elevation impact differences shooting a Browning BAR with a bipod. I also discover how your summer zero is affected when the temperature has dropped 60 degrees. I vow to be dialed in for next season.
It is the spring of my 3rd year that a timely event happened to me. I was selected from the Emergency Response Team at the county where I worked to attend scout / sniper school. I sold my beloved BAR the day I got back and purchased a Remington Sendero in 7mm Remington Mag. I topped the rifle with a Leupold 3.5-10x mil-dot tactical scope and was off to the races. That summer I also acquired a Ranging 1000 range finder. Now at the time I was absolutely setup. I practiced through the summer, and that fall using a combination of mil-dot ranging and the range finder anchored an elk at 625 yards with 1 shot.
Since those early days I have changed equipment, mostly upgrades in existing equipment. Laser range finders, better optics, more accurate rifles etc, but the base equipment stayed the same. The biggest change over the past 10 years of long range hunting for me has been the perfection of the long range ambush.
In the early years I used the techniques used by many today. Simply put, move through an area glassing for the long range game, spot it, setup and shoot. I found some serious disadvantages to this:
- The amount of additional gear and weight that had to be carried.
- Distinct lack of good shooting position when you really needed it.
- Time to prepare and make the shot while it was available.
- Tendency to gravitate to very open areas despite poor game numbers or sign in the area.
I now conduct most of my long range hunting by long range ambush. Here is how I would start the shooter that is new to long range hunting.
First and foremost analyze your equipment. Remington, Winchester, Savage, and Weatherby to name a few, all produce a long range hunting rifle.
Now we need to mount the appropriate optics for our needs. What optics a person needs for long range shooting is a hotly contested issue. Some feel that the long range shooter is best served with an optic of massive power say a 5.5-22x and the largest objective you can get, say 50-56 mm. I will lean toward the high magnification scope for extreme range shooting, but I believe that most shooters are better served by a different optic setup. My preference is a scope of variable power, with a low end of 3x or 4x and a top power of 10x-15x. If you're low power is say 6x or 8x and you jump the "big one" at close range on the way to your ambush spot you can lose the animal from not being able to get on it. I learned this to the hard way. The size of the objective is also an issue, if you choose a larger objective for its' light gathering capabilities that is great, but be sure to get an adjustable cheek piece to insure proper cheek weld. The last thing to choose is how you want to compensate for hold over correction.
Do you want to dial up a target knob or use a reticule hold over such as mil-dots? Calibrated reticules such as the one in a Shepard scope work very well if the rifle / load combo matches the scope calibration. Nominally graduated scopes such as the Horus Vision, Mil-Dot or the Nightforce NXS with NPR2 reticule work very well and are much more versatile. My personal preference is using the target knobs to dial a direct hold on the target. Using this method allows easy condition adjustment and a direct hold point. I also prefer a fairly course adjustment on the knobs. Knobs with 1 MOA adjustment for elevation and ½ MOA for windage are very fast and accurate for shooting out to 600 yards. Distances past 600 I prefer ¼ MOA clicks.
Now I take my new LR setup and head to the range. It is very important not to skip this step. I know people who have purchased a LR rifle, zeroed at 100 yards, ran some computer generated drop figures and headed to the field hunting. I just can't even count the things that can go wrong between the two steps. Get some drop figures to get you close I use the exbal program and have had great results with it. Now zero your rifle at the distance you want to zero at. I like 200 yards and have run the drop chart with this zero in mind. Once you have established a zero at say 200 yards, place a target at 300 yards look to your drop chart and it will tell you to come up a certain distance in minutes of angle (if your program only gives inches you will have to convert) dial the elevation knob of your scope up the desired minutes of angle and shoot a group. Take notes (I keep a small spiral bound note book for this) about where the impact was and the size of group. I put this information right under the notes about the conditions I am shooting in. I repeat this at every 100 yards out to the distance I intend to shoot. Just because you zero for 200 then move out to 300 and the drop chart is right doesn't mean that it will be on at 500 yards. Shoot all distances you intend to shoot.
Home | Next Page>
Long Range Hunting Ambush
If you and your equipment can only shoot one foot at 500 yards you have no business looking at shots beyond that. Now let's say that you and your rifle can shoot a group in the range of 5 inches at 500 yards. If I determine that this is my maximum range, this will likely be the last group I shoot. I have now got my drop figures and an idea of my rifles accuracy at a given distance. Now I go to places during the off season where I can shoot up / down hill, across canyons with wind and thermals etc. I shoot these field shots at a 10" disk. My only concern is that I hit it the first shot. Long range hunting is not all about equipment and small group size. It is by far mostly about reading conditions and being able to shoot in them. My criteria for a taking a shot is that it have a high probability for a first round hit. Some people think that long range shooting is unethical. I don't see long range shooting of big game animals any differently than the hunter shooting at a 100 yard running whitetail in a brushy bottom. For some people it is a high probability shot and others it is a high probability of making noise and at best wounding a game animal.
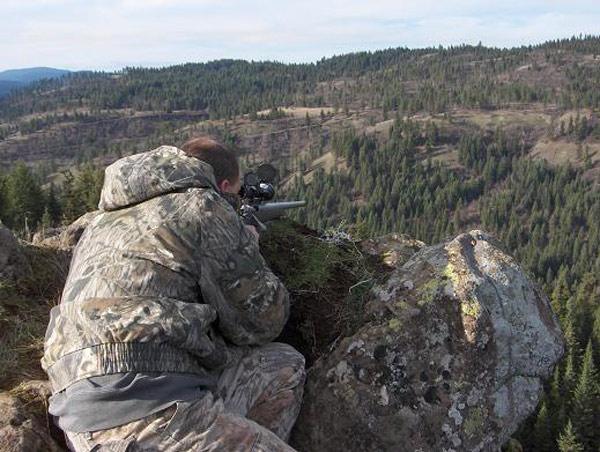
Now with our rifle and scope all dialed in for the long range hunting areas we just need to locate them. I start by looking an aerial photos and topographic maps for a piece of high ground that looks across to or down on a terrain feature I like. Saddles, trails through brush patches between feeding and bedding areas, water sources and travel funnels are the kind of areas I want to over look. When I locate a likely area I look for a location that gives the best shooting advantages. I look for sun direction during the time I intend to hunt it, uphill / down hill issues, I prefer to shoot up or down a canyon instead of across it, I look for access from my shooting position to the target area, I look for terrain features that cause swirling wind conditions and most importantly I look a good route to and from my shooting location. My favorite is to find a spot where I can sneak up the back side of a ridge and look over a spot that is impossible to hunt through. When I'm done I can slip out the way I came in.
Once I have mapped out some potential locations I go to them with my day pack and long range tools. I take my range finder, binoculars, spotting scope, paper and a pen. I follow my approach route in and find a suitable firing position. I bust out the range finder to check some distances to make sure I have not picked a location that is beyond my abilities. Once satisfied with the location of my firing position I make a range card.
The range card is a key tool in the long range ambush. I use a graduated arc military style range card. On my range card I have, the location of my firing position, major land marks, trail intersections and a center focal point to base the card off of. The focal point needs to be something that you and / or your partner can identify quickly and easily. It helps if the focal point is located somewhere in the center of the ambush area. Once this is done, yardages are assigned to the plot points on the card and any special shooting conditions (uphill / downhill etc.). I also divide the card into sections based on obvious terrain features. This allows you to work a section over and your partner another without overlapping. Range cards allow the shooter to show up to a site and start to try to locate game. Once the game is located you may have a small window of opportunity to engage the animal. With the card you simply locate, dial elevation, adjust for wind etc and engage, without moving from behind the rifle. Range cards are a huge time saver. I also keep notes about shooting conditions on the back side of the card for future use.
Now the time has rolled around to hunt our site. We have selected a time to hunt say from 12:00 until dark. We sneak into our site undetected by using our predetermined travel route. We setup our now rather extensive pile of equipment, rifle, spotting scope, rear bag, wind speed meter, and range card. I have found a few other things that can be really helpful, a rubber padded tree stand step for shooting up at a steep angle, a tree stand rain cover to keep rain off of optics and myself, and a book in case I have trouble staying focused.
Long Range Hunting Ambush
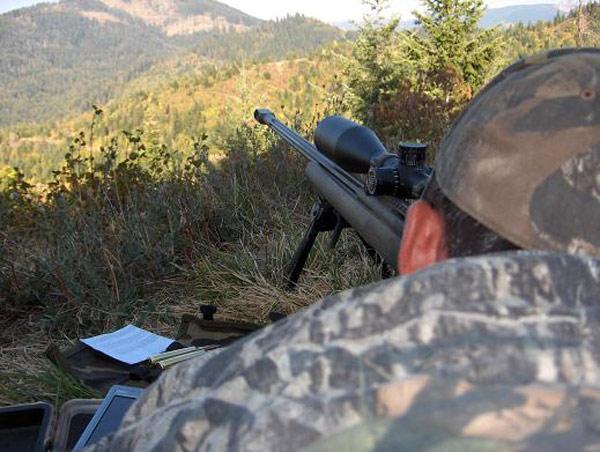
Now that we have setup with a minimal amount of noise we are ready to get started. I first start by a quick scan with the naked eye for movement or colors that don't fit. Next I break out the binoculars and will spend the vast majority of my time behind these. I start on the travel routes first trails, saddles, and ridge tops I can see. Next I move to a section on my range card and grid search it. If I locate any odd shape or detect an animal I switch to the spotting scope for confirmation. If my search has not turned up anything at this point I will get behind the spotting scope and start to work over areas for bedded animals. I am looking for a small part of the animal at this point. The beauty of locating one on the ground is you have all day to setup for your shot and then wait for a good target presentation.
When I have located a target I first get behind the rifle. Next determine the range from my range card and laser it again if I have time. I consider up/down angles and dial in my elevation adjustment. Next I make a determination of the wind speed and direction and pick a hold off point for this. I prefer not to dial in for wind, if I feel like that the wind is strong enough that I should dial it in instead of hold off I would pass on the shot. Much like wind I hold the same criteria for moving game. I prefer to get the animal to stop, but if I choose to take a moving shot I will only take it at the distance where a small hold off works. Remember that a flat fast shooting rifle will take .4 of a second to travel 400 yards. During .4 seconds at 400 yards an animal walking 3 mph will need around 22" of lead. That means that the animal will move 22" after you pull the trigger. In steep country one step after the firing pin drops could also mean a 22" drop down in the animal's position resulting in a miss or even worse a wounded animal. I just don't take long range moving big game shots.
Now that I have corrected for elevation and windage I take the shot. Now is where it pays to have a hunting partner. If you have a spotter he can call your hit and direct an additional shot if needed. If you don't have a spotter you are pretty much obligated to hike over to the shot location to assess the possible hit. A hunting partner and a pair of hand held radios make this task much easier. Also be smart about your shot, if an animal is feeding along a hillside or moving down a trail, take you shot in a spot that is easier to spot your hit and track from. Remember the long range ambush is used to give the hunter, the ability to pick the shot, the presentation, and use his ballistic advantage.
Proper setup and execution of the long range ambush will allow you to areas that were not huntable from within and allow you a whole new way to look at your hunting areas.
Join the discussion of this article with the author HERE at the Article Discussion Forum.
Shawn Carlock is a veteran law enforcement sniper and the current USPSA national precision rifle champion. He runs his business building custom rifles and conducting precision rifle training for civilian and law enforcement interests.
Defensive Edge - Long Range Hunting Videos
