Leveling the Scope Reticle for Long Range Rifles
By Bruce Winker
Ask five different shooters how to level a rifle scope reticle and you'll probably get five very different answers. Anyone who has installed a rifle scope has given this some thought and developed a process. Are all these methods just different ways of getting to the same result? Are there any special considerations for long range shooting?
This article looks at the unique requirements for leveling the reticle for long-range shooting. Different methods of leveling a reticle are compared and typical alignment errors are given for each method.
The long range rifle should be set up to eliminate or minimize all systematic aiming errors, such as canting errors. Canting errors occur when the rifle is zeroed at one elevation and then the elevation is changed to increase the range. Canting errors cause the bullet impact point to shift left or right as the elevation is increased above the rifle zero. There are two sources of canting errors, reticle alignment error and tilting the rifle during the shot.
Accuracy at long range requires that both of these systematic aiming errors be eliminated.
Through both experience and analysis the author has learned that not all reticle alignment methods give the same results. Some of the widely accepted reticle alignment methods can result in significant canting errors in long range shooting. To eliminate canting errors the vertical turret must be aligned so that vertical turret axis passes through the center of the rifle bore, as shown in Figure 1.
In the following discussion, we assume the scope reticle correctly aligned to the turret axes (i.e., no misalignment of the reticle during scope assembly), which is usually the case for all but the lowest quality scopes. Therefore, we could also say that the reticle must be aligned so that the vertical reticle axis passes through the center of the rifle bore. The issue of reticle misalignment inside the scope is discussed at the end of this article.
All rifle barrels have a measurable curvature of the rifle bore. The curvature may be small, but it's there. In most rifles, and especially long range rifles with thick barrel profiles, the last few inches of the bore near the muzzle determine the point of impact. If possible, the reticle should be aligned to the rifle bore near the muzzle, not near the breech. While that is actually quite difficult to do, some alignment methods come closer than others.
If the reticle is not aligned to the rifle bore, then increasing reticle elevation will result in a small change in windage as well. The longer the target range, the larger the elevation angle needed to hit the target. Depending on the method used to align the reticle, the alignment error can be 4 degrees or more. The resulting windage aiming error can be 2 feet or more at long range.
In addition, canting of the rifle during the shot should be avoided by using an anti-cant indicator attached to the scope tube. The anti-cant indicator should be aligned so that it is level when the reticle is level. For long range shooting, this entire reticle alignment process (rifle/scope/anti-cant indictor) should be done with an error of less than +/-2 degrees. Recall that the big hand of the clock rotates 6 degrees for each minute, and you will realize how small this alignment tolerance is. There are several ways that reticle alignment errors can sneak in, and they can cause aiming errors of several feet in long range shots.
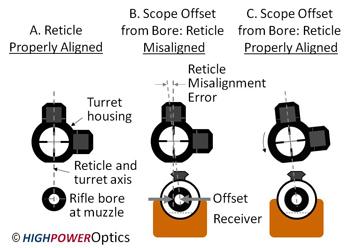
Figure 1. A: Proper reticle alignment to eliminate canting errors in long range shooting. Vertical reticle axis passes through the center of the rifle bore at the muzzle. B: Scope is offset to the left of the receiver. Even though the scope is aligned parallel to the receiver, the reticle is misaligned. C: The scope must be rotated to the left for proper reticle alignment.
One of the most common rifle misalignment problems is a horizontal offset between the scope tube axis and the rifle bore. This type of misalignment is common with most production rifles. It is caused by bent barrels, barrels mounted crooked in the receiver, and rail-mounted rings. Even a small curvature in the rifle bore can cause a significant offset at the receiver between the bore axis and the scope tube axis.
Weaver or Picatinny rings often cause horizontal offsets. These rail mounts are usually cut oversize to fit on non-standard rails. When the mount is tightened, the ring ends up shifting to the left or right of the rail. This happens with nearly all Weaver or Picatinny rings. One exception is Warne steel rings, which are split vertically and therefore mount with the scope tube always centered on the rail.
Figure 1 illustrates how a horizontal offset effects reticle alignment. Aligning the reticle to the rifle bore is the most accurate optical method (Figure 1.A), and eliminates canting errors due to reticle alignment. In Figure 1.B, the turret housing and receiver are parallel, but the scope is horizontally offset from the rifle bore, so the vertical reticle axis doesn't pass through the bore. The scope must be rotated, as in Figure 1.C, to get proper alignment between the reticle and the rifle bore. The correctly aligned scope in Figure 1.C would appear misaligned to many shooters.
Now we summarize the various methods used for reticle alignment. Commonly used reticle alignment methods can be divided into five basic groups.
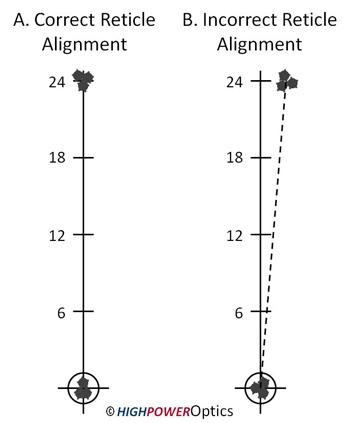
Figure 2. Live fire reticle alignment method. A: The reticle is rotated until the point of impact falls on a plumb (vertical) line above the zero. B: The reticle is misaligned, producing a canting error at 100 yds. The reticle needs to be rotated counterclockwise.
1. Live fire method. This method takes a lot of time and a fair amount of ammunition, but is the most accurate reticle alignment method. First the rifle is leveled and zeroed. Then a target with a long plumb line (at least 16 inches, but preferably 32 inches) is set up at a fixed range, say 100 yds. A group of shots is fired while aiming at the bottom of the plumb line with the scope elevation set to zero.
Then the elevation is increased by 15-30 MOA and another group is fired while aiming at the same target position (bottom of the plumb line). It is important that reticle be level while firing this group. The second group should fall on the plumb line, 15-30 MOA directly above the first group (see Figure 2). If the second group falls to the left or right of the plumb line, the scope must be rotated clockwise or counterclockwise, respectively. This process of firing a group and adjusting the scope is repeated until the group falls directly on the plumb line passing through the rifle zero point of impact.
This method results in almost perfect reticle alignment. The only errors are due to inaccuracy of the spirit levels used to level the rifle while shooting, in determining the center of the group. The potentially large amount of ammunition, time and discipline required to perform this process properly warrants using an optical method.
2. Boresight method. This method aligns the reticle to the bore of the rifle and is the most accurate optical method. First, it involves horizontal boresight alignment of the scope tube axis to the rifle bore axis, followed by alignment of the reticle to the rifle bore. This method is difficult to do without an alignment tool, however. Two alignment tools are now available that allow accurate alignment of the reticle to the rifle bore. The EXD Alignment Tool is sold by Brownells ($46), and the RingTrue Alignment Tool is sold by High Power Optics ($26). Both tools include accurate spirit levels that allow alignment of an anti-cant indicator after the reticle is aligned. The boresight alignment method is described in more detail below.
This reticle alignment method is very accurate (less than +/-2 degree of error). Small reticle alignment errors can result from a bent barrel or a barrel being mounted crooked in the receiver, which causes a small offset of scope axis from the bore at the muzzle. Compared to other methods, however, this method is less sensitive to these rifle alignment problems.
3. Reticle alignment to rifle bore. This method is the same as the method 2 above, except that the horizontal boresight alignment step is omitted. Like the full boresight method, this method requires either the EXD or RingTrue Alignment Tool.
Accuracy is good for all but the longest shots (greater than about 800 yds). Reticle alignment errors do not exceed +/-3 degrees. Figure 3 illustrates why boresight alignment is so important. Even though the objective end of the scope is aligned to the rifle bore, there may still be a reticle alignment error due to the scope tube axis not being horizontally parallel to the rifle bore. When this occurs the objective can be offset from the bore, even though the elevation turret is centered over the receiver. The offset of the objective causes a small reticle misalignment error. Correcting the boresight misalignment eliminates this source of error in the reticle alignment process.
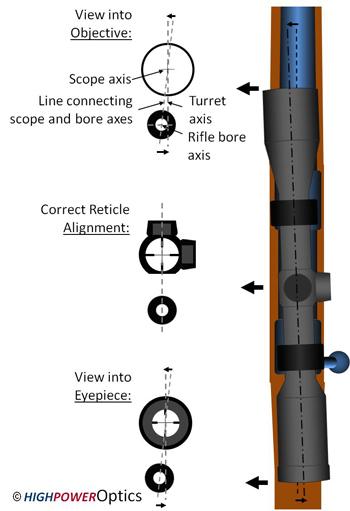
Figure 3. Effect of horizontal boresight mis-alignment on reticle alignment (exaggerated for illustration). In this illustration, the turret housing is centered over the rifle bore and the reticle is properly aligned. The angular misalignment causes a horizontal offset between the ends of the scope and the rifle bore. This apparent offset results in a reticle alignment error using Methods 2-4. Correcting the boresight misalignment eliminates this source of error in the reticle alignment process.
4. Reticle alignment to the rear of the receiver. This method is easy to do by looking into the eyepiece and rotating the scope until the reticle appears to point down toward the center of the receiver. B-Square sells the Cross Hair Reticle Alignment Tool ($10) which is a flat strip of clear acrylic sheet that is bent at a right angle. One end slips into the rear receiver of a bolt action rifle, while the other end has a cross hair printed on it. The user looks through the acrylic sheet and aligns the cross hair parallel to the reticle in the scope. This device only works with bolt actions and does not fit a wide variety of rifles and scopes well. Parabola sells the Reticle-Tru alignment tool ($65) which attaches to the eyepiece. It has a large arrow that is rotated to point toward the center of the receiver, and a thin slot that allows alignment of the reticle to the receiver.
Accuracy is adequate for short-medium range, but can produce significant canting errors for long range shots. Because the alignment is done at the eyepiece end of the scope, rather than the objective end, this method is more sensitive to boresight misalignment errors than the previous methods. It is also more sensitive to the barrel being mounted crooked in the receiver, which is a common problem in production and semi-custom rifles (whenever the action is not trued). A spirit level or plumb line is still required to level the reticle when aligning an anti-cant indicator.
5. Scope alignment to the top of receiver. This is probably the most common optical alignment method. Several variations exist and at least one of them is familiar to most shooters. This method usually involves the use of spirit levels of one type or another, some of which can be quite expensive. A level is placed on the scope base (or rail), or some other flat surface on the top of the receiver, and the rifle is rotated until the receiver is level. Then a spirit level is placed on the rifle scope turret cap and the scope is rotated until the turret cap is level.
After leveling the receiver or base, some shooters use a plumb line 20 or more feet in front of the rifle to align the scope reticle. Another variation is to use a metal ruler to align the bottom of the turret housing parallel to the scope base (or rail). The Segway Reticle Leveler, sold by Straight Shot ($20), is a handy tool that has bold horizontal black lines and attaches to the receiver (usually the base or rail) using a rubber band. It enables the alignment of the reticle by looking into the eyepiece and the leveler at the same time.
All of the variations of Method 5 do essentially the same thing and produce equivalent results. Accuracy is adequate for short range, but this type of method can have large canting errors that make it a poor choice for long range shooting. This method is sensitive to many boresight alignment problems. Canting errors occur whenever the scope tube axis offset from the rifle bore, as shown in Figure 1.B.
Reticle Alignment Canting Errors. The author has installed scopes on a wide variety of rifles, and found that production and semi-custom rifles are prone to a host of alignment problems, usually due to high volume manufacturing and assembly of receivers and barrels. Each of these rifle alignment flaws can cause the reticle not to point through the center of the rifle bore, which leads to a canting error. Some of the alignment methods are more sensitive to these alignment errors than others, as discussed above. The boresight method (2) is insensitive to most of the rifle alignment flaws, for example, while the last method (5) is sensitive to almost all of them.
Alignment errors result from several common manufacturing and scope installation "flaws":
• Bent barrel (2-10 MOA misalignment is common in production rifles).
• Barrel not true to receiver (4-12 MOA misalignment is common in production rifles).
• Point of impact offset from bore direction (resulting from thin barrel profile or poor stock fit).
• Scope base not true to receiver (up to 6-10 MOA misalignment is common due to screw hole size and location tolerances).
• Rings not parallel to scope base (common with windage adjustable dovetail rings).
• Rings not centered on rail (up to 0.040" offset is common with Weaver, Picatinny, etc.).
Only rifles that have been carefully boresight aligned by a qualified gunsmith using a trued action, custom barrel, bedded stock, etc., are free from most of these alignment flaws.
Table 1 lists typical reticle alignment and aiming errors for each of the five reticle alignment methods. By "typical" we mean that the total reticle alignment error was calculated assuming typical values for each type of misalignment that applies to each reticle alignment method. Any given rifle could have all or none of these problems, however, and the magnitude of the misalignments could more or less than the "typical" values used. Also, these misalignments can sometimes produce errors in opposite directions and cancel each other out to some extent. Therefore, the horizontal aiming error for any given rifle could be more or less than the values listed in Table 1. The aiming errors in Table 1 should be used for comparison purposes, and not as an indication of absolute accuracy for a given reticle alignment method or rifle.
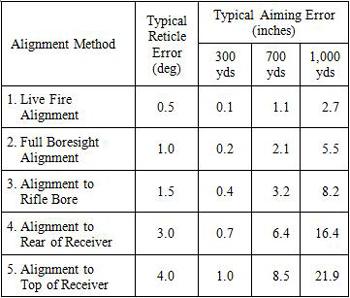
Table 1. Typical reticle alignment and horizontal
aiming errors for short and long range shots. Ballistics for 7 mm WSM at sea level were used in these calculations. Many long range cartridges have generally similar ballistics.
Table 1 shows how horizontal aiming errors increase with range. This is because of the compound effect of increasing elevation adjustment and increasing range. The Table shows that most of these alignment methods are adequate for short range shots. However, at 700-1,000 yds the aiming error can be 0.5-2 feet if an inaccurate reticle alignment method is used.
These canting errors can either add or subtract to canting errors due to tilting the rifle during the shot. For example, a rifle with a 4 degree reticle alignment error, fired with a 6 degree rifle cant in the same direction, would have an aiming error of 21 inches at 700 yds, and 54 inches at 1,000 yds! Canting errors of 4-6 degrees are almost imperceptible without an accurate alignment reference.
Boresight Alignment Method in Detail. The first step, horizontal boresight alignment, involves adjusting the scope base and ring alignment so that the scope tube axis is parallel to the rifle bore at the muzzle. In high quality production, semi-custom and custom rifles, the point of impact is usually within about 4 MOA of the bore axis at the muzzle. Lower quality, high volume production rifles can have bent barrels, excessive barrel resonance and poor stock fit that can cause the point of impact to fall more than 10 MOA away from the bore axis. We assume the long range shooter is using a rifle with acceptable quality in materials, machining and assembly. If not, boresight alignment should be confirmed relative to the point of impact, rather than the rifle bore at the muzzle.
Gunsmiths use a variety of methods to insure that the rifle has no significant boresight misalignment problems. Mechanical methods include mounting the barrel and receiver on a mill table and using a dial indicator to test trueness of the barrel and action, and the use of Kokopelli alignment bars. Optical methods include the use of a quality boresight collimator (such as the Bushnell Professional Boresighter or the Sweany Site-A-Line Boresighter) to determine the bore axis, and then aligning the scope tube axis parallel to the collimator axis. Once this process has been done, it does not have to be repeated, as long as care is used when changing scopes. The long range shooter can perform the horizontal boresight alignment process using commonly available measurement tools and either Kokopelli alignment bars or a calibrated boresight collimator. A reticle crosshair that is aligned to the point of impact at short range and still has a large windage offset (>8 MOA) from the mechanical center is evidence of boresight misalignment.
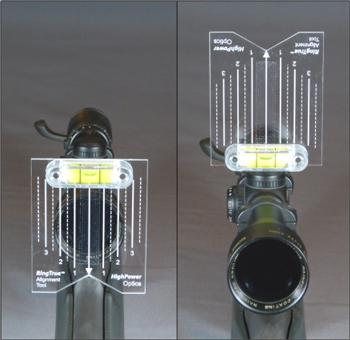
Figure 4. Left: The RingTrue™ Alignment Tool properly aligned and leveled. Double stick tape holds the Alignment Tool against the objective rim. Right: The inverted alignment tool can be used to level the elevation turret.
The reticle alignment process has two parts. First, the rifle is rotated until the scope tube axis is positioned vertically above the rifle bore axis. If there is a boresight misalignment between the rifle bore and scope tube axis, for example, the reticle should be aligned as close to the muzzle as possible. Therefore it is better to use the objective end of the scope, rather than the eyepiece end, for this alignment process.
This step is easily done using either the EXD or RingTrue Alignment Tool (see Figure 4). The alignment tool is aligned to the barrel and objective bell. The rifle is rotated until the spirit level on the alignment tool is level, and then the rifle is secured in this position.
Second, a spirit level is placed on the turret or turret cap, and the scope is rotated until the turret assembly is level. At this point the rings cap screws are tightened using a torque wrench, while checking that the scope does not rotate. Small reticle alignment errors may result from residual boresight misalignment errors, bent barrels, barrel resonances that cause a point of impact shift, as well as from errors in the spirit levels. The resulting reticle misalignment is typically no more than 1.0 degree if the rings are boresight aligned to the rifle bore.
In some scopes there is a small alignment error between the reticle axes and the turret axes. If this is the case, the final reticle alignment process varies depending on the type of elevation adjustment that will be used. The boresight reticle alignment process we just described forces the turret axis to pass through the center of the bore. This method is preferred when the turrets are dialed for elevation. If instead a bullet drop compensated (BDC) reticle is used for elevation, align the reticle to a plumb line or level line located at least 20 ft in front of the rifle. A boresight collimator with an attached spirit level is very handy for this purpose.
Finally, an anti-cant indicator should be attached to the scope tube and aligned. Canting errors due to tilting the rifle during the shot are usually larger than the canting errors due to reticle misalignment. Anti-cant indicators that attach to the Weaver or Picatinny rail should not be used. It should be clear by now that the top of the rail is not necessarily parallel to the reticle when the reticle is properly aligned.
Bruce Winker lives on the West Coast where he is an inventor and scientist with over 20 years experience developing advanced optical displays, weapon sights and fire control systems. He has a Ph.D. in Analytical Chemistry. At work he specializes in optics and ballistics. Bruce is also Vice-President of High Power Optics. He is committed to helping shooters in all disciplines get the best performance from their optics. He runs free rifle scope clinics for shooters every month at local shooting ranges. He is an avid outdoorsman who enjoys fishing and hunting for deer, wild big, varmints and predators. Bruce is a husband and father of two kids.
By Bruce Winker
Ask five different shooters how to level a rifle scope reticle and you'll probably get five very different answers. Anyone who has installed a rifle scope has given this some thought and developed a process. Are all these methods just different ways of getting to the same result? Are there any special considerations for long range shooting?
This article looks at the unique requirements for leveling the reticle for long-range shooting. Different methods of leveling a reticle are compared and typical alignment errors are given for each method.
The long range rifle should be set up to eliminate or minimize all systematic aiming errors, such as canting errors. Canting errors occur when the rifle is zeroed at one elevation and then the elevation is changed to increase the range. Canting errors cause the bullet impact point to shift left or right as the elevation is increased above the rifle zero. There are two sources of canting errors, reticle alignment error and tilting the rifle during the shot.
Accuracy at long range requires that both of these systematic aiming errors be eliminated.
Through both experience and analysis the author has learned that not all reticle alignment methods give the same results. Some of the widely accepted reticle alignment methods can result in significant canting errors in long range shooting. To eliminate canting errors the vertical turret must be aligned so that vertical turret axis passes through the center of the rifle bore, as shown in Figure 1.
In the following discussion, we assume the scope reticle correctly aligned to the turret axes (i.e., no misalignment of the reticle during scope assembly), which is usually the case for all but the lowest quality scopes. Therefore, we could also say that the reticle must be aligned so that the vertical reticle axis passes through the center of the rifle bore. The issue of reticle misalignment inside the scope is discussed at the end of this article.
All rifle barrels have a measurable curvature of the rifle bore. The curvature may be small, but it's there. In most rifles, and especially long range rifles with thick barrel profiles, the last few inches of the bore near the muzzle determine the point of impact. If possible, the reticle should be aligned to the rifle bore near the muzzle, not near the breech. While that is actually quite difficult to do, some alignment methods come closer than others.
If the reticle is not aligned to the rifle bore, then increasing reticle elevation will result in a small change in windage as well. The longer the target range, the larger the elevation angle needed to hit the target. Depending on the method used to align the reticle, the alignment error can be 4 degrees or more. The resulting windage aiming error can be 2 feet or more at long range.
In addition, canting of the rifle during the shot should be avoided by using an anti-cant indicator attached to the scope tube. The anti-cant indicator should be aligned so that it is level when the reticle is level. For long range shooting, this entire reticle alignment process (rifle/scope/anti-cant indictor) should be done with an error of less than +/-2 degrees. Recall that the big hand of the clock rotates 6 degrees for each minute, and you will realize how small this alignment tolerance is. There are several ways that reticle alignment errors can sneak in, and they can cause aiming errors of several feet in long range shots.
Figure 1. A: Proper reticle alignment to eliminate canting errors in long range shooting. Vertical reticle axis passes through the center of the rifle bore at the muzzle. B: Scope is offset to the left of the receiver. Even though the scope is aligned parallel to the receiver, the reticle is misaligned. C: The scope must be rotated to the left for proper reticle alignment.
One of the most common rifle misalignment problems is a horizontal offset between the scope tube axis and the rifle bore. This type of misalignment is common with most production rifles. It is caused by bent barrels, barrels mounted crooked in the receiver, and rail-mounted rings. Even a small curvature in the rifle bore can cause a significant offset at the receiver between the bore axis and the scope tube axis.
Weaver or Picatinny rings often cause horizontal offsets. These rail mounts are usually cut oversize to fit on non-standard rails. When the mount is tightened, the ring ends up shifting to the left or right of the rail. This happens with nearly all Weaver or Picatinny rings. One exception is Warne steel rings, which are split vertically and therefore mount with the scope tube always centered on the rail.
Figure 1 illustrates how a horizontal offset effects reticle alignment. Aligning the reticle to the rifle bore is the most accurate optical method (Figure 1.A), and eliminates canting errors due to reticle alignment. In Figure 1.B, the turret housing and receiver are parallel, but the scope is horizontally offset from the rifle bore, so the vertical reticle axis doesn't pass through the bore. The scope must be rotated, as in Figure 1.C, to get proper alignment between the reticle and the rifle bore. The correctly aligned scope in Figure 1.C would appear misaligned to many shooters.
Now we summarize the various methods used for reticle alignment. Commonly used reticle alignment methods can be divided into five basic groups.
Figure 2. Live fire reticle alignment method. A: The reticle is rotated until the point of impact falls on a plumb (vertical) line above the zero. B: The reticle is misaligned, producing a canting error at 100 yds. The reticle needs to be rotated counterclockwise.
1. Live fire method. This method takes a lot of time and a fair amount of ammunition, but is the most accurate reticle alignment method. First the rifle is leveled and zeroed. Then a target with a long plumb line (at least 16 inches, but preferably 32 inches) is set up at a fixed range, say 100 yds. A group of shots is fired while aiming at the bottom of the plumb line with the scope elevation set to zero.
Then the elevation is increased by 15-30 MOA and another group is fired while aiming at the same target position (bottom of the plumb line). It is important that reticle be level while firing this group. The second group should fall on the plumb line, 15-30 MOA directly above the first group (see Figure 2). If the second group falls to the left or right of the plumb line, the scope must be rotated clockwise or counterclockwise, respectively. This process of firing a group and adjusting the scope is repeated until the group falls directly on the plumb line passing through the rifle zero point of impact.
This method results in almost perfect reticle alignment. The only errors are due to inaccuracy of the spirit levels used to level the rifle while shooting, in determining the center of the group. The potentially large amount of ammunition, time and discipline required to perform this process properly warrants using an optical method.
2. Boresight method. This method aligns the reticle to the bore of the rifle and is the most accurate optical method. First, it involves horizontal boresight alignment of the scope tube axis to the rifle bore axis, followed by alignment of the reticle to the rifle bore. This method is difficult to do without an alignment tool, however. Two alignment tools are now available that allow accurate alignment of the reticle to the rifle bore. The EXD Alignment Tool is sold by Brownells ($46), and the RingTrue Alignment Tool is sold by High Power Optics ($26). Both tools include accurate spirit levels that allow alignment of an anti-cant indicator after the reticle is aligned. The boresight alignment method is described in more detail below.
This reticle alignment method is very accurate (less than +/-2 degree of error). Small reticle alignment errors can result from a bent barrel or a barrel being mounted crooked in the receiver, which causes a small offset of scope axis from the bore at the muzzle. Compared to other methods, however, this method is less sensitive to these rifle alignment problems.
3. Reticle alignment to rifle bore. This method is the same as the method 2 above, except that the horizontal boresight alignment step is omitted. Like the full boresight method, this method requires either the EXD or RingTrue Alignment Tool.
Accuracy is good for all but the longest shots (greater than about 800 yds). Reticle alignment errors do not exceed +/-3 degrees. Figure 3 illustrates why boresight alignment is so important. Even though the objective end of the scope is aligned to the rifle bore, there may still be a reticle alignment error due to the scope tube axis not being horizontally parallel to the rifle bore. When this occurs the objective can be offset from the bore, even though the elevation turret is centered over the receiver. The offset of the objective causes a small reticle misalignment error. Correcting the boresight misalignment eliminates this source of error in the reticle alignment process.
Figure 3. Effect of horizontal boresight mis-alignment on reticle alignment (exaggerated for illustration). In this illustration, the turret housing is centered over the rifle bore and the reticle is properly aligned. The angular misalignment causes a horizontal offset between the ends of the scope and the rifle bore. This apparent offset results in a reticle alignment error using Methods 2-4. Correcting the boresight misalignment eliminates this source of error in the reticle alignment process.
4. Reticle alignment to the rear of the receiver. This method is easy to do by looking into the eyepiece and rotating the scope until the reticle appears to point down toward the center of the receiver. B-Square sells the Cross Hair Reticle Alignment Tool ($10) which is a flat strip of clear acrylic sheet that is bent at a right angle. One end slips into the rear receiver of a bolt action rifle, while the other end has a cross hair printed on it. The user looks through the acrylic sheet and aligns the cross hair parallel to the reticle in the scope. This device only works with bolt actions and does not fit a wide variety of rifles and scopes well. Parabola sells the Reticle-Tru alignment tool ($65) which attaches to the eyepiece. It has a large arrow that is rotated to point toward the center of the receiver, and a thin slot that allows alignment of the reticle to the receiver.
Accuracy is adequate for short-medium range, but can produce significant canting errors for long range shots. Because the alignment is done at the eyepiece end of the scope, rather than the objective end, this method is more sensitive to boresight misalignment errors than the previous methods. It is also more sensitive to the barrel being mounted crooked in the receiver, which is a common problem in production and semi-custom rifles (whenever the action is not trued). A spirit level or plumb line is still required to level the reticle when aligning an anti-cant indicator.
5. Scope alignment to the top of receiver. This is probably the most common optical alignment method. Several variations exist and at least one of them is familiar to most shooters. This method usually involves the use of spirit levels of one type or another, some of which can be quite expensive. A level is placed on the scope base (or rail), or some other flat surface on the top of the receiver, and the rifle is rotated until the receiver is level. Then a spirit level is placed on the rifle scope turret cap and the scope is rotated until the turret cap is level.
After leveling the receiver or base, some shooters use a plumb line 20 or more feet in front of the rifle to align the scope reticle. Another variation is to use a metal ruler to align the bottom of the turret housing parallel to the scope base (or rail). The Segway Reticle Leveler, sold by Straight Shot ($20), is a handy tool that has bold horizontal black lines and attaches to the receiver (usually the base or rail) using a rubber band. It enables the alignment of the reticle by looking into the eyepiece and the leveler at the same time.
All of the variations of Method 5 do essentially the same thing and produce equivalent results. Accuracy is adequate for short range, but this type of method can have large canting errors that make it a poor choice for long range shooting. This method is sensitive to many boresight alignment problems. Canting errors occur whenever the scope tube axis offset from the rifle bore, as shown in Figure 1.B.
Reticle Alignment Canting Errors. The author has installed scopes on a wide variety of rifles, and found that production and semi-custom rifles are prone to a host of alignment problems, usually due to high volume manufacturing and assembly of receivers and barrels. Each of these rifle alignment flaws can cause the reticle not to point through the center of the rifle bore, which leads to a canting error. Some of the alignment methods are more sensitive to these alignment errors than others, as discussed above. The boresight method (2) is insensitive to most of the rifle alignment flaws, for example, while the last method (5) is sensitive to almost all of them.
Alignment errors result from several common manufacturing and scope installation "flaws":
• Bent barrel (2-10 MOA misalignment is common in production rifles).
• Barrel not true to receiver (4-12 MOA misalignment is common in production rifles).
• Point of impact offset from bore direction (resulting from thin barrel profile or poor stock fit).
• Scope base not true to receiver (up to 6-10 MOA misalignment is common due to screw hole size and location tolerances).
• Rings not parallel to scope base (common with windage adjustable dovetail rings).
• Rings not centered on rail (up to 0.040" offset is common with Weaver, Picatinny, etc.).
Only rifles that have been carefully boresight aligned by a qualified gunsmith using a trued action, custom barrel, bedded stock, etc., are free from most of these alignment flaws.
Table 1 lists typical reticle alignment and aiming errors for each of the five reticle alignment methods. By "typical" we mean that the total reticle alignment error was calculated assuming typical values for each type of misalignment that applies to each reticle alignment method. Any given rifle could have all or none of these problems, however, and the magnitude of the misalignments could more or less than the "typical" values used. Also, these misalignments can sometimes produce errors in opposite directions and cancel each other out to some extent. Therefore, the horizontal aiming error for any given rifle could be more or less than the values listed in Table 1. The aiming errors in Table 1 should be used for comparison purposes, and not as an indication of absolute accuracy for a given reticle alignment method or rifle.
Table 1. Typical reticle alignment and horizontal
aiming errors for short and long range shots. Ballistics for 7 mm WSM at sea level were used in these calculations. Many long range cartridges have generally similar ballistics.
Table 1 shows how horizontal aiming errors increase with range. This is because of the compound effect of increasing elevation adjustment and increasing range. The Table shows that most of these alignment methods are adequate for short range shots. However, at 700-1,000 yds the aiming error can be 0.5-2 feet if an inaccurate reticle alignment method is used.
These canting errors can either add or subtract to canting errors due to tilting the rifle during the shot. For example, a rifle with a 4 degree reticle alignment error, fired with a 6 degree rifle cant in the same direction, would have an aiming error of 21 inches at 700 yds, and 54 inches at 1,000 yds! Canting errors of 4-6 degrees are almost imperceptible without an accurate alignment reference.
Boresight Alignment Method in Detail. The first step, horizontal boresight alignment, involves adjusting the scope base and ring alignment so that the scope tube axis is parallel to the rifle bore at the muzzle. In high quality production, semi-custom and custom rifles, the point of impact is usually within about 4 MOA of the bore axis at the muzzle. Lower quality, high volume production rifles can have bent barrels, excessive barrel resonance and poor stock fit that can cause the point of impact to fall more than 10 MOA away from the bore axis. We assume the long range shooter is using a rifle with acceptable quality in materials, machining and assembly. If not, boresight alignment should be confirmed relative to the point of impact, rather than the rifle bore at the muzzle.
Gunsmiths use a variety of methods to insure that the rifle has no significant boresight misalignment problems. Mechanical methods include mounting the barrel and receiver on a mill table and using a dial indicator to test trueness of the barrel and action, and the use of Kokopelli alignment bars. Optical methods include the use of a quality boresight collimator (such as the Bushnell Professional Boresighter or the Sweany Site-A-Line Boresighter) to determine the bore axis, and then aligning the scope tube axis parallel to the collimator axis. Once this process has been done, it does not have to be repeated, as long as care is used when changing scopes. The long range shooter can perform the horizontal boresight alignment process using commonly available measurement tools and either Kokopelli alignment bars or a calibrated boresight collimator. A reticle crosshair that is aligned to the point of impact at short range and still has a large windage offset (>8 MOA) from the mechanical center is evidence of boresight misalignment.
Figure 4. Left: The RingTrue™ Alignment Tool properly aligned and leveled. Double stick tape holds the Alignment Tool against the objective rim. Right: The inverted alignment tool can be used to level the elevation turret.
The reticle alignment process has two parts. First, the rifle is rotated until the scope tube axis is positioned vertically above the rifle bore axis. If there is a boresight misalignment between the rifle bore and scope tube axis, for example, the reticle should be aligned as close to the muzzle as possible. Therefore it is better to use the objective end of the scope, rather than the eyepiece end, for this alignment process.
This step is easily done using either the EXD or RingTrue Alignment Tool (see Figure 4). The alignment tool is aligned to the barrel and objective bell. The rifle is rotated until the spirit level on the alignment tool is level, and then the rifle is secured in this position.
Second, a spirit level is placed on the turret or turret cap, and the scope is rotated until the turret assembly is level. At this point the rings cap screws are tightened using a torque wrench, while checking that the scope does not rotate. Small reticle alignment errors may result from residual boresight misalignment errors, bent barrels, barrel resonances that cause a point of impact shift, as well as from errors in the spirit levels. The resulting reticle misalignment is typically no more than 1.0 degree if the rings are boresight aligned to the rifle bore.
In some scopes there is a small alignment error between the reticle axes and the turret axes. If this is the case, the final reticle alignment process varies depending on the type of elevation adjustment that will be used. The boresight reticle alignment process we just described forces the turret axis to pass through the center of the bore. This method is preferred when the turrets are dialed for elevation. If instead a bullet drop compensated (BDC) reticle is used for elevation, align the reticle to a plumb line or level line located at least 20 ft in front of the rifle. A boresight collimator with an attached spirit level is very handy for this purpose.
Finally, an anti-cant indicator should be attached to the scope tube and aligned. Canting errors due to tilting the rifle during the shot are usually larger than the canting errors due to reticle misalignment. Anti-cant indicators that attach to the Weaver or Picatinny rail should not be used. It should be clear by now that the top of the rail is not necessarily parallel to the reticle when the reticle is properly aligned.
Bruce Winker lives on the West Coast where he is an inventor and scientist with over 20 years experience developing advanced optical displays, weapon sights and fire control systems. He has a Ph.D. in Analytical Chemistry. At work he specializes in optics and ballistics. Bruce is also Vice-President of High Power Optics. He is committed to helping shooters in all disciplines get the best performance from their optics. He runs free rifle scope clinics for shooters every month at local shooting ranges. He is an avid outdoorsman who enjoys fishing and hunting for deer, wild big, varmints and predators. Bruce is a husband and father of two kids.