Don't Get Lost
By Shawn Van Tassell
©Copyright, The Varmint Hunters Association, Inc.
I had been wandering in the woods of North Carolina for nearly seven hours. The miserable, wet, black night had been spent running into fallen trees and stepping into holes. A heavy layer of clouds was still hanging around from the wicked thunderstorm that slashed through hours earlier. I was desperately trying to keep my map dry, and all of my faith was hanging on the little tritium-filled compass that diligently pointed north. I had walked close to 10 miles, and had several more to go.
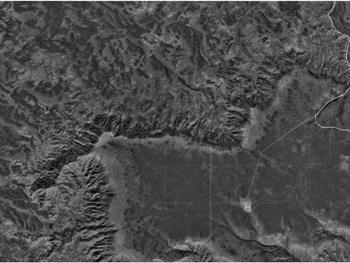
This is a screen capture taken from www.mapquest.com. I often use the "Aerial" feature on the map page to get a feel for the vegetation in the area. As you can see in this map of a location outside of Fort Bridger, Wyoming, this area is pretty barren.
This is when the thought occurred to me, "Boy, wouldn't it be the pits to get lost out here?"
I was right in the middle of the land navigation course at the U.S. Army Special Forces Assessment and Selection Course, and luckily I knew exactly where I was, exactly where I was going, and exactly how to get there.
Unfortunately, of the millions of people who enjoy being outdoors, we continually hear of tragic stories about people getting lost — some never making it home. If you've ever spent any time in the outdoors, I'm sure that you've been a "little" disoriented a time or two yourself. I know I have — and I know that I don't like it. At best, getting lost may mean you have to walk an extra mile or two to get back to camp or your vehicle. At worst, it can mean getting stranded for days and ultimately succumbing to the elements.
There are several reasons people get lost, and when two or more of these factors work together you can find yourself in serious trouble. These factors include: being in unfamiliar territory; losing track of your current location; getting distracted by chasing game or following tracks; trying to navigate by instinct; being unprepared for harsh weather conditions; and panicking once you realize you are lost.
Even though Mother Nature seems to hold the upper hand, there are a few things we can do before setting out on our next outdoor adventure to ensure we have an enjoyable experience, and not wind up as the objective of the local search and rescue team.
1. Always Have A Map Of The Area
One of the most basic items you always should have with you is a map of the area. Even if you are only going on a day hike on a clearly marked path, it is a good idea to have a map. Let's look at what a map actually is, and why it is so beneficial.
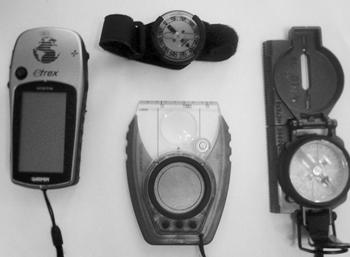
Some tools of the trade (starting at top, going clockwise). Suunto wrist compass, $25.00; Military Lensatic compass, $70.00; Digital Compass, $40.00; Garmin E-trex Vista with Map Source software, $300.00. Not getting lost on your next adventure … priceless.
To really understand map reading, you first must understand that a map is nothing more than a two-dimensional depiction of three-dimensional terrain. Everything from a road atlas, to a military topographical map, to over-flight imagery, maps are simply graphical representations of the earth's surface. One of the most beneficial types of maps to use for hunting is a topographical map. A topo map represents the terrain through the use of contour lines. A single contour line shows a specific elevation, while many contour lines show the difference in elevation at a specified interval. For example, a map with a contour interval of 10 meters will show a contour line for each 10 meters of elevation gained or lost. In practical terms, the closer the contour lines, the steeper the grade. Conversely, the farther apart the contour lines, the more level the terrain. Once this concept is understood, map reading becomes a simple visualization exercise to see the two-dimensional map as three-dimensional terrain.
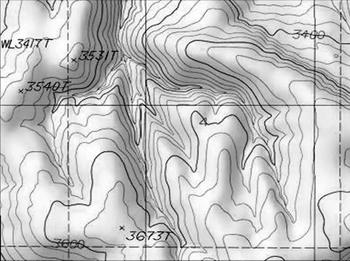
This is an example of a National Geographic Topographic map. These are the most detailed maps I've been able to find. The great thing about this map is the ability to pick and choose the areas you want printed out. This enables you to carry a normal-sized piece of paper of your specific hunting area instead of some big multi-fold map of the entire state. Additionally, the contour shading really helps the user visualize the terrain.
You can obtain topographical maps from many sources. Some of the best topo maps I've found are produced by National Geographic. There are two ways to get these maps. First, you can buy the software and run it on your home PC, and then print a map for whichever particular area you choose. This is very convenient, and very pricey. The software is packaged by state, and each state sells for about $100.00. For someone like me, that can get very expensive considering I hunted in four states over the Christmas holiday last year. The second option is to find one of the free-standing National Geographic map kiosks at certain sporting goods stores that allow the user to select a particular area, and then print the map for that area on the spot. These maps cost only a few dollars, and the cool thing is they're printed on waterproof paper for added durability. This is a handy way to get a highly detailed, area specific map at a great price. The only downfall is sometimes it's hard to find a store with these kiosks.
I've found most BLM offices to be very helpful in obtaining topo maps as well. Oftentimes the BLM maps will show boundary lines, including public and private lands. This can be a tremendous resource when hunting in unfamiliar territory.
For the high tech types out there, Garmin's Map Source software gives a user the ability to see topographical maps right on his or her GPS unit.
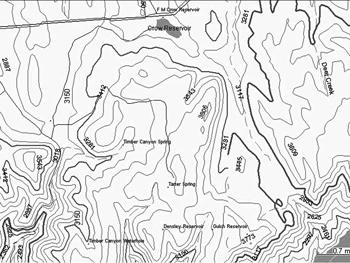
This is the same general area that the National Geographic Topo map depicts. Although not nearly as detailed as the National Geographic maps, the Map Source software downloads to the Garmin E-trex Vista GPS. This enables you to see exactly where you are in relation to the terrain.
Other resources that have become available thanks to the Internet are overhead imagery from Google Earth, MSN Live Search, or the Aerial feature on MapQuest. These programs allow you to see the actual terrain before ever hunting it.
Regardless of which map you use, you must always confirm what the map depicts with the actual terrain. While serving as an infantry platoon leader in Iraq I dealt with this constantly. Regardless of the type of imagery I could get my hands on, and how many hours I pored over every detail of the terrain, it was all for naught if I couldn't get myself oriented on the ground.
Keep in mind that most maps are old, and things change over time. Roads, trails, and streams are notorious for moving over time, and sometimes they just up and disappear. If you're not sure about your location, check your GPS. If you don't have a GPS, use terrain features that aren't prone to moving, like hills and mountains.

Another screen capture from Map Source. This really illustrates the difference between the aerial view of the Fort Bridger area and a contour map view. Looking at different types of maps of the same area can greatly increase your understanding of that terrain. Can you match up the ridgeline and roads between the two maps?
2. Always Have A Compass (or GPS — with extra batteries)
Maps are critical, but without a compass their usefulness is reduced dramatically. There are so many types of compasses available, each with different advantages. I rarely go anywhere without my $20.00 Suunto wrist compass. This small, unobtrusive device has proven itself time and time again.
There is a myriad of options when it comes to compasses, but they all basically do the same thing — show you north, south, east, and west. Because I've tried it on occasion, and the outcome has always been bad (sometimes very bad), I never try to use my "internal" compass or instinct when it comes to navigating.
3. Know Where You Currently Are, And Where You're Going Next
Before embarking on any outdoor adventure, you always should know your start and end points. Whether it be a simple hike, or a several-day backpacking hunt, it is critical to know where you're going. After all, getting lost is simply not knowing where you currently are.
4. Use Landmarks, Handrails, And Backstops
Once you've decided where you're going, take an additional few seconds and look at some obvious landmarks, handrails, and backstops. For example, you might see a river on the map just past where you plan on hunting. During your hunt if you get to the river, you know you've gone too far. A handrail works in much the same way, but a handrail runs parallel to your direction of travel. For example, you may know that a steep ravine runs in the same direction you're heading. If you hit that ravine, you know that you've drifted and need to correct.
You usually can find some type of landmark or terrain feature in each cardinal direction. These will help keep you from getting lost, and they absolutely will save you if you do get lost.
5. If You're Not Sure Where You Are, STOP
If you do happen to get "disoriented," STOP. Pull out your map and try to get oriented. Do this by finding your start point on the map and mentally retracing your steps. Try to follow your progress on the map by finding landmarks, handrails, and backstops that you may have passed along the way. Look for key terrain that will help clue you in like hilltops, saddles, draws, or spurs.
The worst thing you can do is panic and head off in some direction thinking you will somehow become less lost. If you're following a promising set of tracks or a fading blood trail and you realize that you're lost, STOP. You will only become more lost by continuing on.
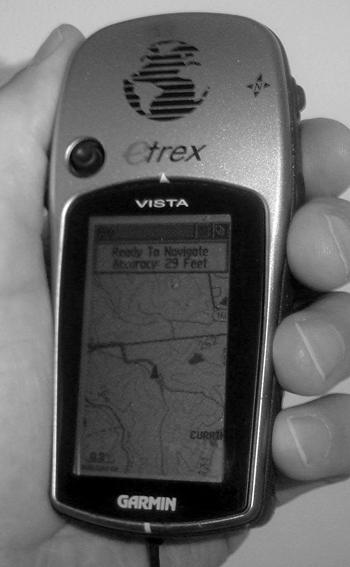
It's hard to beat a good GPS with downloaded contour maps when it comes to hunting. The Garmin E-trex Vista is an extremely versatile GPS receiver with functions ranging from marking where you parked the truck to projecting a waypoint of where you saw that coyote go down. The GPS is only as good as the user's ability to operate it, and ALWAYS have extra batteries with you.
6. The Best Way Not To Get Lost … Is To Not Get Lost
There is only one surefire way that I know of to not get lost, and that is to not get lost. In other words, to avoid becoming lost you need to know where your start point is, where your end point is, and know where you are along the way.
After all, the one thing none of us wants to experience is being in the woods at 4:00 o'clock in the morning, soaking wet, having walked some 10 miles, and saying, "Boy, it sure is the pits to be lost out here."
By Shawn Van Tassell
©Copyright, The Varmint Hunters Association, Inc.
I had been wandering in the woods of North Carolina for nearly seven hours. The miserable, wet, black night had been spent running into fallen trees and stepping into holes. A heavy layer of clouds was still hanging around from the wicked thunderstorm that slashed through hours earlier. I was desperately trying to keep my map dry, and all of my faith was hanging on the little tritium-filled compass that diligently pointed north. I had walked close to 10 miles, and had several more to go.
This is a screen capture taken from www.mapquest.com. I often use the "Aerial" feature on the map page to get a feel for the vegetation in the area. As you can see in this map of a location outside of Fort Bridger, Wyoming, this area is pretty barren.
This is when the thought occurred to me, "Boy, wouldn't it be the pits to get lost out here?"
I was right in the middle of the land navigation course at the U.S. Army Special Forces Assessment and Selection Course, and luckily I knew exactly where I was, exactly where I was going, and exactly how to get there.
Unfortunately, of the millions of people who enjoy being outdoors, we continually hear of tragic stories about people getting lost — some never making it home. If you've ever spent any time in the outdoors, I'm sure that you've been a "little" disoriented a time or two yourself. I know I have — and I know that I don't like it. At best, getting lost may mean you have to walk an extra mile or two to get back to camp or your vehicle. At worst, it can mean getting stranded for days and ultimately succumbing to the elements.
There are several reasons people get lost, and when two or more of these factors work together you can find yourself in serious trouble. These factors include: being in unfamiliar territory; losing track of your current location; getting distracted by chasing game or following tracks; trying to navigate by instinct; being unprepared for harsh weather conditions; and panicking once you realize you are lost.
Even though Mother Nature seems to hold the upper hand, there are a few things we can do before setting out on our next outdoor adventure to ensure we have an enjoyable experience, and not wind up as the objective of the local search and rescue team.
1. Always Have A Map Of The Area
One of the most basic items you always should have with you is a map of the area. Even if you are only going on a day hike on a clearly marked path, it is a good idea to have a map. Let's look at what a map actually is, and why it is so beneficial.
Some tools of the trade (starting at top, going clockwise). Suunto wrist compass, $25.00; Military Lensatic compass, $70.00; Digital Compass, $40.00; Garmin E-trex Vista with Map Source software, $300.00. Not getting lost on your next adventure … priceless.
To really understand map reading, you first must understand that a map is nothing more than a two-dimensional depiction of three-dimensional terrain. Everything from a road atlas, to a military topographical map, to over-flight imagery, maps are simply graphical representations of the earth's surface. One of the most beneficial types of maps to use for hunting is a topographical map. A topo map represents the terrain through the use of contour lines. A single contour line shows a specific elevation, while many contour lines show the difference in elevation at a specified interval. For example, a map with a contour interval of 10 meters will show a contour line for each 10 meters of elevation gained or lost. In practical terms, the closer the contour lines, the steeper the grade. Conversely, the farther apart the contour lines, the more level the terrain. Once this concept is understood, map reading becomes a simple visualization exercise to see the two-dimensional map as three-dimensional terrain.
This is an example of a National Geographic Topographic map. These are the most detailed maps I've been able to find. The great thing about this map is the ability to pick and choose the areas you want printed out. This enables you to carry a normal-sized piece of paper of your specific hunting area instead of some big multi-fold map of the entire state. Additionally, the contour shading really helps the user visualize the terrain.
You can obtain topographical maps from many sources. Some of the best topo maps I've found are produced by National Geographic. There are two ways to get these maps. First, you can buy the software and run it on your home PC, and then print a map for whichever particular area you choose. This is very convenient, and very pricey. The software is packaged by state, and each state sells for about $100.00. For someone like me, that can get very expensive considering I hunted in four states over the Christmas holiday last year. The second option is to find one of the free-standing National Geographic map kiosks at certain sporting goods stores that allow the user to select a particular area, and then print the map for that area on the spot. These maps cost only a few dollars, and the cool thing is they're printed on waterproof paper for added durability. This is a handy way to get a highly detailed, area specific map at a great price. The only downfall is sometimes it's hard to find a store with these kiosks.
I've found most BLM offices to be very helpful in obtaining topo maps as well. Oftentimes the BLM maps will show boundary lines, including public and private lands. This can be a tremendous resource when hunting in unfamiliar territory.
For the high tech types out there, Garmin's Map Source software gives a user the ability to see topographical maps right on his or her GPS unit.
This is the same general area that the National Geographic Topo map depicts. Although not nearly as detailed as the National Geographic maps, the Map Source software downloads to the Garmin E-trex Vista GPS. This enables you to see exactly where you are in relation to the terrain.
Other resources that have become available thanks to the Internet are overhead imagery from Google Earth, MSN Live Search, or the Aerial feature on MapQuest. These programs allow you to see the actual terrain before ever hunting it.
Regardless of which map you use, you must always confirm what the map depicts with the actual terrain. While serving as an infantry platoon leader in Iraq I dealt with this constantly. Regardless of the type of imagery I could get my hands on, and how many hours I pored over every detail of the terrain, it was all for naught if I couldn't get myself oriented on the ground.
Keep in mind that most maps are old, and things change over time. Roads, trails, and streams are notorious for moving over time, and sometimes they just up and disappear. If you're not sure about your location, check your GPS. If you don't have a GPS, use terrain features that aren't prone to moving, like hills and mountains.
Another screen capture from Map Source. This really illustrates the difference between the aerial view of the Fort Bridger area and a contour map view. Looking at different types of maps of the same area can greatly increase your understanding of that terrain. Can you match up the ridgeline and roads between the two maps?
2. Always Have A Compass (or GPS — with extra batteries)
Maps are critical, but without a compass their usefulness is reduced dramatically. There are so many types of compasses available, each with different advantages. I rarely go anywhere without my $20.00 Suunto wrist compass. This small, unobtrusive device has proven itself time and time again.
There is a myriad of options when it comes to compasses, but they all basically do the same thing — show you north, south, east, and west. Because I've tried it on occasion, and the outcome has always been bad (sometimes very bad), I never try to use my "internal" compass or instinct when it comes to navigating.
3. Know Where You Currently Are, And Where You're Going Next
Before embarking on any outdoor adventure, you always should know your start and end points. Whether it be a simple hike, or a several-day backpacking hunt, it is critical to know where you're going. After all, getting lost is simply not knowing where you currently are.
4. Use Landmarks, Handrails, And Backstops
Once you've decided where you're going, take an additional few seconds and look at some obvious landmarks, handrails, and backstops. For example, you might see a river on the map just past where you plan on hunting. During your hunt if you get to the river, you know you've gone too far. A handrail works in much the same way, but a handrail runs parallel to your direction of travel. For example, you may know that a steep ravine runs in the same direction you're heading. If you hit that ravine, you know that you've drifted and need to correct.
You usually can find some type of landmark or terrain feature in each cardinal direction. These will help keep you from getting lost, and they absolutely will save you if you do get lost.
5. If You're Not Sure Where You Are, STOP
If you do happen to get "disoriented," STOP. Pull out your map and try to get oriented. Do this by finding your start point on the map and mentally retracing your steps. Try to follow your progress on the map by finding landmarks, handrails, and backstops that you may have passed along the way. Look for key terrain that will help clue you in like hilltops, saddles, draws, or spurs.
The worst thing you can do is panic and head off in some direction thinking you will somehow become less lost. If you're following a promising set of tracks or a fading blood trail and you realize that you're lost, STOP. You will only become more lost by continuing on.
It's hard to beat a good GPS with downloaded contour maps when it comes to hunting. The Garmin E-trex Vista is an extremely versatile GPS receiver with functions ranging from marking where you parked the truck to projecting a waypoint of where you saw that coyote go down. The GPS is only as good as the user's ability to operate it, and ALWAYS have extra batteries with you.
6. The Best Way Not To Get Lost … Is To Not Get Lost
There is only one surefire way that I know of to not get lost, and that is to not get lost. In other words, to avoid becoming lost you need to know where your start point is, where your end point is, and know where you are along the way.
After all, the one thing none of us wants to experience is being in the woods at 4:00 o'clock in the morning, soaking wet, having walked some 10 miles, and saying, "Boy, it sure is the pits to be lost out here."
