Box2Bench Targets: Right Idea, Right Time
By MeccaStreisand
First things first: A lot of old school guys are probably going to ignore this and that's a shame because it could really make your life easier. My coach hated it, right up until we found my best load was going to be built in a way he would not have leaned toward. He's old school and does things in a way that, to me, is less than scientific. He's also been very successful at it. His way is not systematized at all that I can work out, so learning it from him is like learning to land a plane. You get about seven seconds of real learning at a time, then you have turn around and do it again. That sort of thing may have worked out for him but it's not helpful for transferring knowledge to people like me that have twenty years less experience.
When the Backus' pinged me to write an article on this new target I was a bit skeptical but still excited to try it. It looked quite clever on the surface. Still, something about it told me that it might not be quite as straightforward as it appeared. To be fair, when I got my copies for testing they were pre-release and didn't come with instructions, so I deduced a set and then asked B2B. I'm that way. It turned out after I'd contacted the manufacturer that my version of the how-to was pretty close to their version though the two do diverge a bit here and there. Turns out these targets are, in fact, quite straightforward to use. One should note that this is not a how-to, it's more of a discussion of my experience with Box2Bench Targets so far.

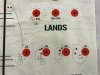
Figure 1. A look at the B2B target at 100yrds through a Vortex Razor Gen2 4.5-27x56
Historically I'd use an NRA 50-yard slow fire pistol target as the backdrop for load development (these are supplied for free at my local range). They always end with groups circled in Sharpie and tons of semi-legible notes scribbled in because a regular ball point pen or pencil punches right through. The aiming points I make from Sharpie or masking tape are not super fine or regularly shaped but they work ok in a pinch. I could use stick on targets and have for years but I don't really like those either. Why? They tend to curl up either before shooting or after removal and anyway don't store well and their black surfaces aren't the best for writing notes so they're not really great for later analysis.
Wood pulp based paper targets themselves have bigger annoyances for me. Moisture is death to paper targets and I often shoot in a place where a heavy morning mist is a regular attendee. Using masking tape on the recycled paper those NRA targets are made out of to attach it to a target frame pretty much assures that it'll tear dramatically upon removal. All of that conspires to make sure that a paper target is going directly in the bin when I'm done instead of maybe being useful for later reference.

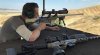
Figure 2. Setting up to shoot the lands test. The rifle is in the middle of being painted to look like a Dodger Dog. I'm weird that way.
Despite any initial concerns about the B2B target I also saw it as quite possibly the best thing since afternoon nap time for guys like me and really hoped it'd deliver. What do I mean by guys like me? Well I'm not rich, I'm not super organized (most say I'm a bit messy) and I have a busy life. Full custom rifles and bench rest level hand loading practices are a lifetime goal, not something I plan to pick up anytime soon. So, at the moment I'm stuck with whatever comes out of a brand name box for my rifles and I don't have the time or money to burn very much of either on load development. At the same time, I like to compete (there's no better place to learn than at a match) and I'd like to do better than last place, so my kit needs to be usefully accurate for the purpose.
My latest project is a Savage 10-FPSR that started as a .308. I do a lot of PRS style and prone forms of long range competition shooting and wanted an option superior to my .308. Particularly, I wanted something with better recoil characteristics. So, I bought a new Columbia River Arms pre-fit barrel in .243 Ackley Improved to replace my factory .308 barrel and got myself into a Vortex Razor Gen2 4.5-27x scope via some figurative horse trading.

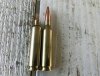
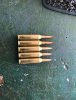
Figure 3. Fire forming loads ready for the lands test.
Ugh. That might have been a bad idea. Why? Well I effectively have another brand spanking new rifle and this one is a barrel burner that I don't see getting beyond 2K rounds of match grade work from. I don't want to spend oodles of ammo developing a match load only to have seriously spent against my starting barrel life when I'm done. Doing it my normal hunt and peck way would almost certainly lead there. It just so happened that the Backus' reached out to me about evaluating this nifty new Box2Bench target and writing an article about it before I'd loaded my first shell for the new barrel. What fortuitous timing indeed.
The instructions that the guys B2B provide basically tell the user to qualify their scope and do the load development work as separate operations. I'll refer you to their site for their easy to follow instructions. They're simple enough but I personally did a box test and tall target test from a firmly fixed rest against the target without shooting first to make sure my click values were consistent and the indicated change in the reticle was the same as the indicated turret inputs before doing a shooting test. Everything worked fine there for me in the end. One should definitely note that the MRAD increments on the tall target lines are 1.5mil not 1mil. I don't see a problem with that at all. It's actually better to test more clicks at a time than fewer. You get a better test using more clicks because click value error/slop will tend to stack up the further you adjust at a time and become more apparent. MOA and IPHY increments are 5MOA/IPHY.
Because I'm using a .243AI chamber and all new components I need to fire form the 250 rounds of brass I bought for it. I also plan on trying to compete with my fire forming loads so I don't have to burn 250 rounds of barrel life for basically nothing. My fire forming load really needs to be match quality if I can pull it off. My coach and I selected 39.3 grains of RL23 as my first charge. Why? Well it fills the case to the body shoulder junction, was plenty snappy for fire forming and should (and did) generate around 2750fps so it's mellow on the bore. Perfect for a break-in and fire forming load.

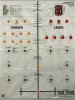
Figure 4. Hot off the target frame. Notice no tearing despite heavy use of masking tape. The big hole under my hand was where the bullet below penetrated through. I had it looped over the top of the target frame. Oops!
I shot 35 rounds before shooting at the target to break in the barrel and get some basic velocity data. My initial SD's were wild as heck, 60FPS+ but the loads were making 1 - 1.5-inch groups at 200m with the bullets just touching the lands. They wouldn't do for anything much beyond 500m though. Velocity spreads like that are bad for proper long-range work.
One really great thing for me about using this B2B target was that all of the hemming and hawing about charge weight and seating depth was basically washed away (I wish I'd had the time to do the powder charge work up but life happened and cut my time short). I didn't have to select a seating depth to start at or increments to try. I normally start at touching but where to go next is the question that gets me riled up and it was there already written down to help me make up my mind. The suggested seating depth intervals are chunky enough to get useful differences from but not so chunky as to make refinement a proposition for eternity. The powder charge I started with I lucked out on as well but I still wish I'd had time to do the full charge weight workup before penning this. I'll still do it. I'm curious to see the results.
Had I done it the way things are meant to be done by the B2B target I'd have run 2 different powders (or 2 different bullets) at 4 different charge weights each, with each charge weight separated by something like three tenths to half a grain and shot those against the 8x powder aim points. Then I'd have picked the 3 best and run those against each other in the 3x spots provided for that, though you could also use those last 3 spots to tweak your powder charge on a single selectee. Then I'd have done the seating depth tests against the single best remaining contender, and finally tuned my final seating depth using the last 3 lands aim points. I did not go the full nine yards mostly because of time (this summer is extremely busy for me) and how the luck of the draw came down with my fire forming load.

Figure 5. First test of different bullet jumps to the lands. Promising!
I took 4 sets of 3x rounds from the fire form loads I'd put together (which would have won the grouping challenge probably anyway) and adjusted seating depth on them according to the numbers on the B2B target. I also kept 3 of my lands-touching loads aside and set off to the range. Once I was set up, I ran my touching loads for velocity to verify my velocities at 65F ammo and air temperature, as they were 95F for barrel break-in and I wanted to see what my temperature induced MV variation was. Everything perfect and no velocity deviation (What a surprise!). They grouped just over half an inch at 100yrds.
By MeccaStreisand
First things first: A lot of old school guys are probably going to ignore this and that's a shame because it could really make your life easier. My coach hated it, right up until we found my best load was going to be built in a way he would not have leaned toward. He's old school and does things in a way that, to me, is less than scientific. He's also been very successful at it. His way is not systematized at all that I can work out, so learning it from him is like learning to land a plane. You get about seven seconds of real learning at a time, then you have turn around and do it again. That sort of thing may have worked out for him but it's not helpful for transferring knowledge to people like me that have twenty years less experience.
When the Backus' pinged me to write an article on this new target I was a bit skeptical but still excited to try it. It looked quite clever on the surface. Still, something about it told me that it might not be quite as straightforward as it appeared. To be fair, when I got my copies for testing they were pre-release and didn't come with instructions, so I deduced a set and then asked B2B. I'm that way. It turned out after I'd contacted the manufacturer that my version of the how-to was pretty close to their version though the two do diverge a bit here and there. Turns out these targets are, in fact, quite straightforward to use. One should note that this is not a how-to, it's more of a discussion of my experience with Box2Bench Targets so far.
Figure 1. A look at the B2B target at 100yrds through a Vortex Razor Gen2 4.5-27x56
Historically I'd use an NRA 50-yard slow fire pistol target as the backdrop for load development (these are supplied for free at my local range). They always end with groups circled in Sharpie and tons of semi-legible notes scribbled in because a regular ball point pen or pencil punches right through. The aiming points I make from Sharpie or masking tape are not super fine or regularly shaped but they work ok in a pinch. I could use stick on targets and have for years but I don't really like those either. Why? They tend to curl up either before shooting or after removal and anyway don't store well and their black surfaces aren't the best for writing notes so they're not really great for later analysis.
Wood pulp based paper targets themselves have bigger annoyances for me. Moisture is death to paper targets and I often shoot in a place where a heavy morning mist is a regular attendee. Using masking tape on the recycled paper those NRA targets are made out of to attach it to a target frame pretty much assures that it'll tear dramatically upon removal. All of that conspires to make sure that a paper target is going directly in the bin when I'm done instead of maybe being useful for later reference.
Figure 2. Setting up to shoot the lands test. The rifle is in the middle of being painted to look like a Dodger Dog. I'm weird that way.
Despite any initial concerns about the B2B target I also saw it as quite possibly the best thing since afternoon nap time for guys like me and really hoped it'd deliver. What do I mean by guys like me? Well I'm not rich, I'm not super organized (most say I'm a bit messy) and I have a busy life. Full custom rifles and bench rest level hand loading practices are a lifetime goal, not something I plan to pick up anytime soon. So, at the moment I'm stuck with whatever comes out of a brand name box for my rifles and I don't have the time or money to burn very much of either on load development. At the same time, I like to compete (there's no better place to learn than at a match) and I'd like to do better than last place, so my kit needs to be usefully accurate for the purpose.
My latest project is a Savage 10-FPSR that started as a .308. I do a lot of PRS style and prone forms of long range competition shooting and wanted an option superior to my .308. Particularly, I wanted something with better recoil characteristics. So, I bought a new Columbia River Arms pre-fit barrel in .243 Ackley Improved to replace my factory .308 barrel and got myself into a Vortex Razor Gen2 4.5-27x scope via some figurative horse trading.
Figure 3. Fire forming loads ready for the lands test.
Ugh. That might have been a bad idea. Why? Well I effectively have another brand spanking new rifle and this one is a barrel burner that I don't see getting beyond 2K rounds of match grade work from. I don't want to spend oodles of ammo developing a match load only to have seriously spent against my starting barrel life when I'm done. Doing it my normal hunt and peck way would almost certainly lead there. It just so happened that the Backus' reached out to me about evaluating this nifty new Box2Bench target and writing an article about it before I'd loaded my first shell for the new barrel. What fortuitous timing indeed.
The instructions that the guys B2B provide basically tell the user to qualify their scope and do the load development work as separate operations. I'll refer you to their site for their easy to follow instructions. They're simple enough but I personally did a box test and tall target test from a firmly fixed rest against the target without shooting first to make sure my click values were consistent and the indicated change in the reticle was the same as the indicated turret inputs before doing a shooting test. Everything worked fine there for me in the end. One should definitely note that the MRAD increments on the tall target lines are 1.5mil not 1mil. I don't see a problem with that at all. It's actually better to test more clicks at a time than fewer. You get a better test using more clicks because click value error/slop will tend to stack up the further you adjust at a time and become more apparent. MOA and IPHY increments are 5MOA/IPHY.
Because I'm using a .243AI chamber and all new components I need to fire form the 250 rounds of brass I bought for it. I also plan on trying to compete with my fire forming loads so I don't have to burn 250 rounds of barrel life for basically nothing. My fire forming load really needs to be match quality if I can pull it off. My coach and I selected 39.3 grains of RL23 as my first charge. Why? Well it fills the case to the body shoulder junction, was plenty snappy for fire forming and should (and did) generate around 2750fps so it's mellow on the bore. Perfect for a break-in and fire forming load.
Figure 4. Hot off the target frame. Notice no tearing despite heavy use of masking tape. The big hole under my hand was where the bullet below penetrated through. I had it looped over the top of the target frame. Oops!
I shot 35 rounds before shooting at the target to break in the barrel and get some basic velocity data. My initial SD's were wild as heck, 60FPS+ but the loads were making 1 - 1.5-inch groups at 200m with the bullets just touching the lands. They wouldn't do for anything much beyond 500m though. Velocity spreads like that are bad for proper long-range work.
One really great thing for me about using this B2B target was that all of the hemming and hawing about charge weight and seating depth was basically washed away (I wish I'd had the time to do the powder charge work up but life happened and cut my time short). I didn't have to select a seating depth to start at or increments to try. I normally start at touching but where to go next is the question that gets me riled up and it was there already written down to help me make up my mind. The suggested seating depth intervals are chunky enough to get useful differences from but not so chunky as to make refinement a proposition for eternity. The powder charge I started with I lucked out on as well but I still wish I'd had time to do the full charge weight workup before penning this. I'll still do it. I'm curious to see the results.
Had I done it the way things are meant to be done by the B2B target I'd have run 2 different powders (or 2 different bullets) at 4 different charge weights each, with each charge weight separated by something like three tenths to half a grain and shot those against the 8x powder aim points. Then I'd have picked the 3 best and run those against each other in the 3x spots provided for that, though you could also use those last 3 spots to tweak your powder charge on a single selectee. Then I'd have done the seating depth tests against the single best remaining contender, and finally tuned my final seating depth using the last 3 lands aim points. I did not go the full nine yards mostly because of time (this summer is extremely busy for me) and how the luck of the draw came down with my fire forming load.
Figure 5. First test of different bullet jumps to the lands. Promising!
I took 4 sets of 3x rounds from the fire form loads I'd put together (which would have won the grouping challenge probably anyway) and adjusted seating depth on them according to the numbers on the B2B target. I also kept 3 of my lands-touching loads aside and set off to the range. Once I was set up, I ran my touching loads for velocity to verify my velocities at 65F ammo and air temperature, as they were 95F for barrel break-in and I wanted to see what my temperature induced MV variation was. Everything perfect and no velocity deviation (What a surprise!). They grouped just over half an inch at 100yrds.